Working with Raspberry Pi
Before connecting or disconnecting the DSI cable, shut down the Raspberry Pi and disconnect power. Ensure the DSI cable is correctly oriented and avoid inserting or removing the connector at an angle.
Hardware Connection
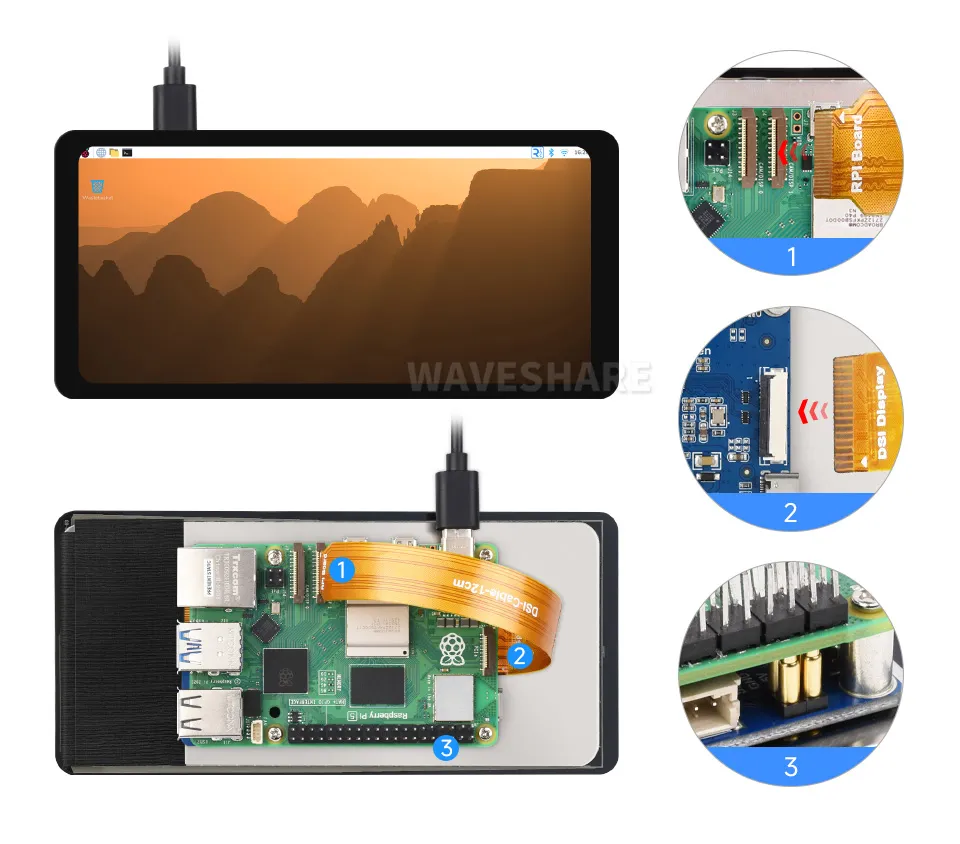
Raspberry Pi 5
- Use the "DSI-Cable-12cm" cable to connect the DSI interface of the display to the 22PIN DSI interface on the Raspberry Pi.
- Secure the Raspberry Pi to the standoffs on the back of the display.
- Ensure the pogo pins make proper contact with the Raspberry Pi. The display draws 5 V power through these pogo pins.
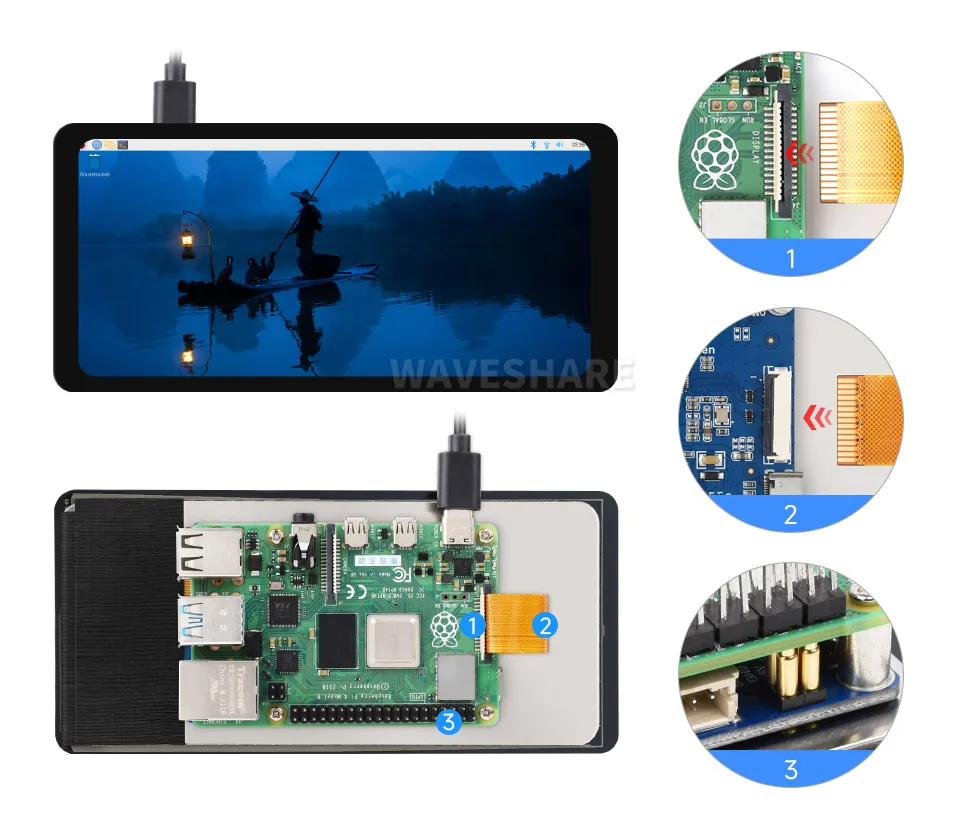
Raspberry Pi 4B / 3B+ / 3B / 3A+
- Use a double-headed 15PIN FPC cable to connect the DSI interface of the display to the 15PIN DSI interface on the Raspberry Pi.
- Secure the Raspberry Pi to the standoffs on the back of the display.
- Ensure the pogo pins make proper contact with the Raspberry Pi. The display draws 5 V power through these pogo pins.
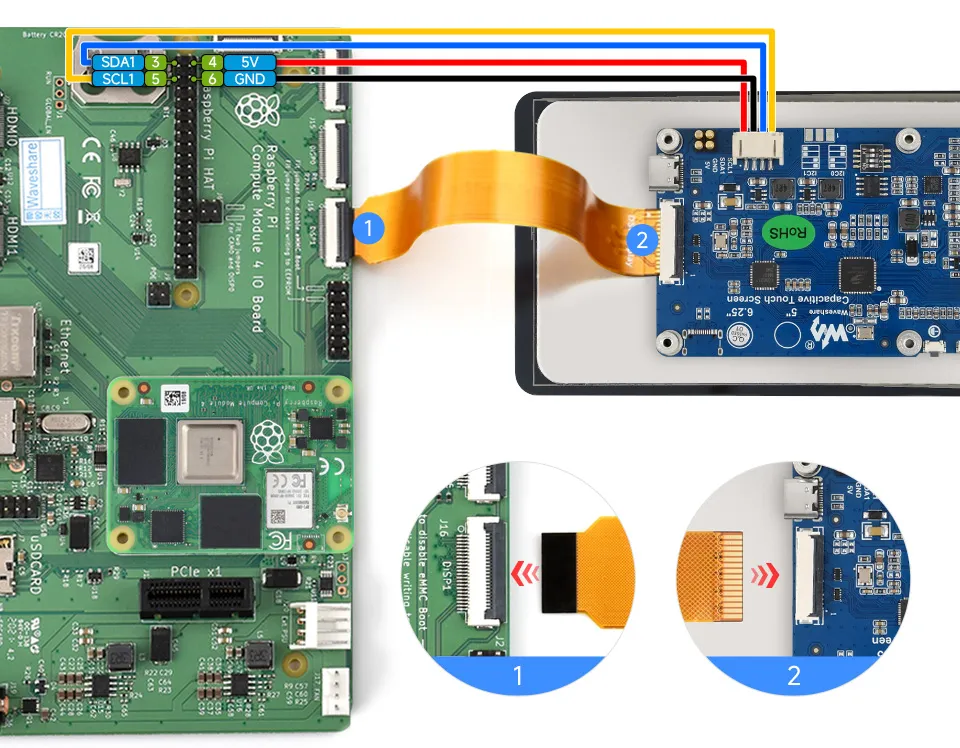
Compute Module IO Board
- Use the "DSI-Cable-12cm" cable to connect the DSI interface of the display to the DSI interface on the Compute Module IO Board.
- Use the 4PIN PH2.0 cable, connect the 5V and GND of the display to the 5V and GND pins of the Raspberry Pi respectively. (By default, the built-in I2C0 on the DSI interface is used, so SDA1 and SCL1 can be left unconnected.)
Software Settings
Flashing the System
-
Connect the TF card to the PC, download and use Raspberry Pi Imager to flash the latest Raspberry Pi OS.
-
After flashing, open the
config.txtfile in the root directory of the TF card, add the following configuration at the end of the file, save, and safely eject the TF card.DSI Interface SelectionRaspberry Pi 5 / CM5 / CM4 / CM3+ / CM3 have two MIPI DSI interfaces. DSI1 is recommended by default. If the screen is connected to DSI0, enable the corresponding configuration for DSI0.
dtoverlay=vc4-kms-v3d#DSI1 Usedtoverlay=vc4-kms-dsi-waveshare-panel,6_25_inchB#DSI0 Use#dtoverlay=vc4-kms-dsi-waveshare-panel,6_25_inchB,dsi0 -
Insert the TF card into the Raspberry Pi and power it on. After the system boots, display and touch functions will work normally.
Backlight Brightness Adjustment
GUI Brightness Adjustment
The following steps use Raspberry Pi OS Trixie as an example:
-
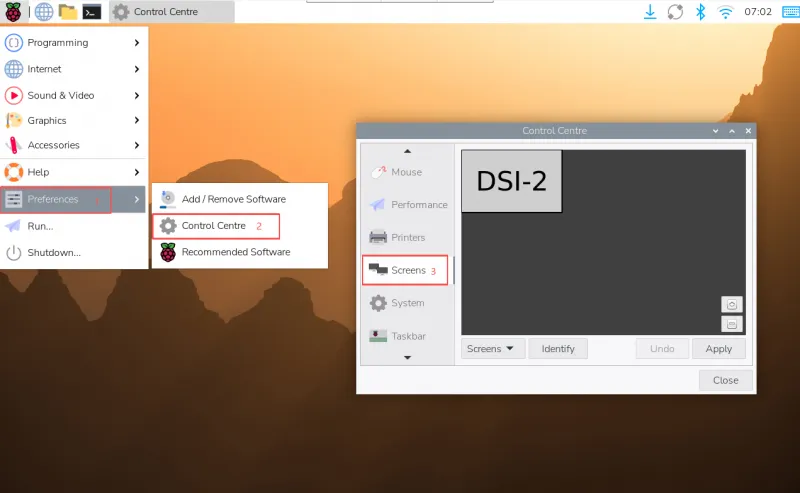
Click the top‑left menu, go to "Preferences" > "Control Center", and select "Screens".
-
Go to "Screen" > "DSI-2" > "Brightness", check and adjust the desired backlight brightness, and finally click "Apply" to save the settings.
In Raspberry Pi OS Bookworm, this setting is located under "Screen Configuration" > "Screen".
Using the Backlight Adjustment Application
You can also use the graphical backlight adjustment tool provided by Waveshare:
wget https://files.waveshare.com/wiki/common/Brightness.zip
unzip Brightness.zip
cd Brightness
sudo chmod +x install.sh
./install.sh
After installation, you can open the program from "Accessories" > "Brightness".
Adjusting Backlight via Terminal
echo X | sudo tee /sys/class/backlight/*/brightness
Where X represents any number between 0 and 255. 0 means the darkest, and 255 means the brightest. For example:
echo 100 | sudo tee /sys/class/backlight/*/brightness
echo 0 | sudo tee /sys/class/backlight/*/brightness
echo 255 | sudo tee /sys/class/backlight/*/brightness
Trixie/Bookworm Display Rotation
GUI Rotation
The following steps use Raspberry Pi OS Trixie as an example:
-
Click the top‑left menu, go to "Preferences" > "Control Center", and select "Screens".

-
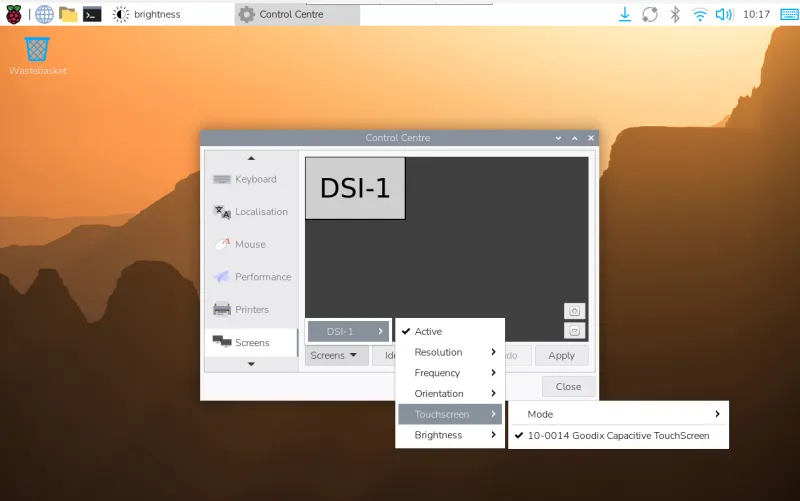
Go to "Screen" > "DSI-1" > "Touchscreen" and check "10-0014 Goodix Capacitive TouchScreen".
-
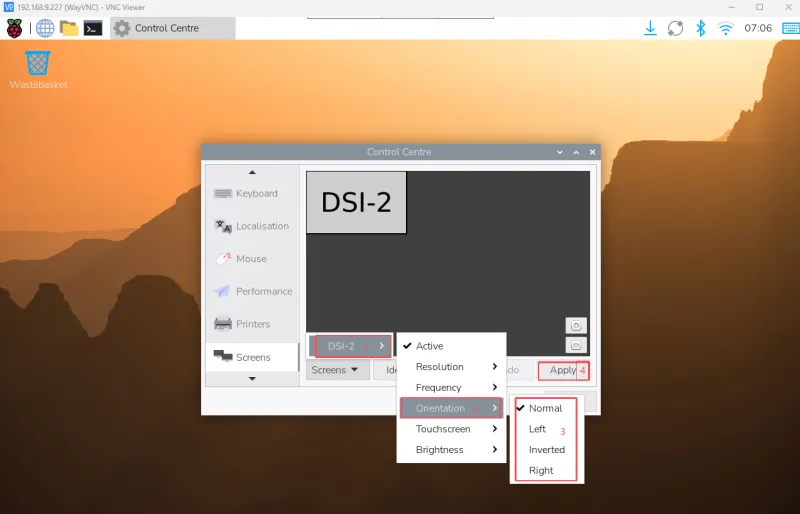
Go to "Screen" > "DSI-2" > "Orientation", select the desired orientation, and click "Apply" to synchronously rotate both the display and touch.
The actual display identifier may be DSI-1 or DSI-2; use the one detected by the system.
Lite Version Display Rotation
Edit cmdline.txt:
sudo nano /boot/firmware/cmdline.txt
Add the corresponding rotation parameter at the beginning of the file, save, and reboot for the change to take effect.
# Display rotation 90 degrees
video=DSI-1:720x1560M@60,rotate=90

# Rotate display 180 degrees
video=DSI-1:720x1560M@60,rotate=180

# Rotate display 270 degrees
video=DSI-1:720x1560M@60,rotate=270
When using both DSI and HDMI displays simultaneously, the cmdline.txt method cannot rotate the DSI display independently from the HDMI display.
Touch Rotation
If you rotate using the GUI, you can check the "Touchscreen" option in the screen layout editor to synchronize touch rotation. For command‑line touch rotation, you can configure it via udev rules.
-
Create the
99-waveshare-touch.rulesfile.sudo nano /etc/udev/rules.d/99-waveshare-touch.rules -
Add the following rule as needed, save, and reboot for the change to take effect.
# Touch rotation 90 degreesENV{ID_INPUT_TOUCHSCREEN}=="1", ENV{LIBINPUT_CALIBRATION_MATRIX}="0 -1 1 1 0 0"# Touch rotation 180 degreesENV{ID_INPUT_TOUCHSCREEN}=="1", ENV{LIBINPUT_CALIBRATION_MATRIX}="-1 0 1 0 -1 1"# Touch rotation 270 degreesENV{ID_INPUT_TOUCHSCREEN}=="1", ENV{LIBINPUT_CALIBRATION_MATRIX}="0 1 0 -1 0 1" -
Reboot the Raspberry Pi.
sudo reboot
Touch Mode Selection
Raspberry Pi OS Trixie and Bookworm support two touch modes, which can be switched under "Screen Configuration" > "Touchscreen".
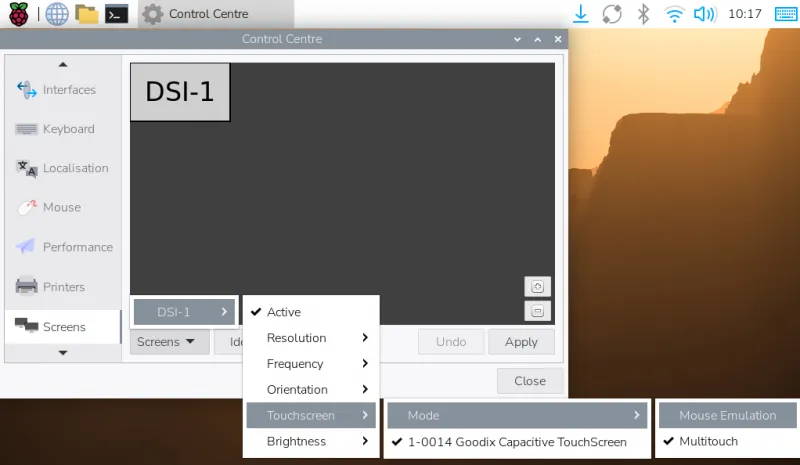
Mouse Emulation
- Single tap = left mouse click.
- Long press = right mouse click.
- Supports double‑click.
- Does not support page scrolling or multi‑touch.
Multitouch
- Supports multi-touch.
- Supports page scrolling.
- Does not support double-click or long-press right-click.
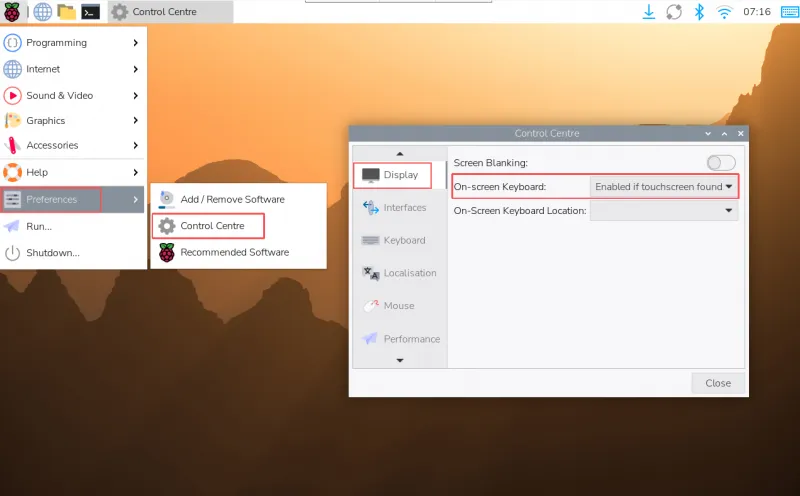
On‑Screen Keyboard
Starting from Raspberry Pi OS Bookworm, the system includes the Squeekboard on‑screen keyboard by default.
- The keyboard automatically appears when text input is possible and hides when input is not possible.
- You can also manually show or hide it using the keyboard icon in the top-right corner of the taskbar.

In Trixie, you can set the on‑screen keyboard to show or hide via "Preferences" > "Control Center" > "Display".
In Bookworm, you can set the on‑screen keyboard to show or hide via "Raspberry Pi Configuration" > "Display" or raspi-config > "Display".
