Working with Arduino
This chapter contains the following sections. Please read as needed:
Arduino Getting Started
New to Arduino ESP32 development and looking for a quick start? We have prepared a comprehensive Getting Started Tutorial for you.
- Section 0: Getting to Know ESP32
- Section 1: Installing and Configuring Arduino IDE
- Section 2: Arduino Basics
- Section 3: Digital Output/Input
- Section 4: Analog Input
- Section 5: Pulse Width Modulation (PWM)
- Section 6: Serial Communication (UART)
- Section 7: I2C Communication
- Section 8: SPI Communication
- Section 9: Wi-Fi Basics
- Section 10: Web Server
- Section 11: Bluetooth
- Section 12: LVGL GUI Development
- Section 13: Comprehensive Project
Note: This tutorial uses the ESP32-S3-Zero as a reference example, and all hardware code is based on its pinout. Before you start, we recommend checking the pinout of your development board to ensure the pin configuration is correct.
Setting Up the Development Environment
1. Installing and Configuring the Arduino IDE
Please refer to the tutorial Installing and Configuring Arduino IDE to download and install the Arduino IDE and add ESP32 support.
2. Installing Libraries
To run the example, you need to install the corresponding library.
The example program package for the ESP32-C3-LCD-0.71 development board can be downloaded from here. The Arduino\libraries directory within this package contains all the necessary library files required for this tutorial.
| Library or File Name | Description | Version | Installation Method |
|---|---|---|---|
| TFT_eSPI | LCD driver library | - | Manual installation |
| LVGL | LVGL library | - | Manual installation |
| lv_conf.h | LVGL configuration file | - | Manual installation |
Installation Steps:
- Navigate to the downloaded example package.
- Copy all folders from its
Arduino\librariesdirectory to your Arduino libraries folder.
The path to the Arduino libraries folder is typically: c:\Users\<username>\Documents\Arduino\libraries.
You can also locate it in the Arduino IDE by going to File > Preferences and checking the "Sketchbook location". The libraries folder is the libraries subfolder within this path.
- For other installation methods, please refer to: Arduino Library Management Tutorial.
Arduino Project Parameter Settings
Example
The Arduino examples are located in the Arduino/examples directory of the example package.
| Example | Basic Description |
|---|---|
| 01_Text_and_Number_Display | Test text and number display |
| 02_Shapes_on_Circular_Display | Draw shapes |
| 03_Animated_Eye1 | Simulated eye style 1 |
| 04_Animated_Eye2 | Simulated eye style 2 |
| 05_Animated_Eye12 | Alternating simulated eye styles 1 and 2 |
| 06_Image_Display | Display images |
| 07_Clock | Clock |
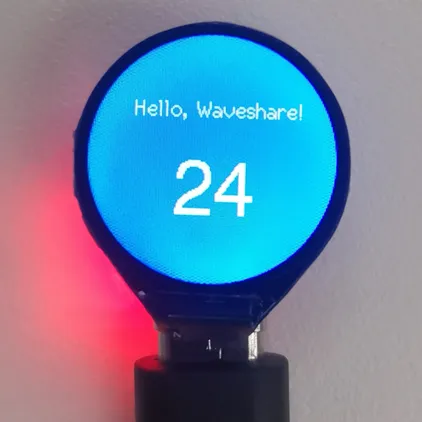
01_Text_and_Number_Display
Example Description
- This example demonstrates a text and number display program on the LCD dual display. The core functionality is "synchronously displaying fixed text + dynamic numbers on both screens", cyclically showing two-digit numbers from 00 to 99 to test text and number display on the LCD.
Hardware Connection
- Connect the development board to the computer.
Code Analysis
setup: The setup function runs once when the program starts, mainly responsible for initializing the TFT display and performing some initial settings.tft.init(): Initializes the TFT display, preparing it for subsequent display operations.- A series of
tft.fillScreen()anddelay()calls create a color transition effect, showcasing the TFT display's color-filling capabilities and adding visual appeal at startup. tft.fillScreen(0x04FF): Sets a specific background color.tft.setTextColor(TFT_WHITE, 0x04FF): Sets the text color to ensure clear visibility against the background.tft.drawString("Hello, Waveshare!", 30, 40, 2): Displays a welcome message to enhance user experience.
loop: The loop function runs continuously, implementing the core number display functionality.- Number formatting: Converts the integer
numberinto a stringdisplayNumber, adding a leading zero when the number is single-digit to ensure two-digit display. tft.drawString(displayNumber, 55, 80, 6): Displays the formatted number at a specific position with a specific font size.number++increments the number; whennumberexceeds 99, it resets to 0, ensuring numbers cycle between 00 and 99.delay(1000): Controls the number update speed, allowing the user to clearly see the number changes.
- Number formatting: Converts the integer
Operation Result
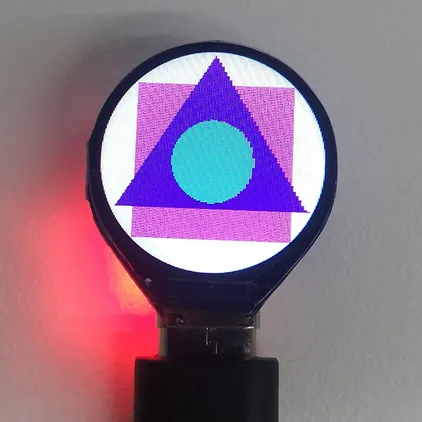
02_Shapes_on_Circular_Display
Example Description
- This example sequentially displays a square, triangle, and circle with random colors on the LCD display. It is suitable for learning ESP32 interaction with the LCD, sequentially drawing a square, triangle, and circle with random colors at the screen center, switching every 3 seconds to test graphics rendering stability.
Hardware Connection
- Connect the development board to the computer.
Code Analysis
-
drawSquare(): Draws a square filled with a random color. -
drawTriangle(): Draws an equilateral triangle filled with a random color. -
drawCircleInCenter(): Draws a circle filled with a random color, with its center at the screen center.- Generates a random color.
tft.fillCircle(centerX, centerY, 30, circleColor): Draws a circle with the screen center coordinates and a fixed radius, filled with the random color.
Operation Result
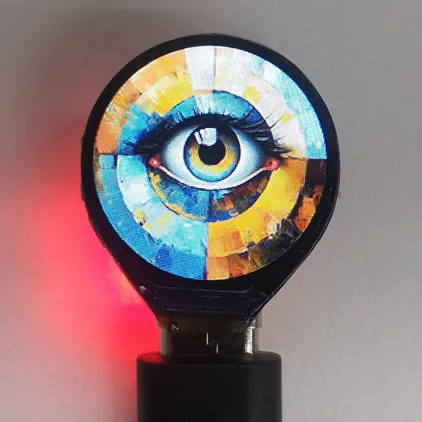
03_Animated_Eye1
Example Description
- This example uses the TFT_eSPI library to drive a TFT display on different processors, showing an animated eye effect. Parameters are configurable and DMA support improves performance. The main loop continuously updates the eye state. Suitable for learning how to display eye animations with the TFT_eSPI library, it allows configuration of parameters, utilizing state machines to control blinking, and testing performance
Hardware Connection
- Connect the development board to the computer.
Code Analysis
initEyes(): Initializes eye parameters.tft.init(): Initializes the display.updateEye(): Calculates eye movement angles, controls blinking animation, and draws the eye on the screen.
Operation Result

04_Animated_Eye2
Example Description
- This example uses the LVGL and TFT_eSPI libraries to create a GUI that displays a GIF image. Suitable for learning ESP32 interaction with LVGL and TFT screens, displaying LVGL images, and testing stability and reliability.
Hardware Connection
- Connect the development board to the computer.
Code Analysis
-
my_disp_flush(): LVGL display refresh callback function, responsible for flushing graphics data from LVGL to the TFT display. -
setup(): Initializes LVGL and the TFT screen in sequence, initializes the display buffer, configures and registers the display driver, creates and sets the GIF object's position and source image.lv_init()andtft.begin(): Initializes the LVGL library and the TFT display.lv_disp_draw_buf_init(&draw_buf, buf, NULL, screenHeight _ screenWidth / 15): Initializes the LVGL display buffer.lv_disp_drv_init(&disp_drv): Initializes the LVGL display driver structure.disp_drv.flush_cb = my_disp_flush: Sets the previously definedmy_disp_flushfunction as the display driver's flush callback, so LVGL can call this function to update the screen content when a display refresh is needed.disp_drv.draw_buf = &draw_buf: Associates the previously initialized display bufferdraw_bufwith the display driver, ensuring graphics data is correctly stored and transmitted to the display.lv_disp_drv_register(&disp_drv): Registers the display driver, enabling LVGL to use the configured driver for graphics display operations. This completes the connection and configuration between LVGL and the TFT display.
Operation Result

05_Animated_Eye12
Example Description
- Alternates between simulated eye styles 1 and 2.
Hardware Connection
- Connect the development board to the computer.
Code Analysis
loop(): Continuously executes animations and updates the display content.- If
a == 1, fills the screen with black, calls theDemo_1function, then delays for 2 seconds. - If
a == 2, uses an inner loop to execute theDemo_2function multiple times. The loop count is controlled by variablei, with a total of 7 iterations. TheDemo_2function sequentially displays a series of images to create an animation effect.
- If
Operation Result
| |
|---|
06_Image_Display
Example Description
- This example initializes the TFT display and LVGL library, creates an image object, and the main loop handles timer tasks. Suitable for learning ESP32 interaction with LVGL and TFT screens, displaying LVGL images after initialization, and testing stability and reliability.
Hardware Connection
- Connect the development board to the computer.
Code Analysis
setup(): Hardware initialization, display driver setup, and creation and configuration of the graphic object.tft.begin(): Initializes the TFT hardware.tft.setRotation(0): Sets the display rotation to 0 (no rotation).lv_disp_draw_buf_init(&draw_buf, buf, NULL, screenWidth * screenHeight / 10): Prepares storage for graphics data.- Display driver initialization and registration:
lv_disp_drv_init(&disp_drv): Initializes the display driver structure.- Sets driver parameters such as resolution, flush callback, and display buffer, then registers the display driver.
- Declares the image resource using
LV_IMG_DECLARE(A3), creates an image objectlogo_img, sets its source to the declared image, and finally sets the image object's position on the screen usinglv_obj_centerandlv_obj_align.
Operation Result
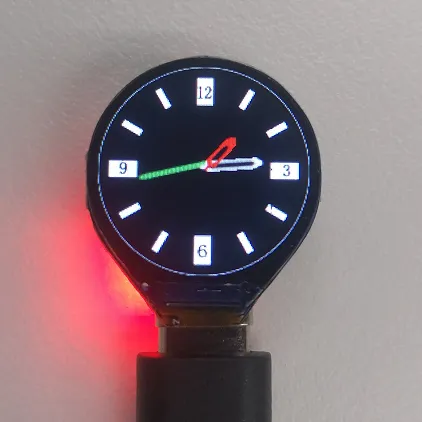
07_Clock
Example Description
- This example uses the TFT_eSPI library and the LVGL graphics library to initialize the TFT display and build a graphical user interface framework to achieve display and interaction functions. Suitable for learning ESP32 interaction with LVGL and TFT screens; after initialization, it can display the graphical interface, testing stability and reliability.
Hardware Connection
- Connect the development board to the computer.
Code Analysis
-
setup(): Initialization at power-on.lv_init(): Initializes the LVGL graphics engine.tft.begin(): Initializes the screen hardware.tft.setRotation(0): Sets the screen rotation angle; 0 means no rotation.lv_disp_draw_buf_init( &draw_buf, buf, NULL, screenWidth * screenHeight / 10 ): Initializes the display buffer and configures the display driver to ensure LVGL can correctly interact with the display.ui_init(): Initializes the designed UI.- Finally, outputs debug information indicating initialization is complete.
-
loop(): Main loop function.lv_timer_handler(): LVGL core processing function: handles animations, button presses, and refreshes the interface.
Operation Result