Working with ESP-IDF
This section describes how to compile, flash, operate, and observe the behavior of the basic ESP-IDF examples. Prepare the development board and a USB data cable, and download the ESP32-C5-Touch-LCD-2.8 Example Programs.
This chapter contains the following sections; read as needed:
- ESP-IDF Getting Started
- Set Up the Development Environment
- Compile and Flash
- Examples
- Troubleshooting
ESP-IDF Getting Started
New to ESP32 ESP-IDF development and looking to get started quickly? We have prepared a general Getting Started Tutorial for you.
- Section 1: Environment Setup
- Section 2: Running Examples
- Section 3: Creating a Project
- Section 4: Using Components
- Section 5: Debugging
- Section 6: FreeRTOS
- Section 7: Peripherals
- Section 8: Wi-Fi Programming
- Section 9: BLE Programming
Please Note: This tutorial uses the ESP32-S3-Zero as a teaching example, and all hardware code is based on its pinout. Before you start, it is recommended that you check the pinout of your development board to ensure the pin configuration is correct.
Set Up the ESP-IDF Development Environment
Refer to the ESP-IDF Development Environment Installation Tutorial to install the environment.
This document uses ESP-IDF v5.5.4. There are 8 basic examples, located in examples/esp-idf. The graphical interface uses LVGL 9.5.0, which differs from the LVGL 8.4.0 used by the Arduino examples.
The following guide uses Windows as an example, demonstrating development using VS Code + the ESP-IDF extension. macOS and Linux users should refer to the official documentation.
The screenshots in this section use ESP-IDF V5.5.2 as an example. When installing, please select the ESP-IDF version that matches your board's example.
Install the ESP-IDF Development Environment
-
Download the installation manager from the ESP-IDF Installation Manager page. This is Espressif's latest cross-platform installer. The following steps demonstrate how to use its offline installation feature.
Click the Offline Installer tab on the page, then select Windows as the operating system and the ESP-IDF version you need (the version shown in the screenshot is for reference only — choose the version that fits your actual needs).
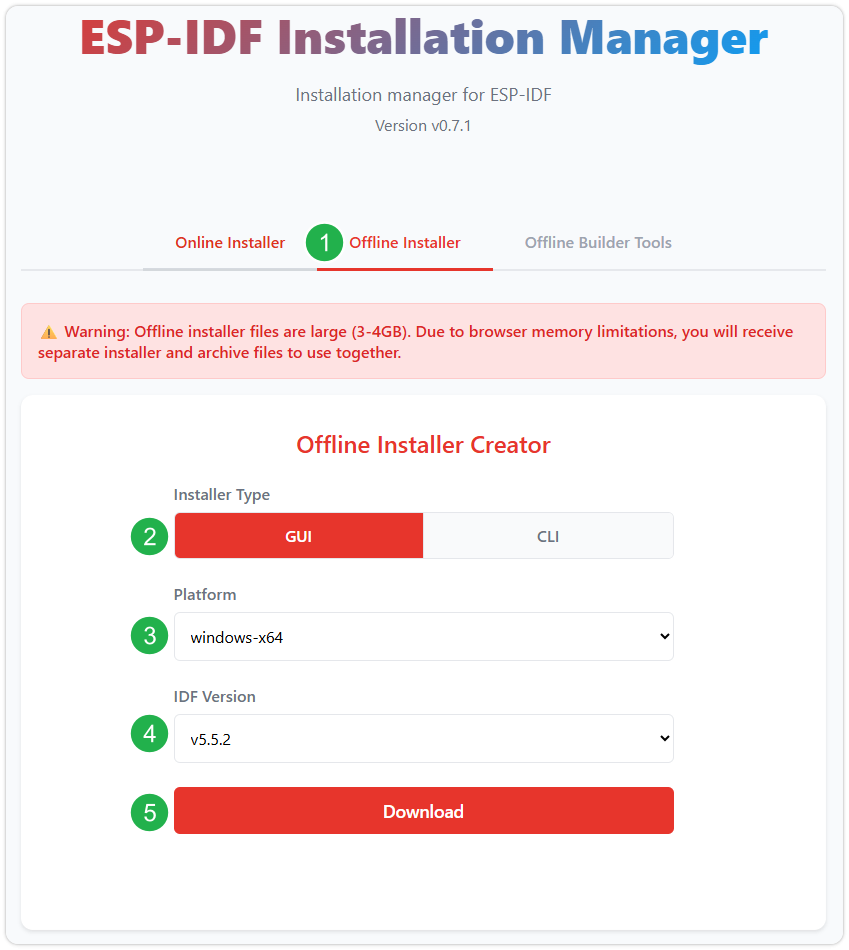
After confirming your selection, click the download button. The browser will automatically download two files: the ESP-IDF Offline Package (.zst) and the ESP-IDF Installer (.exe).
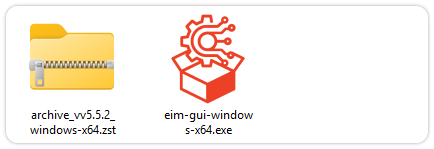
Please wait for both files to finish downloading.
-
Once the download is complete, double-click to run the ESP-IDF Installer (eim-gui-windows-x64.exe).
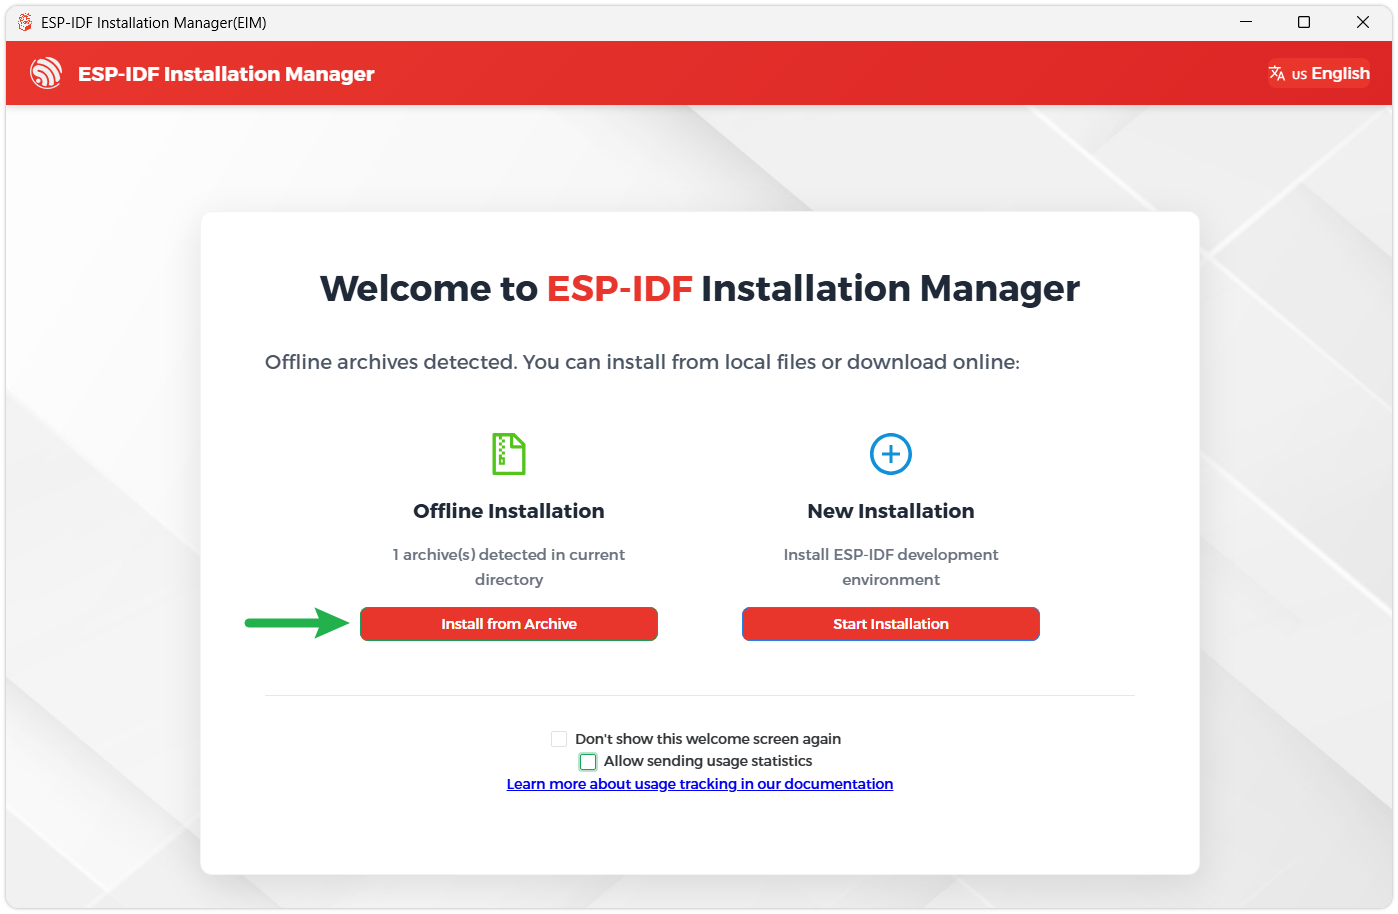
The installer will automatically detect if the offline package exists in the same directory. Click Install from archive.
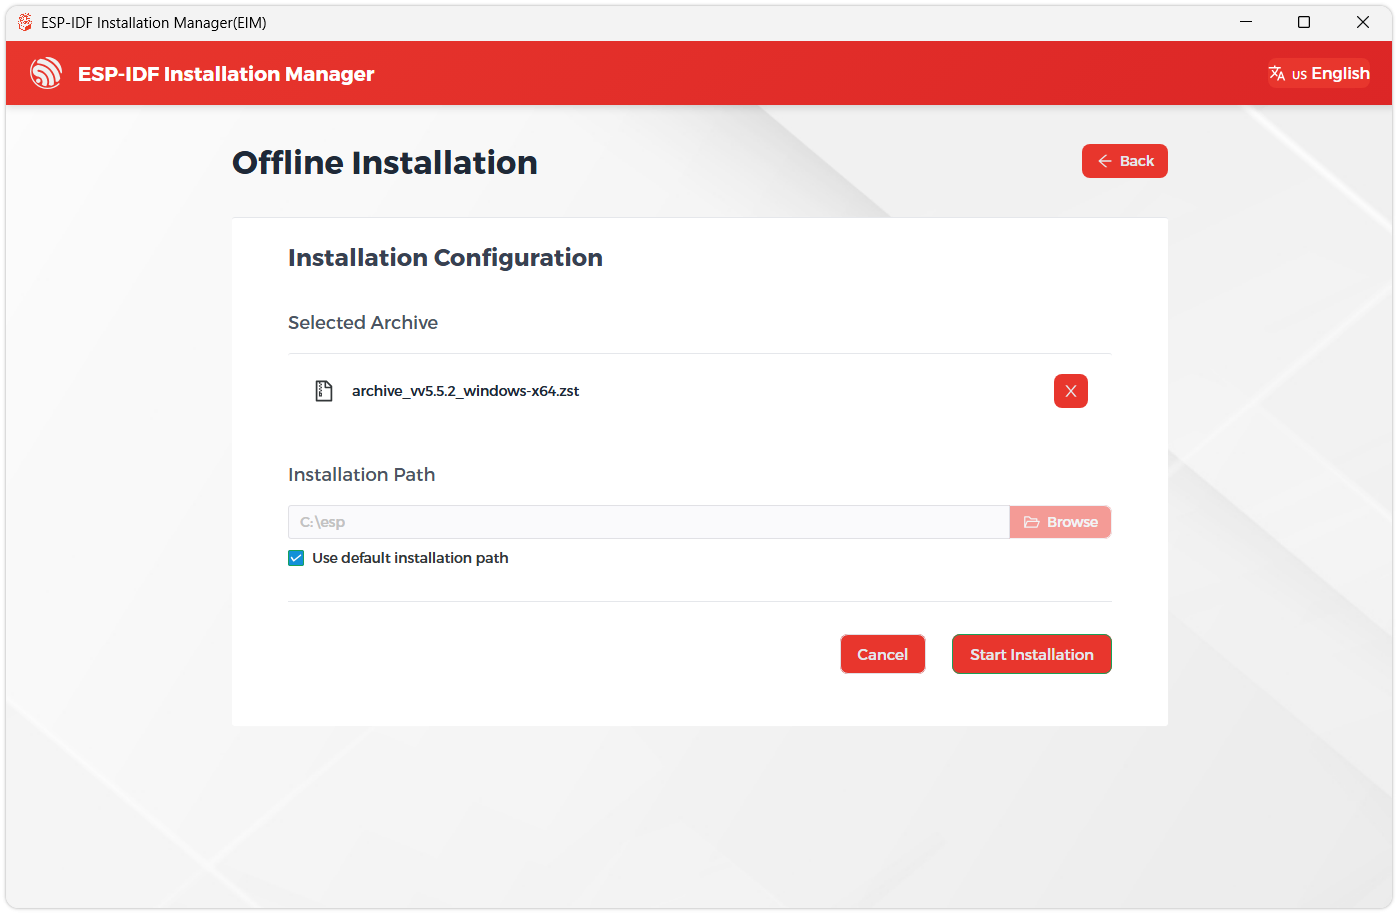
Next, select the installation path. We recommend using the default path. If you need to customize it, ensure the path does not contain Chinese characters or spaces. Click Start installation to proceed.
-
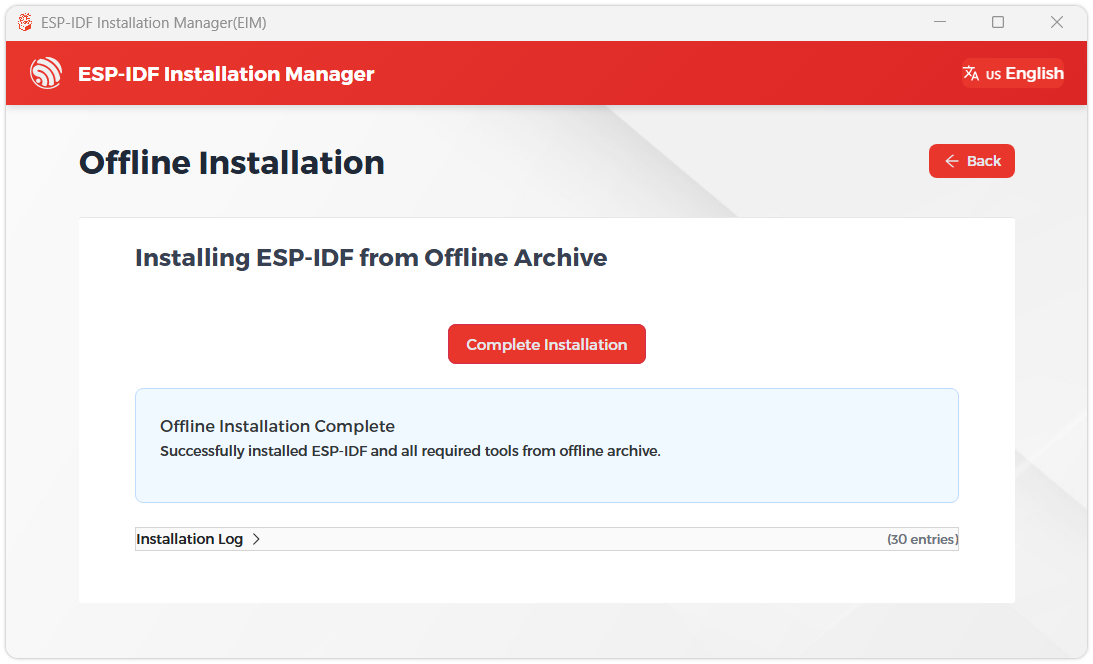
When you see the following screen, the ESP-IDF installation is successful.
-
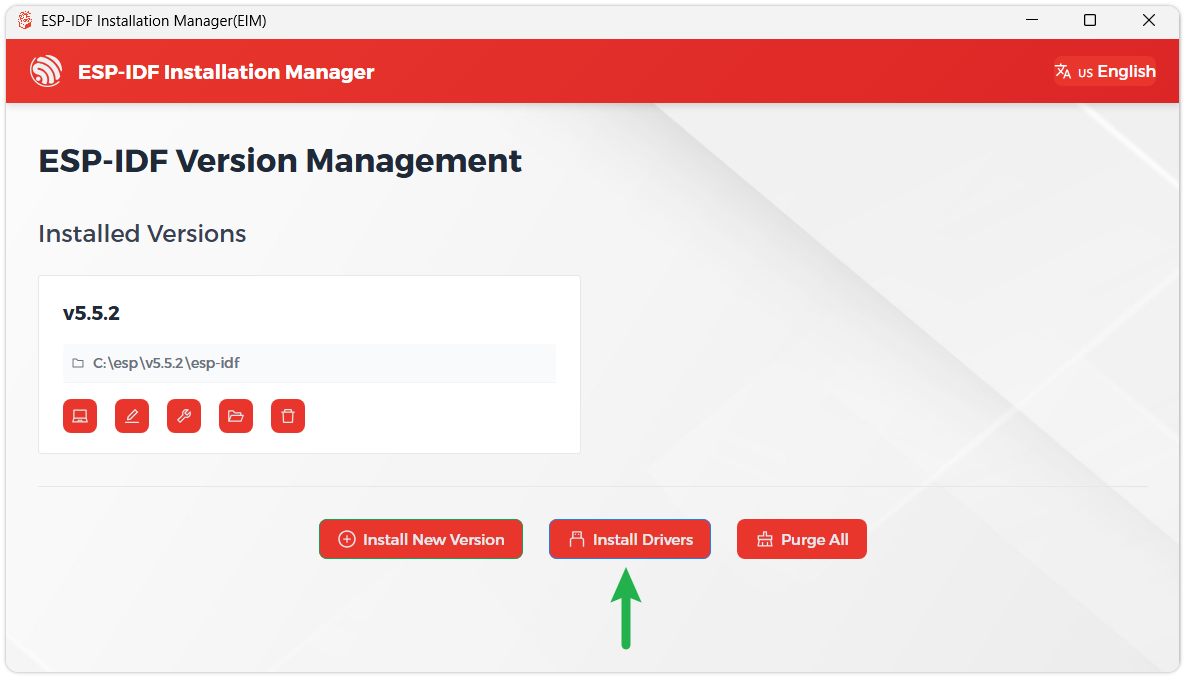
We recommend installing the drivers as well. Click Finish installation, then select Install driver.
Install Visual Studio Code and the ESP-IDF Extension
-
Download and install Visual Studio Code.
-
During installation, it is recommended to check Add "Open with Code" action to Windows Explorer file context menu to facilitate opening project folders quickly.
-
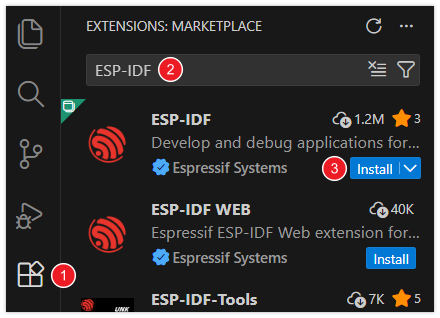
In VS Code, click the Extensions icon
 in the Activity Bar on the side (or use the shortcut Ctrl + Shift + X) to open the Extensions view.
-
Enter ESP-IDF in the search box, locate the ESP-IDF extension, and click Install.
-
For ESP-IDF extension versions ≥ 2.0, the extension will automatically detect and recognize the ESP-IDF environment installed in the previous steps, requiring no manual configuration.
| Environment or Component | Version or Configuration | Description |
|---|---|---|
| ESP-IDF | v5.5.4 | Use the same SDK version as the project |
| Target chip | esp32c5 | Already set in the project; no need to change the target |
| LVGL | 9.5.0 | Managed by the project dependency configuration |
| Board support package | components/esp32_c5_touch_lcd_2_8 | Bundled with each example; includes display, touch, and onboard peripheral adaptations |
| Serial baud rate | 115200 | Used for basic example logs |
The first build downloads the required components according to the project dependency configuration. Keep the original component configuration and dependency lock file, and do not copy Arduino library files into the ESP-IDF project.
Compile and Flash
-
In VS Code, select the installed ESP-IDF v5.5.4 environment.
-
Open the directory of the individual example you want to run, for example
examples/esp-idf/01_lvgl_demo. The directory should containCMakeLists.txt, and the project is already set to target the ESP32-C5. -
Connect the development board via USB and open an ESP-IDF terminal in that example directory.
-
Run the following commands to compile, flash, and view the serial log, replacing
COM5with the actual serial port:idf.py buildidf.py -p COM5 flash monitor -
The serial monitor uses 115200 baud rate. After flashing, check the results as described below, and press
Ctrl+]to exit the monitor.
Each example comes with its own Board Support Package (BSP) and local drivers, so you can copy an entire individual example directory and use it; keep its components, configuration files, and dependency lock file.
After flashing a basic example, the development board runs that example. The complete apps such as Weather, Music Player, XiaoZhi AI, and 2048 are located in the separate factory project examples/factory. To restore the desktop, re-flash the ESP32-C5-Touch-LCD-2.8 Factory Firmware.
Example
The examples are located in the examples/esp-idf directory of the source package. Each of the following examples is an independent project; open the corresponding directory and run it according to the steps in Compile and Flash.
| Example Directory | Function | View Results |
|---|---|---|
| 01_lvgl_demo | LVGL widgets display and touch | LCD |
| 02_sd_card | Write, read back, and verify a TF card test file | LCD, serial port |
| 03_qmi8658 | Three-axis acceleration and angular velocity | Serial port |
| 04_pcf85063 | RTC setting and reading | Serial port |
| 05_shtc3 | Temperature and humidity reading with CRC check | Serial port |
| 06_exio | EXIO6/7 levels and backlight PWM switching | Serial port, level, and backlight changes |
| 07_audio | Touch recording, level monitoring, and playback | LCD, speaker |
| 08_battery_voltage | Battery voltage and raw ADC value | LCD, serial port |
01_lvgl_demo
Example Description
Uses the board support package to initialize the screen and touch, and runs the LVGL 9 widgets Example.
Hardware Connection
Connect the development board to the computer using a USB data cable; no TF card or speaker is required.
Code Analysis
-
bsp_display_start(): Initializes the display, touch, and LVGL runtime environment. -
bsp_display_lock()andbsp_display_unlock(): Protect LVGL operations while creating widgets. -
lv_demo_widgets(): Creates the widgets demonstration interface; then callsbsp_display_show()to turn on the screen after the first frame is complete.
Running Result
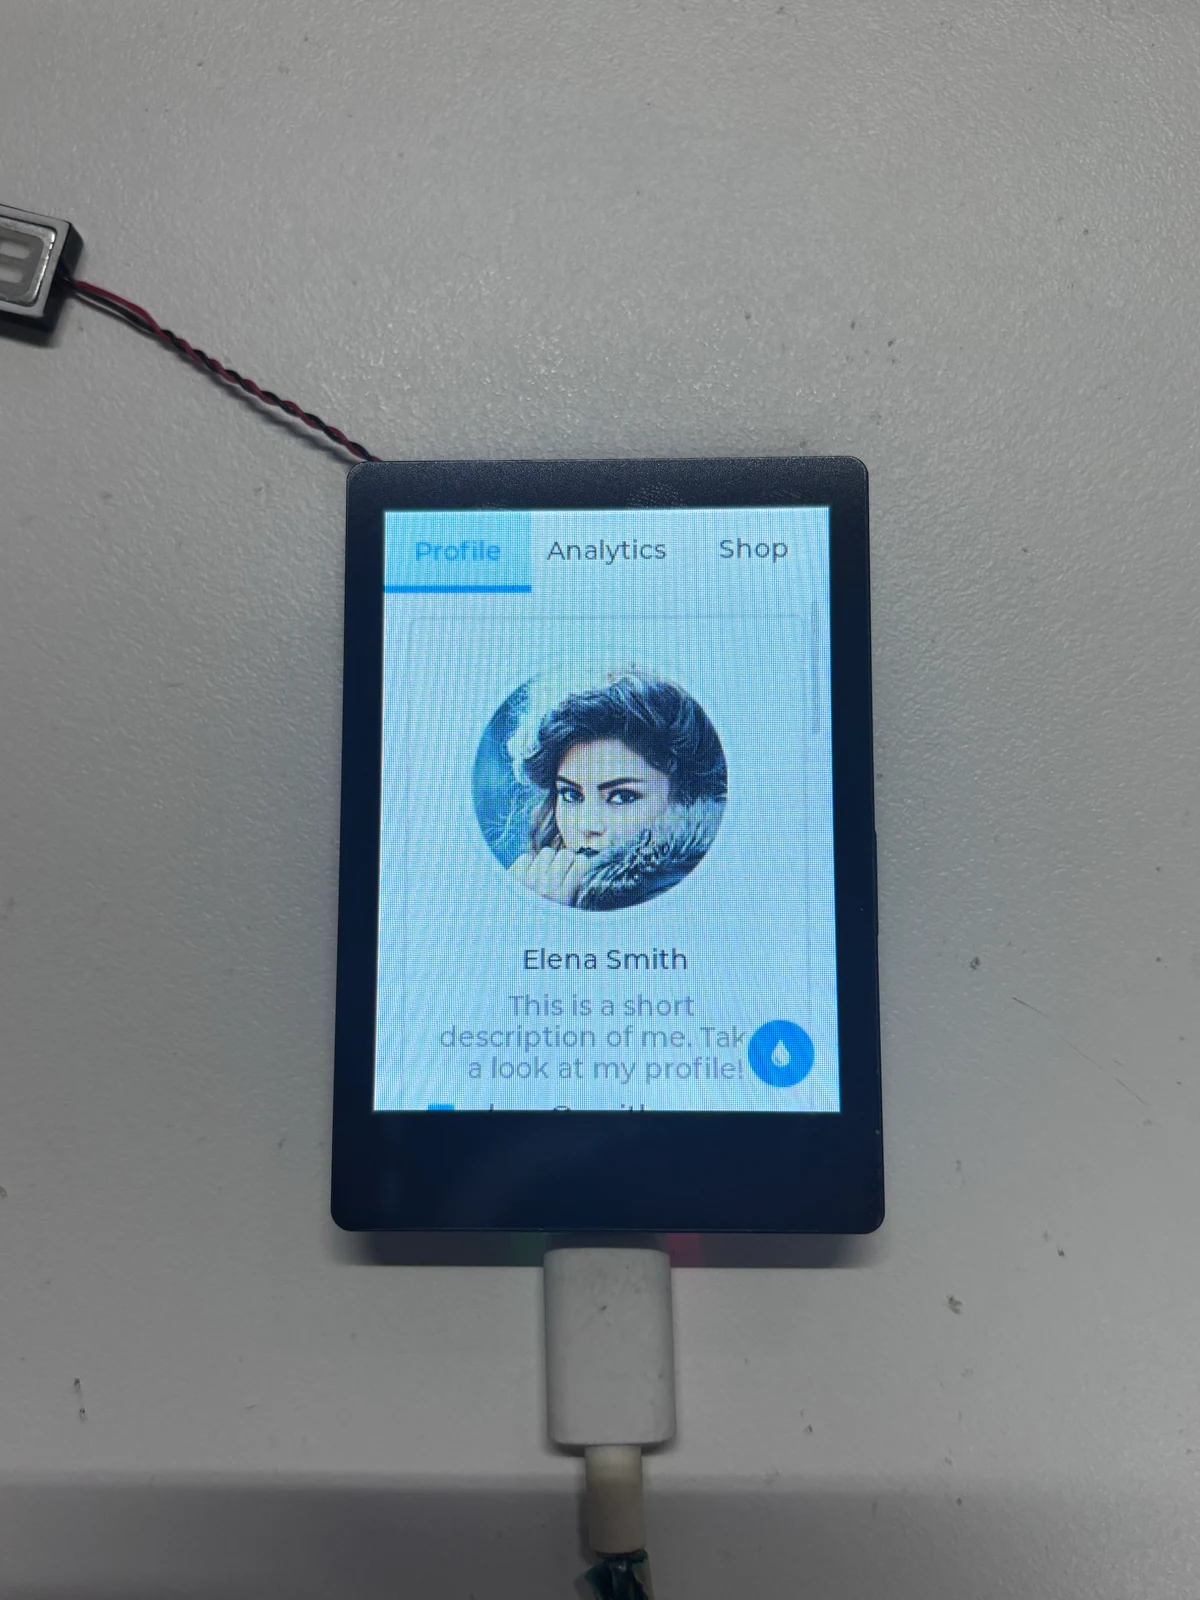
After compiling and flashing, the screen turns on after the first frame is complete and displays the LVGL widgets demonstration page. Tap widgets and drag sliders to check whether touch interaction works properly; press RESET to restart the demonstration.
If the screen stays dark, check the serial output for errors in LCD, touch, and backlight initialization.
02_sd_card
Example Description
Writes a test file to the TF card, reads it back and compares the contents, and displays the test results on the serial port and LCD.
Hardware Connection
Each run overwrites test.txt in the TF card root directory. Please back up any file with the same name first, and use a FAT32-formatted test card. This IDF example does not format the TF card.
Insert the TF card before powering on, then connect the development board to the computer using a USB data cable; there is no need to create the test file in advance.
Code Analysis
run_sd_test(): Mounts the TF card viabsp_sdcard_acquire(), writestest.txtin overwrite mode, then reads the file back and compares its length and contents.- After the test is complete, it releases and unmounts the TF card, keeping the file for viewing on a computer.
show_result(): Creates the LVGL result interface, displaying the status, file path, and read-back contents. TF card access completes before LCD initialization, avoiding simultaneous use of the SPI bus shared by both.
Running Result
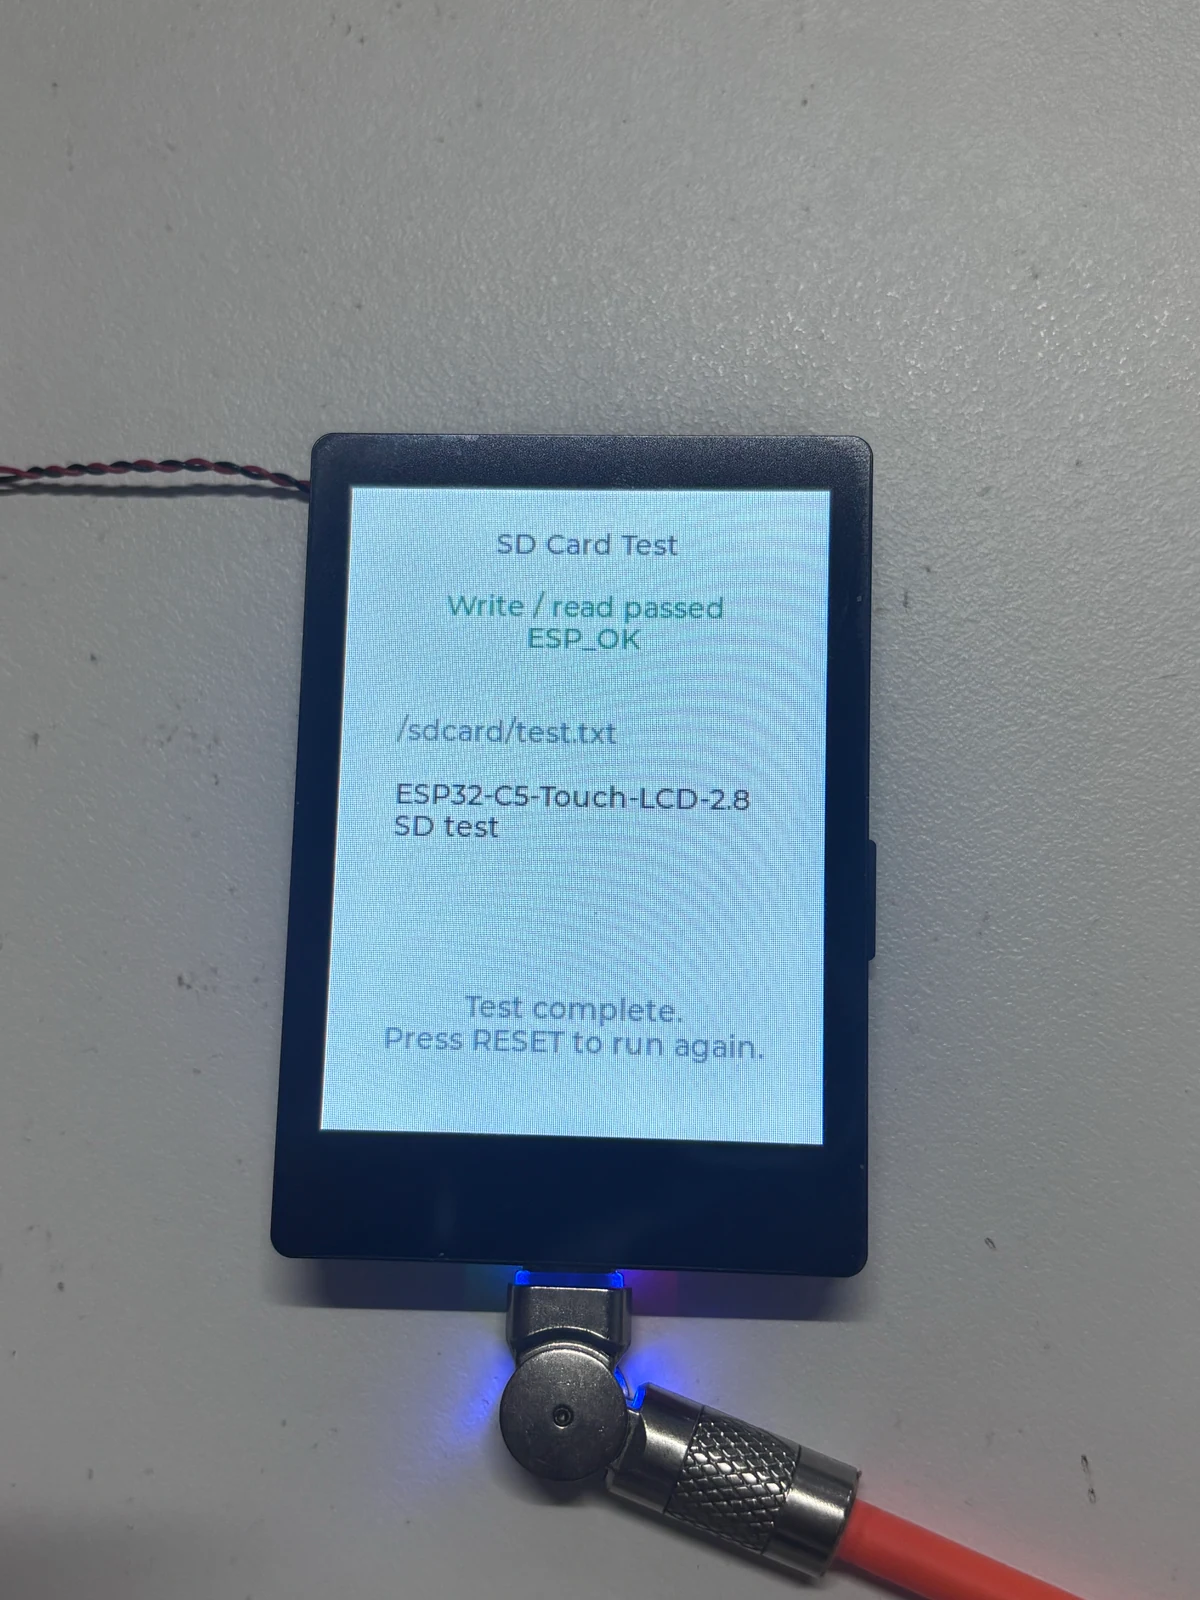
The program first writes the test content to the TF card, then reads it back and verifies it, and finally turns on the screen to display the result. On success:
-
The serial port outputs
SD card mounted,Write successful,Read successful, andWrite/read verification: ESP_OKin sequence. -
The screen displays
Write / read passed, the file path/sdcard/test.txt, and the following read-back contents:ESP32-C5-Touch-LCD-2.8 SD test
After verification completes and the TF card is successfully unmounted, the screen retains the result, and you can remove the card to view test.txt in the root directory on a computer. Press RESET to test again.
If no card is inserted or mounting fails, the screen displays SD card not mounted; insert a FAT32 card and press RESET to retry. If writing, reading, or verification fails, check the corresponding step based on the on-screen prompt and serial log.
A standalone cmd=5 ... command not supported does not mean the test failed. This command is used to probe SDIO functionality, which ordinary storage cards may not support; rely on the subsequent mounting, writing, and read-back verification results instead.
03_qmi8658
Example Description
Reads the onboard QMI8658 six-axis sensor and outputs the three-axis acceleration and angular velocity through the serial port.
Hardware Connection
Connect the development board to the computer using a USB data cable; no external sensor is required.
Code Analysis
-
bsp_imu_init(): Initializes the motion sensor. -
bsp_imu_get_data(): Reads the three-axis acceleration and angular velocity, outputs the data on success, and prints an error code on failure. -
The main loop sets a read interval of about 500 ms via
vTaskDelay().
Running Result
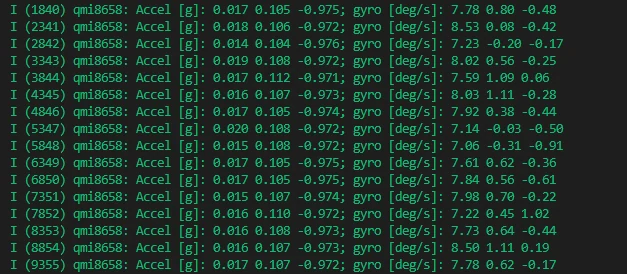
The serial port outputs the three-axis acceleration Accel [g] and angular velocity gyro [deg/s] about every 500 ms. Gently tilt or rotate the development board and the data will change accordingly; gravity is still measured when stationary, so the axes are not necessarily zero.
This example does not initialize the LCD, so a dark screen is normal.
04_pcf85063
Example Description
Sets the onboard PCF85063 real-time clock (RTC) and periodically reads the date and time through the serial port.
Hardware Connection
Connect the development board to the computer using a USB data cable; no external clock module is required.
Code Analysis
-
bsp_rtc_init(): Initializes the RTC. -
initial: Stores the demonstration time at startup;bsp_rtc_set_datetime()writes it to the RTC. -
bsp_rtc_get_datetime(): Reads the date and time in a loop and outputs them about once per second.
Running Result
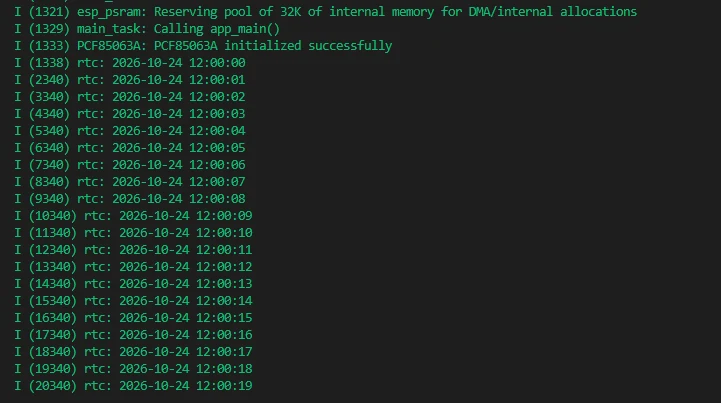
At startup, the onboard RTC is set to October 24, 2026, 12:00:00, and the serial port outputs the date and time once per second, with the seconds continuing to increment. This example does not turn on the screen.
Each reset rewrites the demonstration time, with no network time synchronization. To change the starting date, adjust initial in main/main.c and recompile and flash.
05_shtc3
Example Description
Reads the ambient temperature and relative humidity from the onboard SHTC3, verifies the data, and outputs it through the serial port.
Hardware Connection
Connect the development board to the computer using a USB data cable; no TF card or external sensor is required.
Code Analysis
-
bsp_environment_init(): Initializes the temperature and humidity sensor. -
bsp_environment_get_data(): Reads the temperature and humidity; the underlying driver performs a Cyclic Redundancy Check (CRC). -
The main loop reads once per second, outputting the Celsius temperature and relative humidity on success and an error code on failure.
Running Result
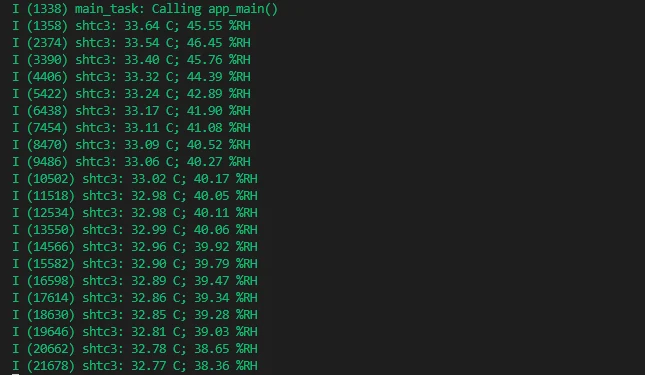
The serial port outputs the ambient temperature and relative humidity about once per second, for example 25.00 C; 50.00 %RH. Readings include a CRC check of the data returned by the sensor. This example does not turn on the screen.
If an I2C or CRC error occurs, power cycle the device and check the log; when measuring ambient temperature and humidity, do not cover or wet the sensor.
06_exio
Example Description
Controls the EXIO6/7 output levels and the backlight Pulse Width Modulation (PWM) value through the onboard CH32V003.
Hardware Connection
Connect the development board to the computer using a USB data cable; you can use a multimeter to measure the voltage of the EXIO6/7 header pins relative to GND.
Code Analysis
-
bsp_io_expander_init(): Initializes the IO expander, then obtains the control handle. -
esp_io_expander_set_dir(): Configures only EXIO6/7 as outputs. -
esp_io_expander_set_level()andcustom_io_expander_set_pwm(): Toggle the output levels and backlight PWM every second, and print the status through the serial port.
Running Result
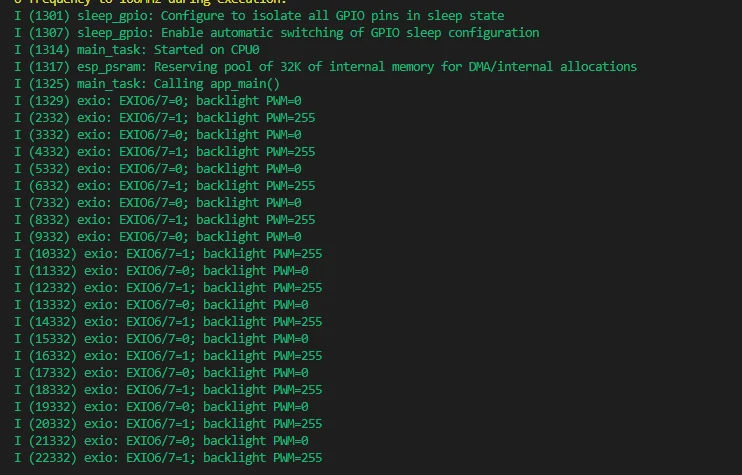
After running, the EXIO6/7 outputs toggle every second, and the backlight switches between PWM 0 and 255. The serial port alternately displays:
EXIO6/7=0; backlight PWM=0
EXIO6/7=1; backlight PWM=255
The backlight switching between bright and dim is expected behavior, and the LCD does not display an application interface. The CH32V003 comes preloaded with control firmware, so no separate flashing is required; this example only uses EXIO6/7 for testing, and the other expanded IOs are used for onboard devices, so do not toggle them arbitrarily.
07_audio
Example Description
Uses a touch interface to monitor the microphone level and supports recording, stopping, and playback. Recordings are kept in memory and do not require a TF card or network.
Hardware Connection
Connect a matching speaker before powering on, then connect the development board to the computer using a USB data cable.
Code Analysis
-
main/main.cpp: Initializes the display and callsMicTest::init()andMicTest::run()to create the recording interface and start the background task. -
MicTest::event(): Responds to the Record, Stop, and Play buttons. -
MicTest::work(): Captures microphone PCM data, calculates the level, and records or plays back according to the current state; the recording buffer holds up to 10 seconds of audio. -
MicTest::refresh(): Updates the volume bar, status, and duration display.
Running Result
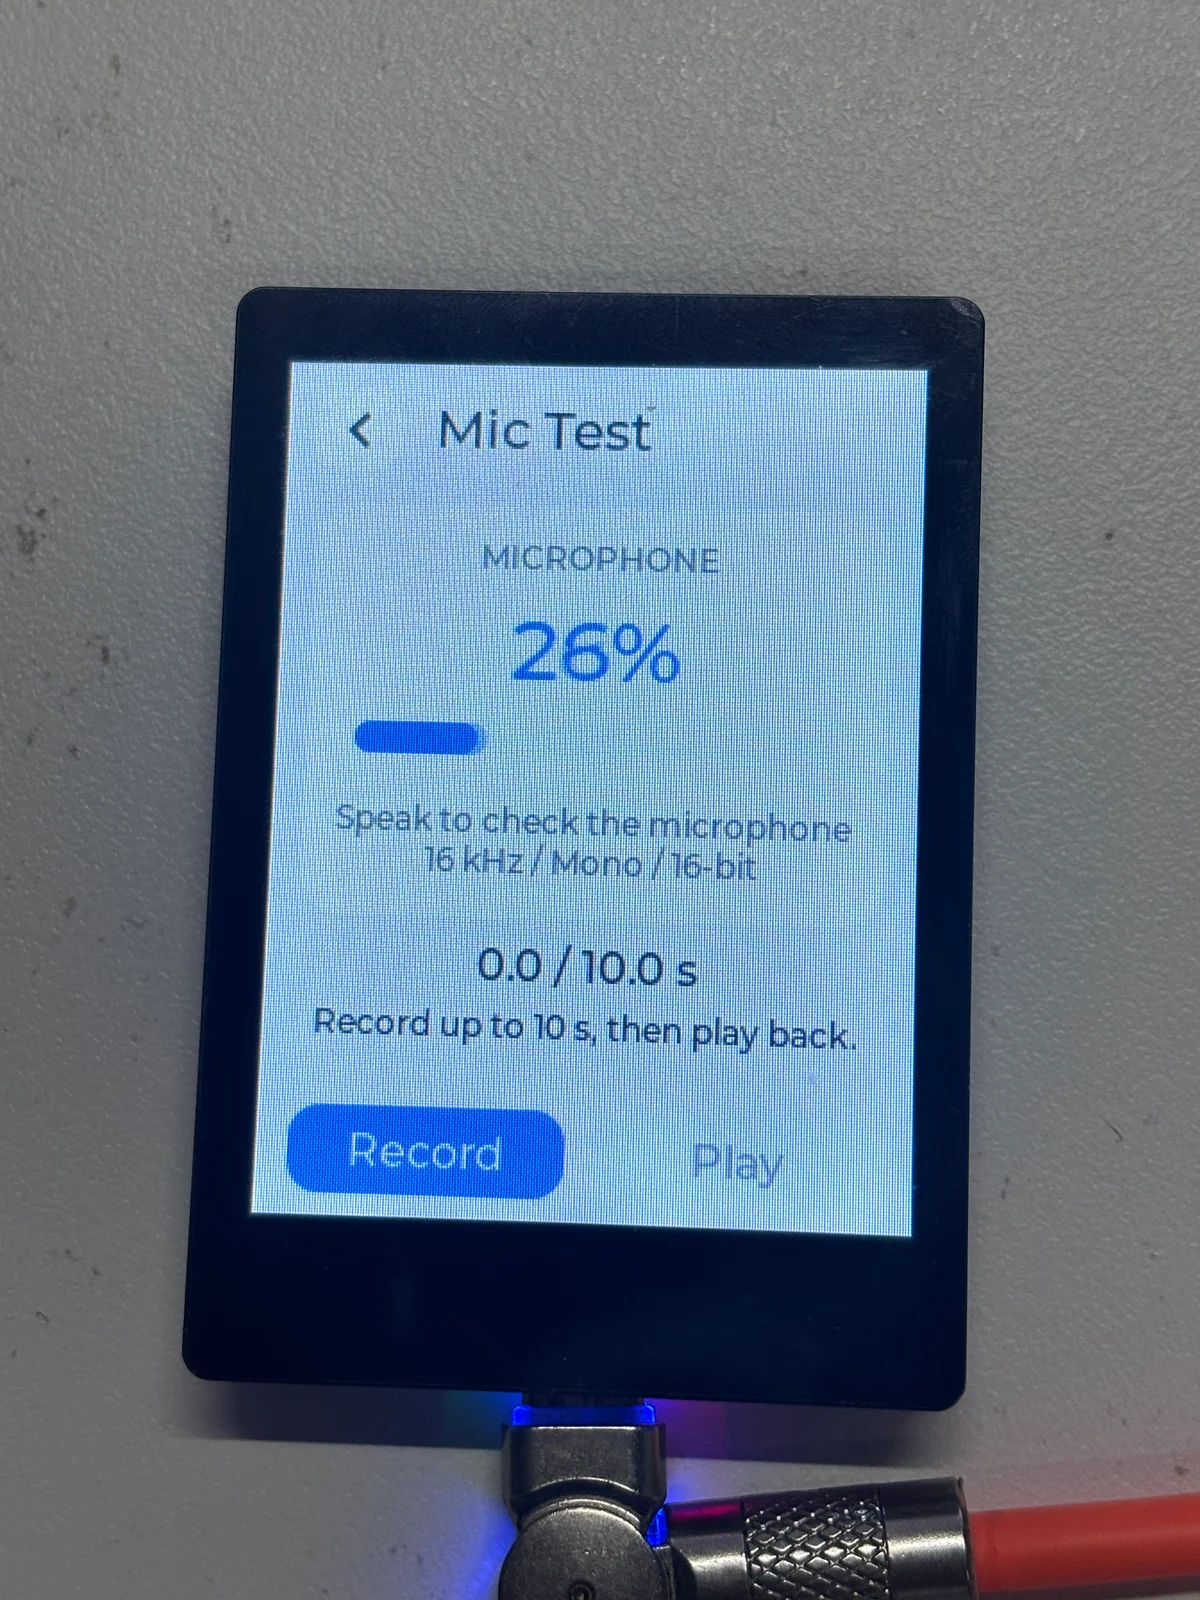
This standalone example follows the touch operations of the factory Mic Test. After startup, follow these steps:
-
Speak into the onboard microphone and observe changes in the volume bar and level percentage.
-
Tap "Record" to start recording; the screen displays
RECand the recorded duration. -
Tap "Stop" to end early, or wait until the full 10 seconds are recorded and it stops automatically.
-
Tap "Play" to play back the recording; during playback you can tap "Stop" to abort, and you can play it again after it ends.
The recording parameters are 16 kHz, mono, 16-bit, and the default playback volume is 100/100. Recordings are temporarily stored in memory; a new recording overwrites the previous one, and they are cleared on reset or power loss, without being written to the TF card or Flash.
The "Play" button is unavailable when there is no recording. The speaker stays muted while monitoring the level and does not play the microphone sound in real time. If playback is silent, check the speaker connection, the recording duration, and the on-screen error messages.
08_battery_voltage
Example Description
Obtains the battery ADC sample value through the CH32V003, converts it to voltage, and displays it on the LCD and in the serial port.
Hardware Connection
Connect a matching battery to the battery holder; verify the positive and negative terminals before connecting, then connect to the computer using a USB data cable.
Code Analysis
-
app_main(): Initializes the IO expander and display, creates the voltage label, and then loops to read data. -
bsp_battery_get_voltage(): Reads eight ADC samples and averages them, and calculates the battery voltage using a nominal 3.3 V reference voltage and a 3:1 voltage divider. -
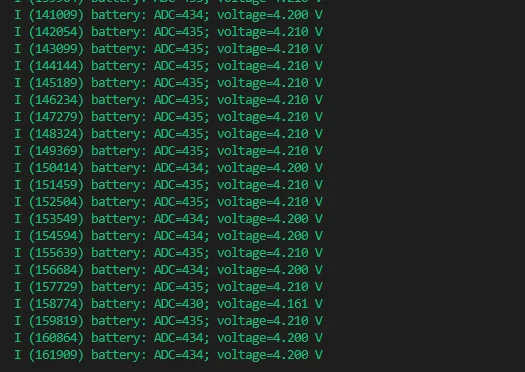
Updates the LCD and serial output every second; uses the display lock when updating the label and displays
ADC read failedif reading fails.
Running Result
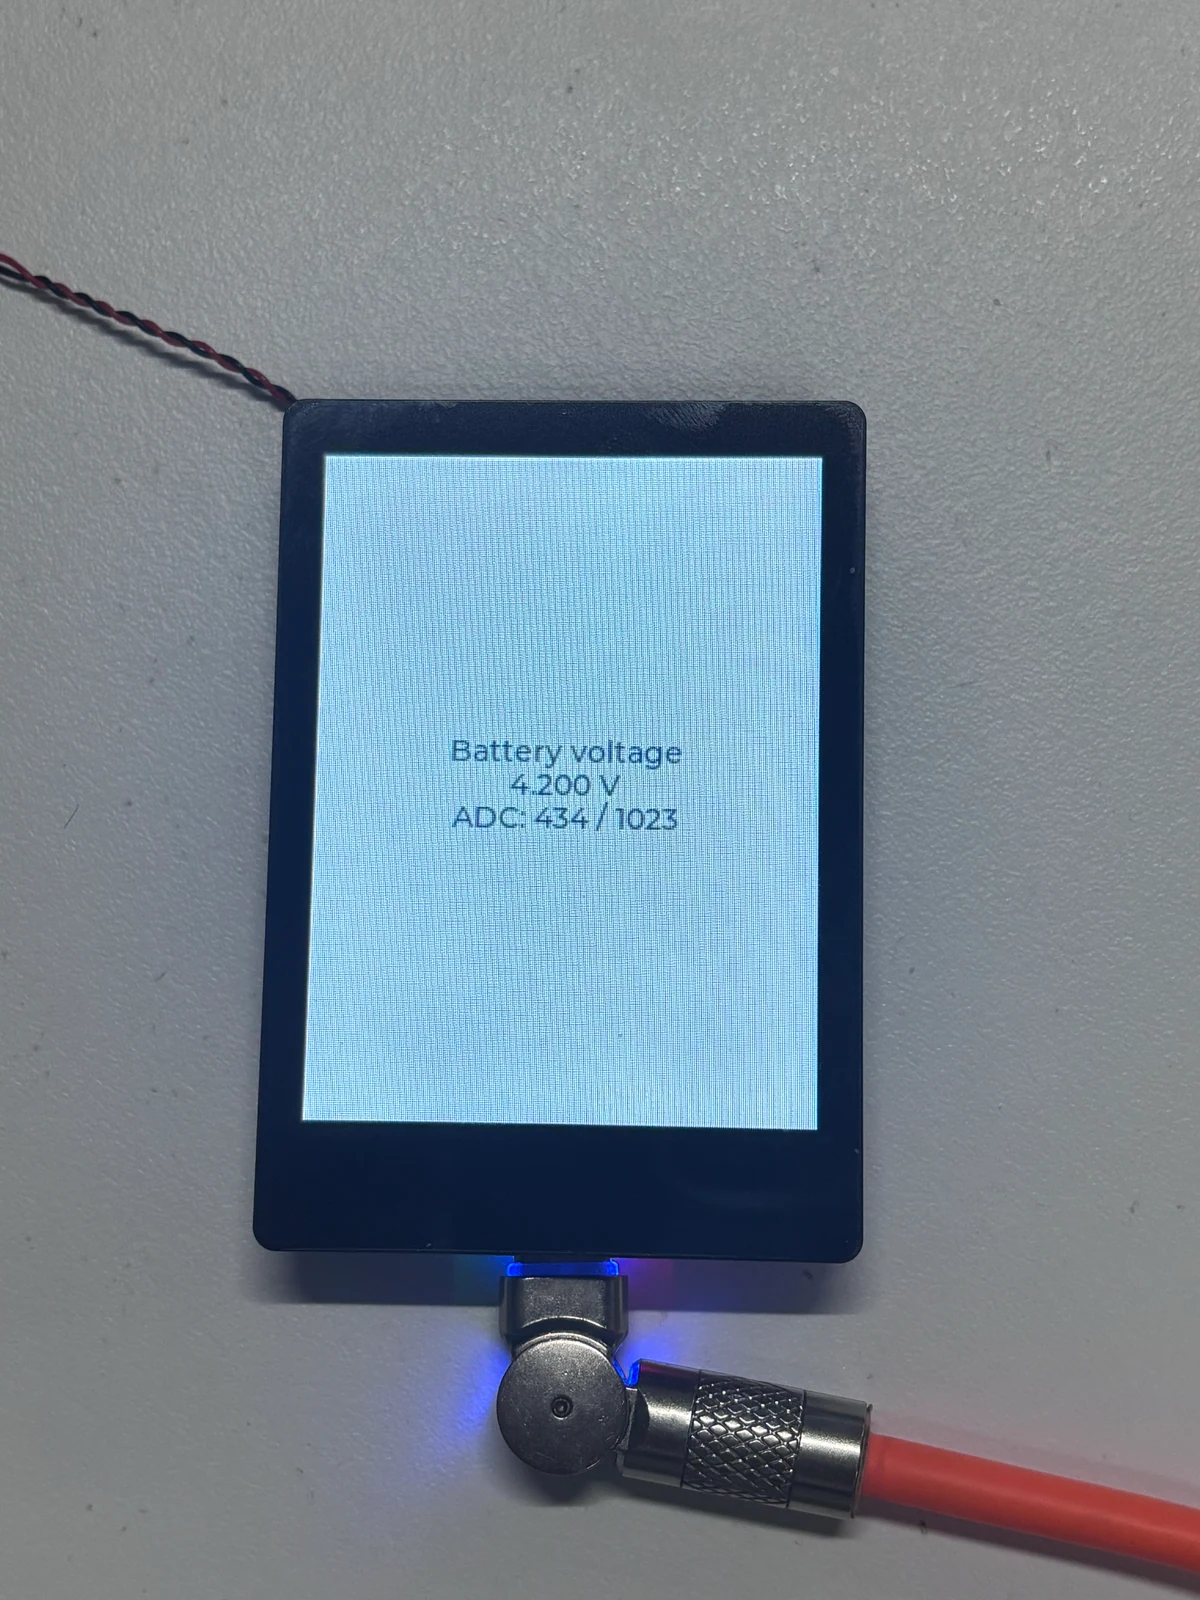
The LCD and serial port update the estimated battery voltage and the raw ADC value about once per second. The screen displays Battery voltage, the voltage, and ADC: ... / 1023; this displays voltage, not the remaining battery percentage.
If no battery is connected or the contact is poor, the reading may be zero or abnormal. The program averages eight ADC samples and uses a nominal 3.3 V reference voltage and a 3:1 voltage divider; if you need to verify accuracy, compare with a multimeter.
Troubleshooting
-
Compilation errors after switching IDF versions: Confirm that the current terminal uses v5.5.4, run
idf.py fullclean, and recompile without reusing build caches generated by other IDF versions. -
esp_timer_stop_blockingerrors: Check whether the IDF and display adaptation component versions match, and rebuild using the specified v5.5.4 and the dependency configuration provided with the project. -
No serial output: Check the USB data cable, serial port selection, and 115200 baud, close other software that is occupying the serial port, and press RESET.
-
Screen stays dark: First check the example list to confirm whether there is a display interface; the sensor serial examples do not turn on the screen.
For more questions, see the ESP32-C5-Touch-LCD-2.8 FAQ.