Working with Arduino
This chapter contains the following sections. Please read as needed:
Arduino Getting Started
New to Arduino ESP32 development and looking for a quick start? We have prepared a comprehensive Getting Started Tutorial for you.
- Section 0: Getting to Know ESP32
- Section 1: Installing and Configuring Arduino IDE
- Section 2: Arduino Basics
- Section 3: Digital Output/Input
- Section 4: Analog Input
- Section 5: Pulse Width Modulation (PWM)
- Section 6: Serial Communication (UART)
- Section 7: I2C Communication
- Section 8: SPI Communication
- Section 9: Wi-Fi Basics
- Section 10: Web Server
- Section 11: Bluetooth
- Section 12: LVGL GUI Development
- Section 13: Comprehensive Project
Note: This tutorial uses the ESP32-S3-Zero as a reference example, and all hardware code is based on its pinout. Before you start, we recommend checking the pinout of your development board to ensure the pin configuration is correct.
Setting Up Development Environment
1. Installing and Configuring Arduino IDE
Please refer to the tutorial Installing and Configuring Arduino IDE to download and install the Arduino IDE and add ESP32 support.
Installation Steps: For installation methods, please refer to: Arduino Library Management Tutorial.
2. Example
The Arduino examples are located in the Arduino directory of the example package.
| Example | Basic Description |
|---|---|
| 01_GPIO | Control the logic level of the exposed GPIO pins |
| 02_BlinkRGB | Implement a breathing LED effect on the RGB LED |
| 03_GetchipID | Obtain and print ESP32-C5 chip hardware information every three seconds, including chip model, revision, core count, and chip ID |
| 04_BLE | Use the ESP32-C5-Zero development board to connect to BLE beacons and receive broadcast data |
| 05_UART | Implement UART communication using the ESP32-C5-Zero development board |
| 06_WIFI_AP | Configure the ESP32-C5-Zero development board as an AP hotspot (2.4G), allowing other Wi-Fi devices to connect |
| 07_WIFI_STA | Connect to a specified Wi-Fi network, print connection information, fetch weather data via an API, and support automatic reconnection upon Wi-Fi disconnection |
| 08_WIFI_StaticIP | Use the ESP32-C5-Zero development board to connect to Wi-Fi with a static IP address |
01_GPIO
Code
01_GPIO.ino
void loop() {
  REG_WRITE(GPIO_OUT_REG, REG_READ(GPIO_OUT_REG) ^ gpio_low);
  REG_WRITE(GPIO_OUT1_REG, REG_READ(GPIO_OUT1_REG) ^ gpio_high);
  delay(300);
}
Code Analysis
REG_WRITE()combined withREG_READ()toggles the GPIO output registers bitwise, allowing multiple pins to change state simultaneously.delay(300)controls the toggling rhythm, making it easier to observe with external LEDs or an oscilloscope.
02_BlinkRGB
Code
02_BlinkRGB.ino
void loop() {
  static uint8_t wheel_pos = 0;      // Current color position (0-255)
  static uint32_t last_update_ms = 0;

  const uint32_t now = millis();

  if (now - last_update_ms >= 20) {
    last_update_ms = now;

    // Calculate and set the color
    set_wheel_color(wheel_pos);

    // Increment position and wrap around at 255
    wheel_pos++;
  }
}
Code Analysis
set_wheel_color(wheel_pos)computes an RGB color based on the current wheel position and writes it to the onboard LED.wheel_pos++continuously increments the color index, creating a smooth color-cycling effect with a 20ms refresh interval.
Operation Result
 |  |  |
|---|
03_GetchipID
Code
03_GetchipID.ino
void loop() {
  const uint64_t mac = ESP.getEfuseMac();
  uint32_t chip_id = 0;
  for (uint8_t i = 0; i < 24; i = (uint8_t)(i + 8)) {
    chip_id |= (uint32_t)(((mac >> (40 - i)) & 0xff) << i);
  }

  Serial.printf("ESP32-C5-Zero Chip model = %s Rev %d\n", ESP.getChipModel(), ESP.getChipRevision());
  Serial.printf("This chip has %d cores\n", ESP.getChipCores());
  Serial.print("Chip ID: ");
  Serial.println(chip_id);
  delay(3000);
}
Code Analysis
ESP.getEfuseMac()reads the factory-flashed MAC address of the chip and further combines it into a simplifiedchip_id.- The code outputs the chip model, revision, and core count via the serial port, making it easy to quickly identify the current board.
Operation Result
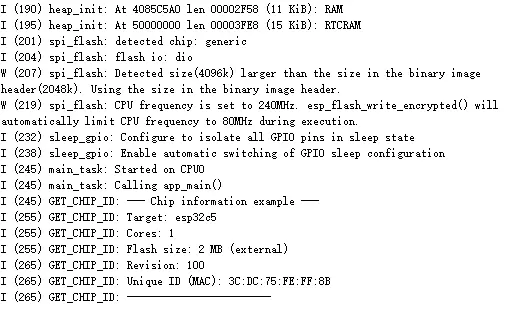 |
|---|
04_BLE
Code
04_BLE.ino
void setup() {
  Serial.begin(115200);

  NimBLEDevice::init("ESP32-C5-Zero");

  NimBLEAdvertising *advertising = NimBLEDevice::getAdvertising();

  NimBLEAdvertisementData scan_response;
  scan_response.setName("ESP32-C5-Zero");   // This is the name shown on the phone
  advertising->setScanResponseData(scan_response);

  const bool ok = advertising->start();
  if (ok) {
    Serial.println("BLE advertising started");
  }else{
    Serial.println("BLE advertising start failed");
  }
}
Code Analysis
NimBLEDevice::init()initializes the BLE stack and sets the device name shown during advertising.advertising->start()starts advertising, allowing the board to be discovered by phones or other BLE devices.
Operation Result
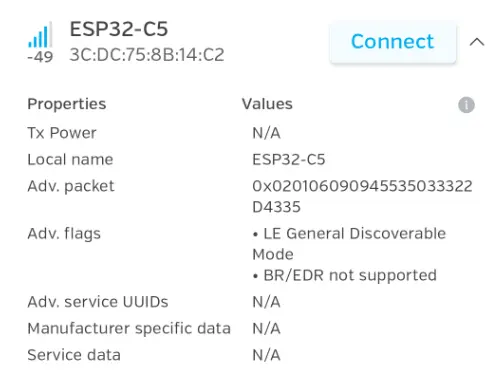 |
|---|
05_UART
Code
05_UART.ino
void loop() {
  while (Serial1.available() > 0) {
    Serial1.write(Serial1.read());
  }
  delay(1);
}
Code Analysis
Serial1.available()checks whether new data is present in the UART receive buffer.- Any data read is immediately sent back via
Serial1.write(), implementing a basic serial loopback test.
Operation Result
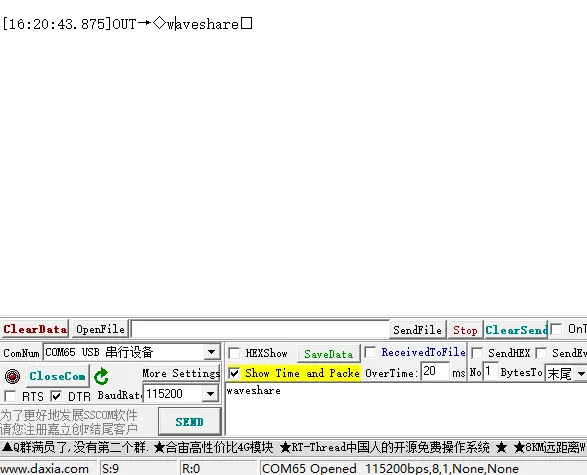 |
|---|
06_WIFI_AP
Code
06_WIFI_AP.ino
void setup() {
  Serial.begin(115200);

  // Best practice: Register the event handler BEFORE starting the AP
  // so you don't miss any immediate connection events.
  WiFi.onEvent(on_wifi_event);

  // Start the Access Point
  Serial.println("Starting WiFi Access Point...");
  if (!WiFi.softAP(ssid, password)) {
    Serial.println("Failed to start WiFi AP! Halting system.");
    while (true); // Halt if AP fails to start
  }

  Serial.println("WiFi Access Point initialized successfully!");
  Serial.print("AP SSID: ");
  Serial.println(ssid);
  Serial.print("AP IP Address: ");
  Serial.println(WiFi.softAPIP()); // Also print the AP's own IP address
}
Code Analysis
WiFi.softAP(ssid, password)starts the access point mode, making the development board work as a Wi-Fi hotspot.WiFi.softAPIP()reads the hotspot's local IP address, facilitating subsequent connection testing with phones or computers.
Operation Result
 |
|---|
07_WIFI_STA
Code
07_WIFI_STA.ino
void setup() {
  // Initialize serial communication
  Serial.begin(115200);
  while (!Serial);  // Wait for serial port to connect

  // Connect to WiFi
  Serial.println("Connecting to WiFi...");
  WiFi.begin(ssid, password);

  // Wait for WiFi connection
  while (WiFi.status() != WL_CONNECTED) {
    delay(500);
    Serial.print(".");
  }

  // Print connection success message with WiFi details
  Serial.println("\n");
  Serial.println("=====================================");
  Serial.println("WiFi connection successful!");
  Serial.print("Connected to SSID: ");
  Serial.println(ssid);
  Serial.print("With password: ");
  Serial.println(password);
  Serial.print("Assigned IP address: ");
  Serial.println(WiFi.localIP());
  Serial.println("=====================================\n");
}
Code Analysis
WiFi.begin(ssid, password)attempts to connect to the specified router, with a loop that continuously checks the connection status.- After a successful connection,
WiFi.localIP()prints the assigned IP address to confirm network connectivity.
Operation Result
 |
|---|
08_WIFI_StaticIP
Code
08_WIFI_StaticIP.ino
void loop() {
  static uint32_t last_check_ms = 0;
  const uint32_t now = millis();
  if ((uint32_t)(now - last_check_ms) < 5000) {
    delay(10);
    return;
  }
  last_check_ms = now;

  // Periodically check Wi-Fi connection and auto-reconnect
  if (WiFi.status() != WL_CONNECTED) {
    Serial.println("Wi-Fi disconnected, attempting reconnection...");
    WiFi.begin(ssid, password); // Re-initiate connection
    uint8_t retry = 0;
    uint32_t retry_start_ms = millis();
    uint32_t retry_dot_ms = retry_start_ms;
    while (WiFi.status() != WL_CONNECTED && retry < 5) {
      const uint32_t now2 = millis();
      if ((uint32_t)(now2 - retry_dot_ms) >= 1000) {
        retry_dot_ms = now2;
        Serial.print('.');
        retry++;
      }
      delay(10);
    }
    if (WiFi.status() == WL_CONNECTED) {
      Serial.println("\nReconnected to Wi-Fi!");
      Serial.print("Current IP: ");
      Serial.println(WiFi.localIP());
    }
  }
  delay(10);
}
Code Analysis
- This code checks the network connection status every 5 seconds to avoid frequent reconnection attempts in the main loop.
- When the Wi-Fi is disconnected, it re-calls
WiFi.begin()to initiate a new connection and prints the current IP address upon successful reconnection.