Working with MicroPython
This chapter contains the following sections. Please read as needed:
MicroPython Getting Started
New to ESP32 MicroPython development and looking for a quick start? We have prepared a comprehensive ESP32 MicroPython Getting Started Tutorial for you.
- Section 1: Setup Development Environment
- Section 2: Basics
- Section 3: GPIO Digital Output/Input
- Section 4: ADC Analog Input
- Section 5: PWM Output
- Section 6: UART Communication
- Section 7: I2C Communication
- Section 8: SPI Communication
- Section 9: Wi-Fi Basic
- Section 10: Web Server
- Section 11: Bluetooth
- Section 12: Comprehensive Project
Note: This tutorial uses the ESP32-S3-Zero as a teaching example, and all hardware code is based on its pinout. Before proceeding, we recommend checking the pinout diagram of your specific development board to ensure the pin configuration is correct.
Setting Up Development Environment
1. Flash MicroPython Firmware and Configure Thonny
Please refer to the Set Up MicroPython Development Environment to flash the MicroPython firmware.
2. Other Tips
-
ESP32-C5-Zero MicroPython firmware download link: https://micropython.org/download/ESP32_GENERIC_C5/
-
If you flash the MicroPython firmware using the Espressif Flash Download Tool for the ESP32-C5-Zero, the flash address is
0x0.
| Example | Basic Description |
|---|---|
| 01_GPIO | Controls a total of 20 specified GPIO pins to cycle through HIGH/LOW level switching in sequence, and prints the level change status of each pin via serial port |
| 02_BlinkRGB | Controls an RGB LED to create a waterfall light dynamic effect |
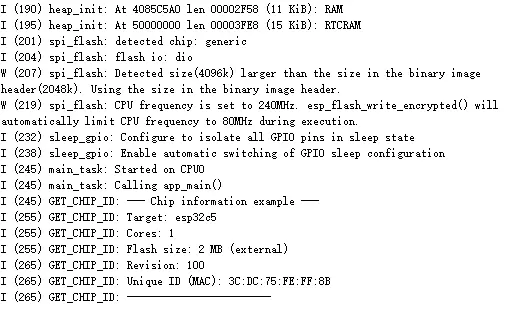
| 03_GetchipID | Obtain and print ESP32-C5 chip hardware information every three seconds, including chip model, revision, core count, and chip ID |
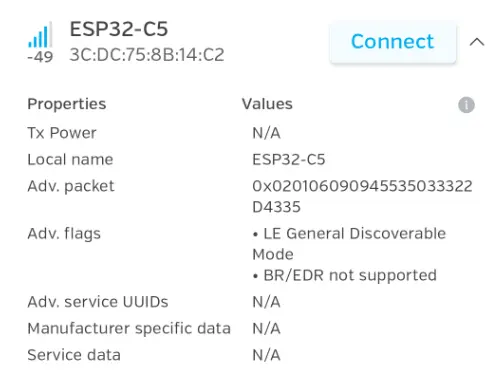
| 04_BLE | Use the ESP32-C5-Zero development board to connect to BLE beacons and receive broadcast data |
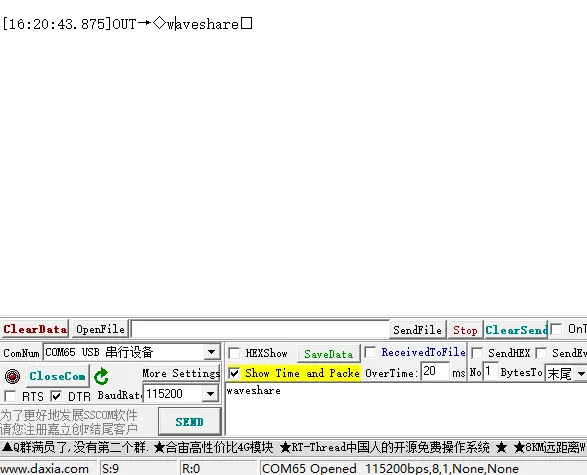
| 05_UART | Implement UART communication using the ESP32-C5-Zero development board |
| 06_WIFI_AP | Configure the ESP32-C5-Zero development board as an AP hotspot (2.4G), allowing other Wi-Fi devices to connect |
| 07_WIFI_STA | Connect to Wi-Fi using DHCP on the ESP32-C5-Zero development board and obtain an IP address |
| 08_WIFI_StaticIP | Connect to a specified Wi-Fi network, print connection information, then switch to a static IP configuration after a successful connection, facilitating local network debugging and access |
01_GPIO
Code
GPIO.py
for i in range(13):
    pins.append(Pin(i, Pin.OUT))

while True:
    for p in pins:
        p.value(1)
    time.sleep(0.5)

    for p in pins:
        p.value(0)
    time.sleep(0.5)
Code Analysis
- The code first configures GPIO 0 to 12 as output pins, then sets them all high or low in a loop to create a blinking effect.
time.sleep(0.5)controls the on/off rhythm, making it easy to observe the pin output.
02_BlinkRGB
Code
BlinkRGB.py
def wheel(pos):
    if pos < 85:
        return (pos * 3, 255 - pos * 3, 0)
    elif pos < 170:
        pos -= 85
        return (255 - pos * 3, 0, pos * 3)
    else:
        pos -= 170
        return (0, pos * 3, 255 - pos * 3)

while True:
    for i in range(256):
        np[0] = wheel(i)
        np.write()
        time.sleep(0.02)
Code Analysis
wheel(pos)returns different RGB combinations based on the position value, used to generate a rainbow gradient effect.np.write()refreshes the color data to the LED, and the loop creates a flowing color-changing effect.
Operation Result
 |  |  |
|---|
03_GetchipID
Code
GetchipID.py
wlan = network.WLAN(network.STA_IF)
wlan.active(True)

mac = wlan.config('mac')
chip_id = ubinascii.hexlify(mac).decode()

print("Chip Unique ID:", chip_id)
Code Analysis
network.WLAN(network.STA_IF)enables the wireless card in STA mode.- The obtained
macis converted to a hex string usingubinascii.hexlify()and printed as a unique ID.
Operation Result
 |
|---|
04_BLE
Code
BLE.py
def adv_payload(name, tx_power=-4):
    name = name.encode()

    payload = bytearray()

    # Flags
    payload += struct.pack("BB", 2, 0x01) + b"\x06"

    # TX Power
    payload += struct.pack("BBb", 2, 0x0A, tx_power)

    # Name
    payload += struct.pack("BB", len(name) + 1, 0x09) + name

    return payload

ble.gap_advertise(200_000, adv_payload("ESP32-C5-Zero-BLE"))

while True:
    time.sleep(1)
Code Analysis
adv_payload()assembles the BLE advertising packet, including the device name and transmit power.- After
ble.gap_advertise()starts broadcasting, external devices can discover the BLE device by its name.
Operation Result
 |
|---|
05_UART
Code
UART.py
# UART1
uart = UART(
    1,
    baudrate=115200,
    tx=Pin(11),
    rx=Pin(12)
)

print("UART-Init")

while True:
    uart.write("Waveshare\r\n")
    time.sleep(1)
Code Analysis
- The code initializes UART1 using
UART(1, ...)and maps TX/RX to the specified pins. - In the main loop, it sends a string every second, providing a basic serial connectivity test.
Operation Result
 |
|---|
06_WIFI_AP
Code
WIFI_AP.py
# Brief pause to ensure the AP is fully initialized
time.sleep(1)

# Print the AP details in a formatted way
print("-" * 30)
print("AP (Access Point) Started Successfully!")
print("SSID:", ap.config("essid"))
print("Password:", PASSWORD)
# ap.ifconfig() returns a tuple: (IP, Subnet Mask, Gateway, DNS)
# Index [0] is the IP address
print("IP Address:", ap.ifconfig()[0])
print("-" * 30)
Code Analysis
- This code prints the SSID, password, and IP address after the hotspot is started, confirming that AP mode is working.
ap.ifconfig()[0]retrieves the current IP address of the hotspot.
Operation Result
 |
|---|
07_WIFI_STA
Code
WIFI_STA.py
def connect_wifi():
    sta = network.WLAN(network.STA_IF)
    sta.active(True)

    if not sta.isconnected():
        print("Connecting to WiFi...")
        sta.connect(SSID, PASSWORD)

        while not sta.isconnected():
            time.sleep(0.5)
            print(".", end="")
Code Analysis
sta.connect(SSID, PASSWORD)initiates the connection, and the following loop waits until the connection is established.- This approach is suitable for example demonstrations, showing the device connecting to Wi-Fi.
Operation Result
 |
|---|
08_WIFI_StaticIP
Code
WIFI_StaticIP.py
if sta.isconnected():
    # Step 2: After connection, overwrite configuration to lock static IP
    sta.ifconfig((STATIC_IP, SUBNET_MASK, GATEWAY, DNS))

    print("-" * 30)
    print("WiFi connected successfully!")
    print("Connected to SSID:", SSID)
    print("Static IP locked to:", sta.ifconfig()[0])
    print("Gateway:", sta.ifconfig()[2])
    print("-" * 30)
else:
    print("Connection failed. Please check hotspot status, credentials, or signal strength.")
Code Analysis
- After a successful connection,
sta.ifconfig(...)manually writes the static IP configuration, overriding the DHCP assignment. - This ensures the device always uses a fixed address after connecting, facilitating local network debugging and access.