Working with Arduino
This chapter contains the following sections. Please read as needed:
Arduino Getting Started
New to Arduino ESP32 development and looking for a quick start? We have prepared a comprehensive Getting Started Tutorial for you.
- Section 0: Getting to Know ESP32
- Section 1: Installing and Configuring Arduino IDE
- Section 2: Arduino Basics
- Section 3: Digital Output/Input
- Section 4: Analog Input
- Section 5: Pulse Width Modulation (PWM)
- Section 6: Serial Communication (UART)
- Section 7: I2C Communication
- Section 8: SPI Communication
- Section 9: Wi-Fi Basics
- Section 10: Web Server
- Section 11: Bluetooth
- Section 12: LVGL GUI Development
- Section 13: Comprehensive Project
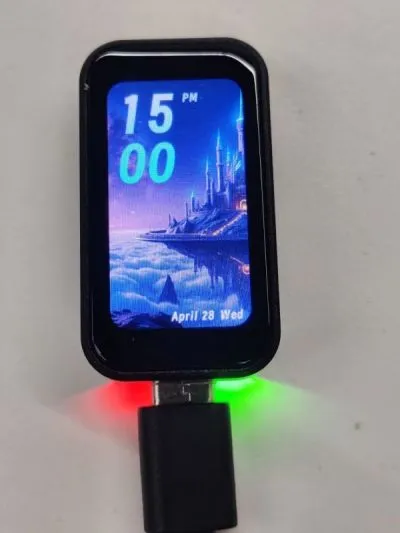
Note: This tutorial uses the ESP32-S3-Zero as a reference example, and all hardware code is based on its pinout. Before you start, we recommend checking the pinout of your development board to ensure the pin configuration is correct.
Setting Up the Development Environment
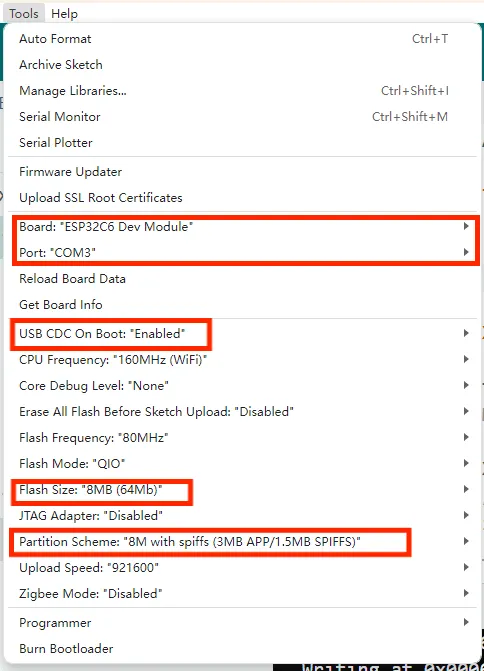
1. Installing and Configuring the Arduino IDE
Please refer to the tutorial Installing and Configuring Arduino IDE to download and install the Arduino IDE and add ESP32 support.
2. Installing Libraries
To run the example, you need to install the corresponding library.
The example package for the ESP32-C6-Touch-LCD-1.47 development board can be downloaded from here. The arduino\libraries directory within the package already includes all the library files required for this tutorial.
| Library/File Name | Description | Version | Installation Method |
|---|---|---|---|
| lvgl | LVGL graphics library | v8.4.0 | "Online" installation (requires copying the demos folder to src) |
| GFX_Library_for_Arduino | GFX graphics library | v1.5.9 | Online or manual installation |
| FastIMU | IMU driver library | v1.2.8 | Online or manual installation |
| esp_lcd_touch_axs5106l | Touch driver library | v2.6.1 | Manual installation |
There are strong dependencies between versions of LVGL and its driver libraries. For example, a driver written for LVGL v8 may not be compatible with LVGL v9. To ensure that the examples can be reproduced reliably, it is recommended to use the specific versions listed in the table above. Mixing different versions of libraries may lead to compilation failures or runtime errors.
Installation Steps:
-
Navigate to the downloaded example package.
-
Copy all folders (such as lvgl and lv_conf.h) from the
arduino\librariesdirectory to the Arduino libraries folder.infoThe path to the Arduino libraries folder is typically:
c:\Users\<username>\Documents\Arduino\libraries.You can also locate it in the Arduino IDE by going to File > Preferences and checking the "Sketchbook location". The libraries folder is the
librariessubfolder within this path. -
For other installation methods, please refer to: Arduino Library Management Tutorial.
3. Arduino Project Parameter Settings
[ ]
]
Example
| Example | Basic Description | Dependency Library |
|---|---|---|
| 01_gfx_helloworld | Display HelloWorld on the screen | GFX_Library_for_Arduino |
| 02_qmi8658_output | Print QMI8658 data over serial | FastIMU |
| 03_sd_card_test | Test TF card | - |
| 04_lvgl_arduino_v8 | LVGL example program | lvgl, GFX_Library_for_Arduino, esp_lcd_touch_axs5106l |
| 05_lvgl_battery | Display battery voltage using LVGL | lvgl, GFX_Library_for_Arduino, esp_lcd_touch_axs5106l |
| 06_lvgl_brightness | Control and display screen brightness using LVGL | lvgl, GFX_Library_for_Arduino, esp_lcd_touch_axs5106l |
| 07_lvgl_qmi8658 | Display QMI8658 data using LVGL | lvgl, GFX_Library_for_Arduino, FastIMU, esp_lcd_touch_axs5106l |
| 08_lvgl_image | Display images using LVGL | lvgl, GFX_Library_for_Arduino, esp_lcd_touch_axs5106l |
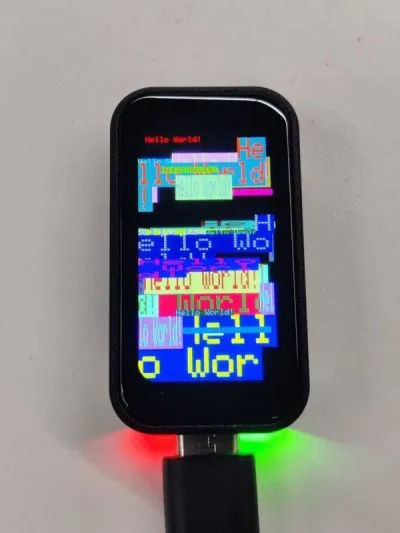
01_gfx_helloworld
Example Description
- This example demonstrates the ESP32-C6-Touch-LCD-1.47 using the GFX_Library_for_Arduino library to drive the screen and display HelloWorld.
Hardware Connection
- Connect the board to the computer.
Code Analysis
-
Create an Arduino_ESP32SPI object
busto configure the SPI bus GPIOs, and create an Arduino_ST7789 objectgfxto drive the ST7789 display.Arduino_DataBus *bus = new Arduino_ESP32SPI(45 /* DC */, 21 /* CS */, 38 /* SCK */, 39 /* MOSI */);Arduino_GFX *gfx = new Arduino_ST7789(bus, 47 /* RST */, 0 /* rotation */, false /* IPS */,172 /* width */, 320 /* height */,34 /*col_offset1*/, 0 /*uint8_t row_offset1*/,34 /*col_offset2*/, 0 /*row_offset2*/);
Operation Result
-
HelloWorld is displayed on the screen.
02_qmi8658_output
Example Description
- This example demonstrates the ESP32-C6-Touch-LCD-1.47 reading QMI8658 data and printing it over the serial port.
Hardware Connection
- Connect the board to the computer.
Code Analysis
-
Initialize QMI8658.
int err = IMU.init(calib, IMU_ADDRESS);if (err != 0) {Serial.print("Error initializing IMU: ");Serial.println(err);while (true) {;}}
Operation Result
-
Opening the serial monitor shows printed accelerometer and gyroscope data for the x, y, and z axes.

03_sd_card_test
Example Description
- This example demonstrates testing TF card read/write functionality on the ESP32-C6-Touch-LCD-1.47.
Hardware Connection
- Connect the board to the computer.
- Insert the TF card into the card slot (TF card needs to be formatted as FAT32).
Code Analysis
-
SPI interface initialization and TF card initialization.
#ifdef REASSIGN_PINSSPI.begin(sck, miso, mosi, cs);if (!SD.begin(cs)) {#elseif (!SD.begin()) {#endifSerial.println("Card Mount Failed");return;}
Operation Result
-
Insert the TF card into the computer, and and two files, test.txt and foo.test, will appear. The content of the foo.txt is Hello World!, and the test.txt is empty.

04_lvgl_arduino_v8
Example Description
- This example demonstrates running the LVGL example program on the ESP32-C6-Touch-LCD-1.47.
Hardware Connection
- Connect the board to the computer.
- Insert the TF card into the card slot (TF card needs to be formatted as FAT32).
Code Analysis
-
If the lvgl library is installed online, you need to copy the demos folder to src.
lv_demo_widgets();// lv_demo_benchmark();// lv_demo_keypad_encoder();// lv_demo_music();// lv_demo_stress();
Operation Result
-
Touch operation is supported.

05_lvgl_battery
Example Description
- This example demonstrates using the LVGL library on the ESP32-C6-Touch-LCD-1.47 to display battery voltage and ADC values on the screen.
Hardware Connection
- Connect the board to the computer.
- Insert the TF card into the card slot (TF card needs to be formatted as FAT32).
Code Analysis
-
Initialize the UI and create a 1000ms timer to obtain ADC data and convert it to voltage.
lvgl_battery_ui_init(lv_scr_act());
Operation Result

06_lvgl_brightness
Example Description
- This example demonstrates using the LVGL library on the ESP32-C6-Touch-LCD-1.47 to display screen brightness, with a slider to control the brightness.
Hardware Connection
- Connect the board to the computer.
- Insert the TF card into the card slot (TF card needs to be formatted as FAT32).
Code Analysis
-
Initialize the UI and create a slider value change callback; when the slider value changes, the screen brightness is adjusted.
lvgl_brightness_ui_init(lv_scr_act());
Operation Result

07_lvgl_qmi8658
Example Description
- This example demonstrates reading QMI8658 data on the ESP32-C6-Touch-LCD-1.47 and displaying it using the LVGL library.
Hardware Connection
- Connect the board to the computer.
- Insert the TF card into the card slot (TF card needs to be formatted as FAT32).
Code Analysis
-
Initialize the UI and create a 100ms timer to obtain QMI8658 data.
lvgl_qmi8658_ui_init(lv_scr_act());
Operation Result

08_lvgl_image
Example Description
- This example demonstrates the ESP32-C6-Touch-LCD-1.47 running LVGL to display an image.
Hardware Connection
- Connect the board to the computer using a USB cable.
Preparation
- Open LVGL image converter website.
- Import the image
images/image_1.jpgand convert it; this will generate animage_1.cfile.

- Copy
image_1.cto the project folder. - Add the following code to
06_lvgl_image.inoto declare the image.
LV_IMG_DECLARE(image_1);
Code Analysis
-
Specify the image to be displayed.
lv_img_set_src(img, &image_1);
Operation Result