Section 1: Installing Home Assistant OS
This section uses Windows + VMware Workstation as an example to demonstrate how to install the Home Assistant Operating System (HAOS) in a virtual machine. After completion, you will have a VM running HAOS that can be accessed via a browser, preparing you for the initial setup in Section 2.
1. About Home Assistant Installation Methods
Home Assistant officially provides two installation types:
- Home Assistant Operating System (hereafter referred to as HAOS): Officially recommended. This is a minimal OS customized for Home Assistant, integrating the Home Assistant core and the Apps system. It can be installed directly on a Raspberry Pi, Mini PC, or run in a virtual machine.
- Home Assistant Container: Runs the Home Assistant core as a Docker container. You need to set up a Linux system and Docker environment yourself, and handle updates manually. Container installation does not include the Apps system — ESPHome must run as a separate Docker container alongside the HA container.
In this tutorial, ESPHome runs as a Home Assistant app, which is the most straightforward approach for beginners — hence we use HAOS as the example.
HAOS can be deployed on a Raspberry Pi, x86-64 host, or a virtual machine. This tutorial uses the Windows + VMware Workstation Pro 17 virtual machine approach: no additional hardware is needed, and backup/rollback is as simple as copying disk files. If you use VirtualBox, Hyper-V, or other platforms, the general approach is the same.
If you need to install directly on a Raspberry Pi or other single-board computer, or install via container/other VM platforms, refer to the Home Assistant Official Installation Documentation and select the corresponding platform.
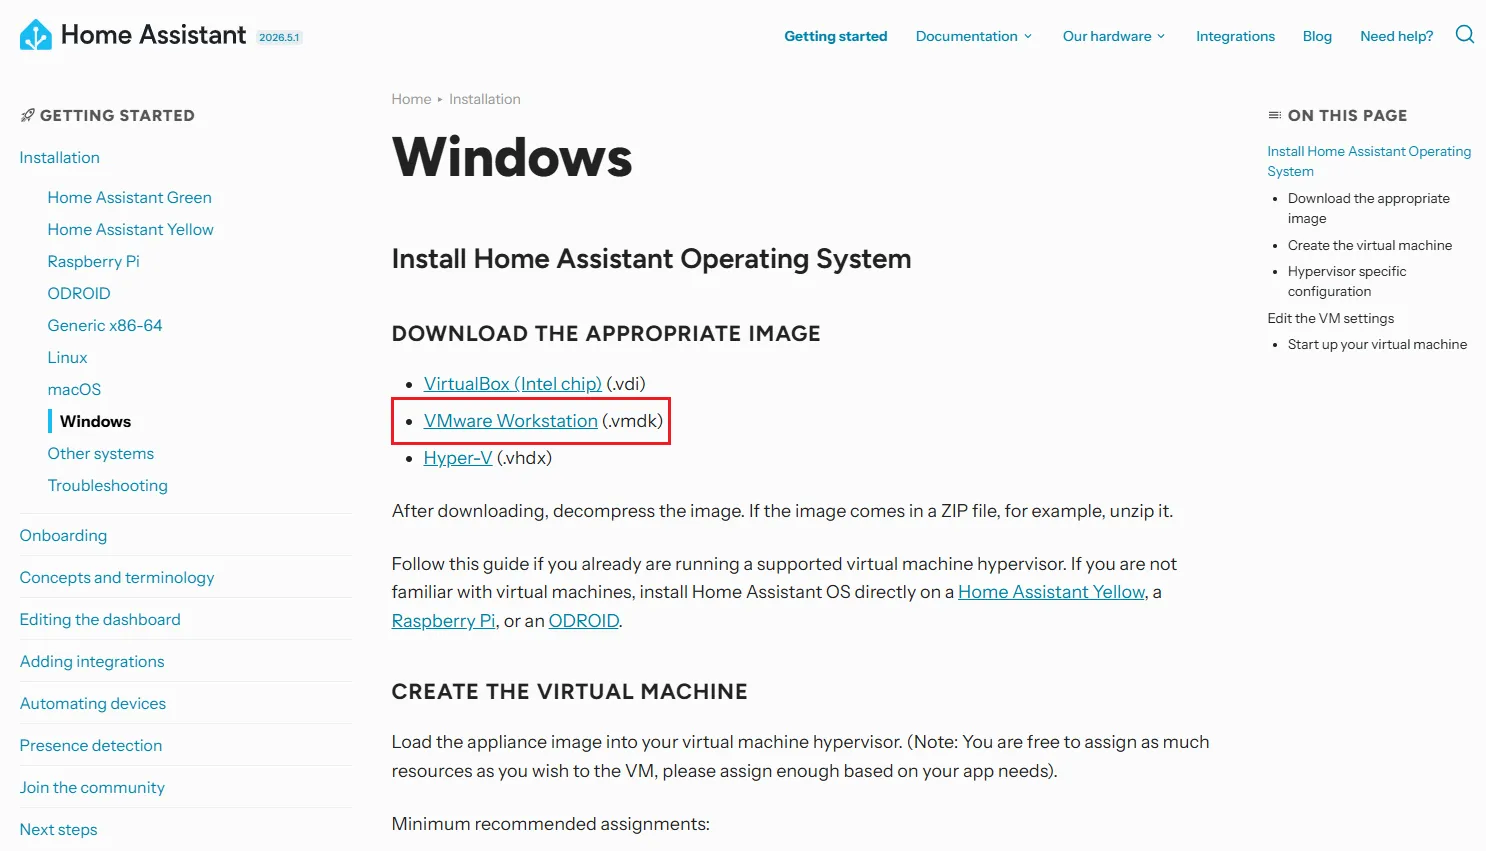
2. Download the Home Assistant OS Image
Open the Home Assistant Windows Installation Page, find the DOWNLOAD THE APPROPRIATE IMAGE section, locate VMware Workstation (.vmdk), and click to download.
The download is a compressed archive (typically .zip) — extract it to get the .vmdk file.
3. Create the Home Assistant Virtual Machine
The specific names and locations of settings may vary depending on the VMware version. This tutorial is based on VMware Workstation Pro 17.
-
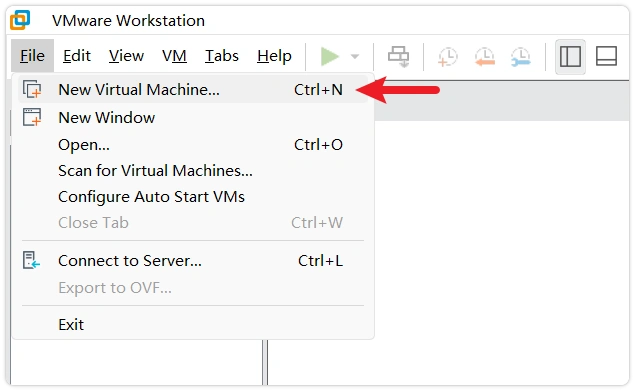
Launch VMware Workstation and select File → New Virtual Machine.
-
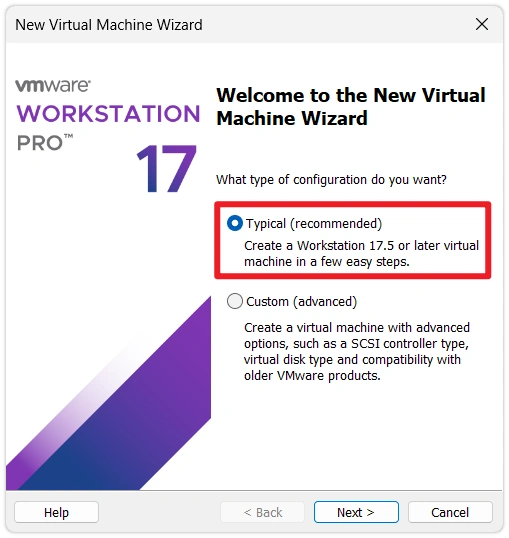
Select "Typical (recommended)" and proceed to the next step.
-
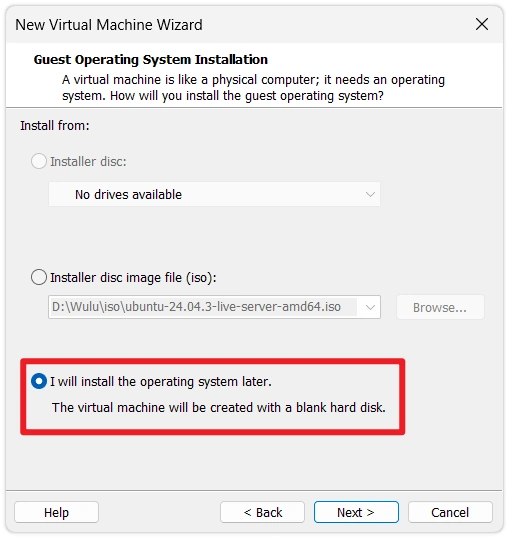
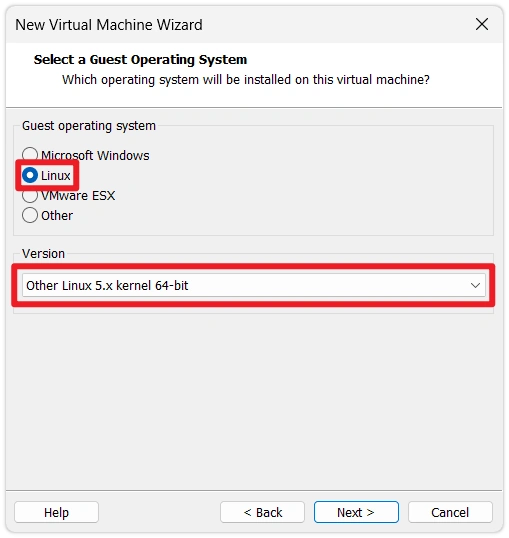
Select "I will install the operating system later", then set the OS type to Linux → version Other Linux 5.x kernel 64-bit.
-
Set a name for the virtual machine and specify an easy-to-find storage path, such as
D:\VMs\Home_Assistant. You will need to return to this directory later when replacing the disk image.noteIt is recommended that the name does not contain spaces or special characters to avoid filename mismatch issues when replacing the vmdk later. This tutorial uses
Home_Assistantas the example.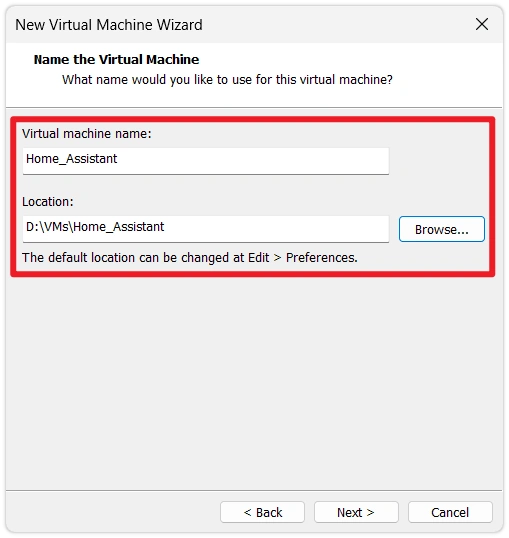
-
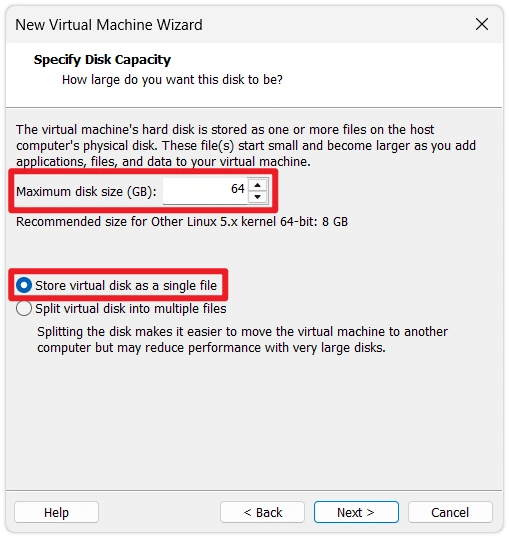
Set the virtual disk size to 32 GB or more, and select "Store virtual disk as a single file."
noteThe blank virtual disk created here will later be replaced with the HAOS image, so the disk size setting here won't apply directly. However, keeping it at 32 GB ensures VMware reserves enough space at the VM configuration level.
4. Customize Hardware Configuration
-
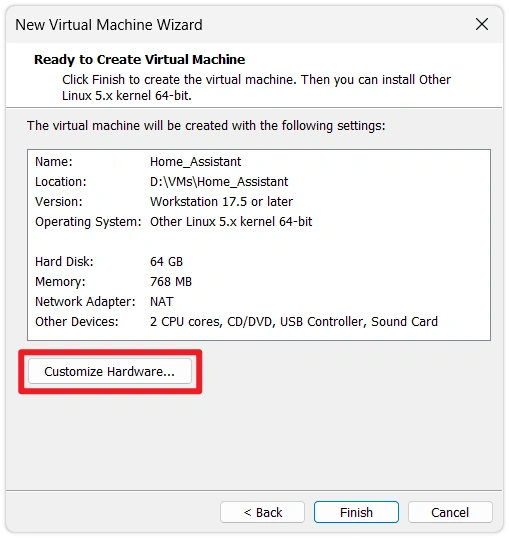
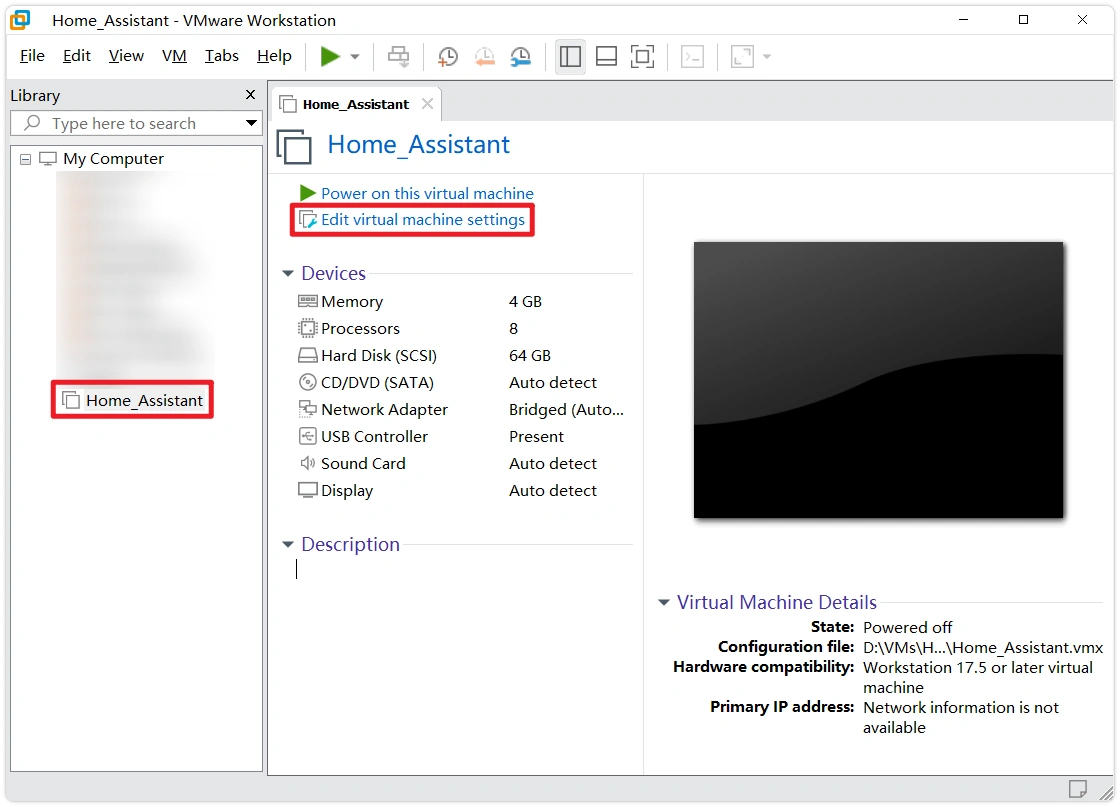
After the VM is created, click Customize Hardware.
-
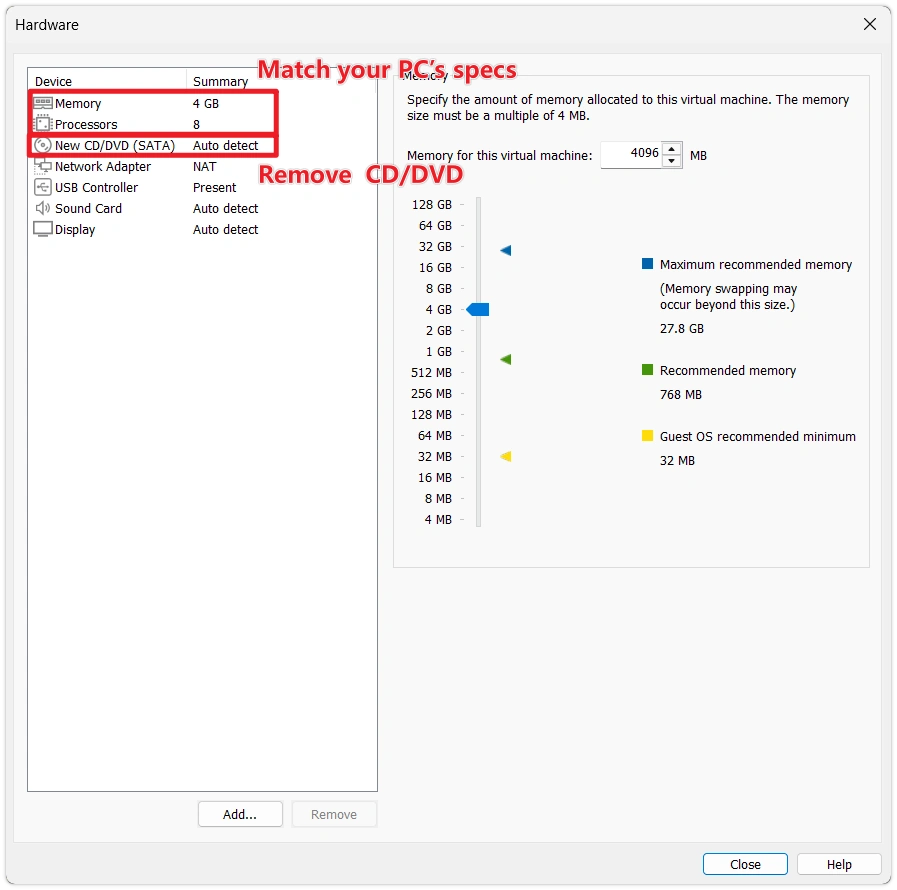
Adjust hardware resources:
- Memory: At least 2 GB, 4 GB recommended. The more HA apps you install, the more memory is needed.
- Processors: At least 2 cores. You can increase the core count to speed up firmware compilation.
- Remove the "New CD/DVD" entry (the HAOS image approach does not require optical drive booting).
-
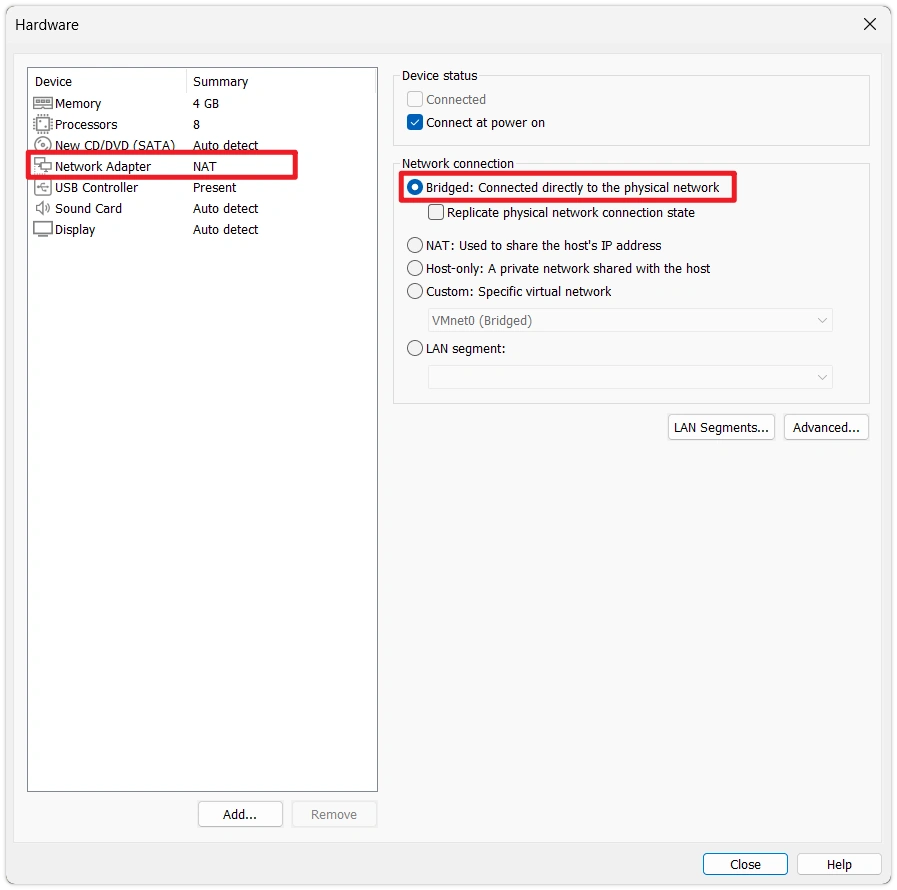
Set the network adapter to Bridged mode.
Bridged Mode vs. NAT ModeBoth modes allow the VM to access the internet, but they differ in the VM's network position:
- Bridged mode: The VM connects directly to the physical LAN, sharing the same subnet as the host and ESP32. You can access HA via
homeassistant.local, and mDNS auto-discovery for ESP32 devices works out of the box. - NAT mode: The VM sits in a VMware-created subnet. You need to access HA via the VM's IP address (
homeassistant.localcannot be resolved from the host network).
This tutorial uses Bridged mode, which directly corresponds to the operations in subsequent sections. If you are already using NAT mode, adjust the access method accordingly.
In the network adapter options:
- Select "Bridged: Connected directly to the physical network"
- Uncheck "Replicate physical network connection state"
- Bridged mode: The VM connects directly to the physical LAN, sharing the same subnet as the host and ESP32. You can access HA via
5. Replace with the Home Assistant OS Disk Image
VMware automatically generates a blank virtual disk file (.vmdk) when creating a VM. HAOS is a complete system image that already includes the bootloader and filesystem, so we need to delete the blank disk file and replace it with the HAOS image downloaded in step 2, then enable EFI booting.
-
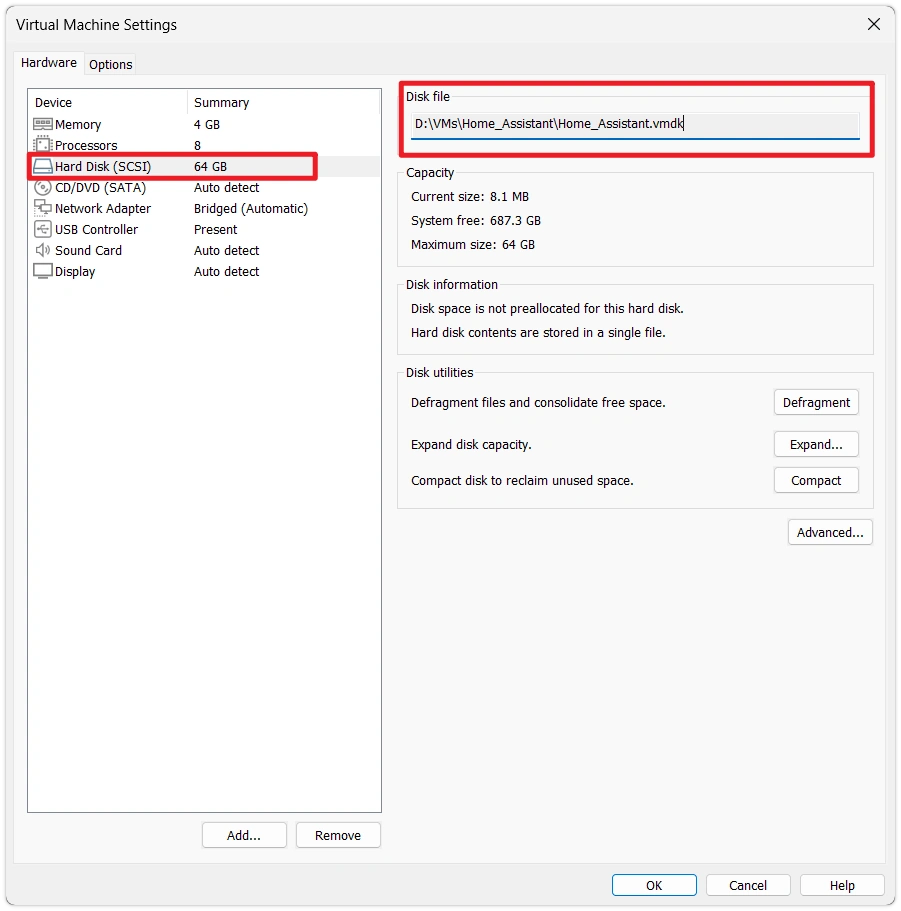
After clicking Finish in the New Virtual Machine Wizard, you will see the VM summary page. Click Edit virtual machine settings, select Hard Disk, and note the full path shown under Disk file (example:
D:\VMs\Home_Assistant\Home_Assistant.vmdk).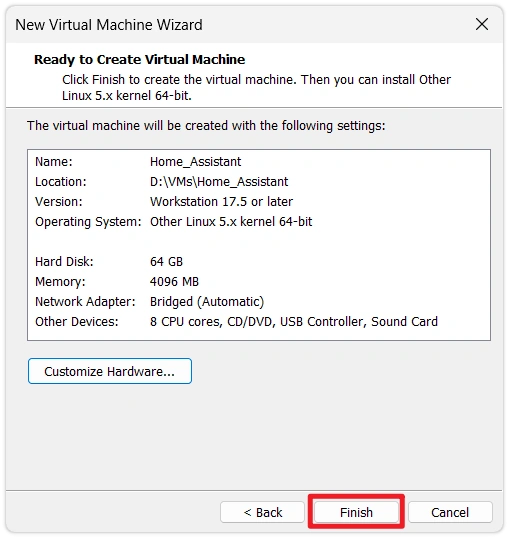
-
Close VMware (or at least close the VM settings window), open File Explorer to navigate to the directory from the previous step, and delete the
Home_Assistant.vmdkfile (the blank disk auto-generated by VMware).noteThe filename matches the name specified when creating the VM. In this tutorial, it is
Home_Assistant.vmdk— use the actual filename in that directory.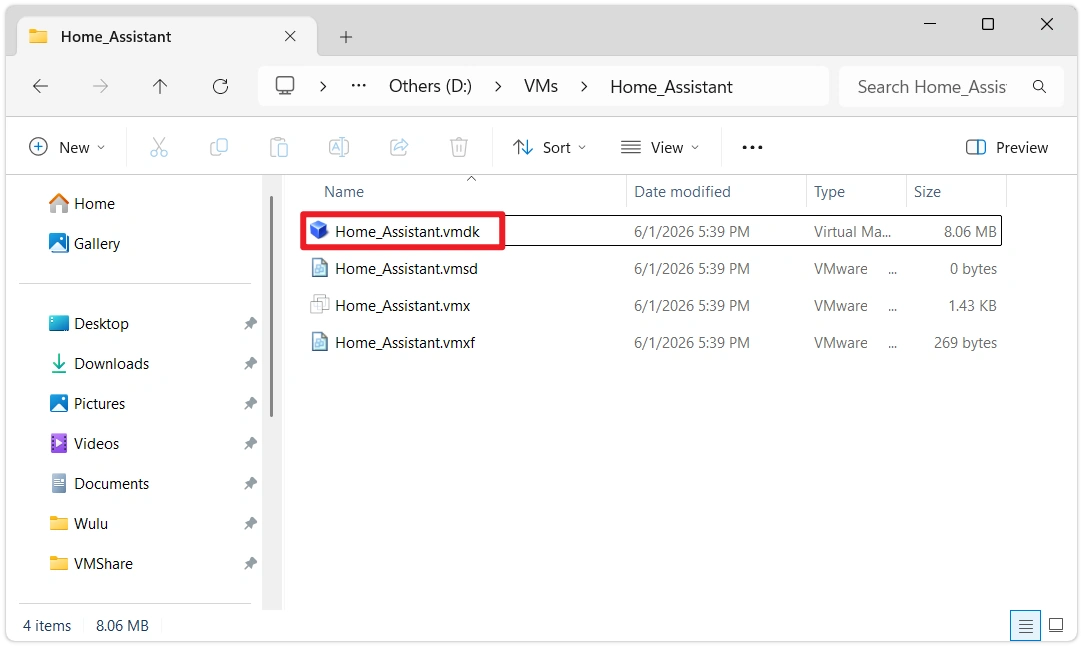
-
Copy the
haos_ova_X.Y.vmdkfile downloaded in step 2 to this directory.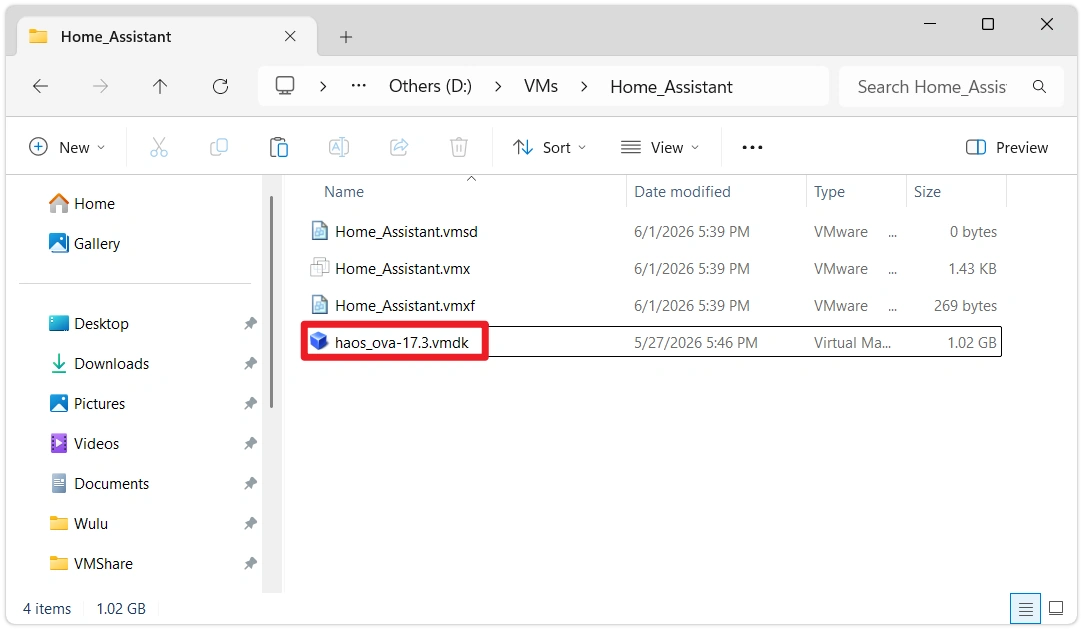
-
Rename the copied
haos_ova_X.Y.vmdkto exactly the same name as the file deleted in the previous step — in this tutorial, that isHome_Assistant.vmdk.warningThe filename must exactly match the name referenced in the
.vmxconfiguration (including hyphens / underscores / letter case), otherwise the VM will report that it cannot find the disk file on startup.
-
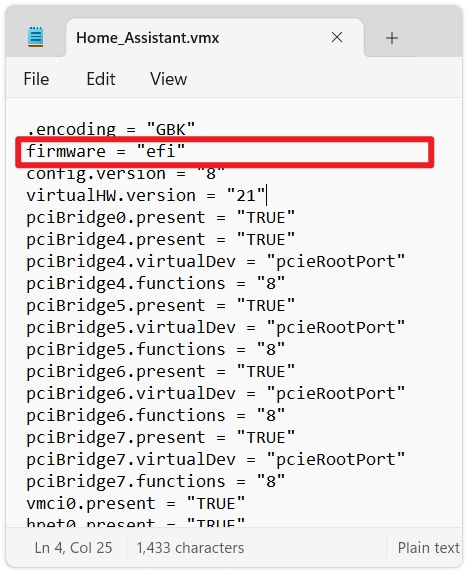
In the same directory, find the
Home_Assistant.vmxfile, right-click and open it with Notepad. Append the following line at the end of the file:firmware = "efi"Why Add EFIThe HAOS image is built for EFI booting, but VMware defaults to BIOS booting. Without switching to EFI, the VM will show a black screen or
Operating System not foundon startup with no further error messages.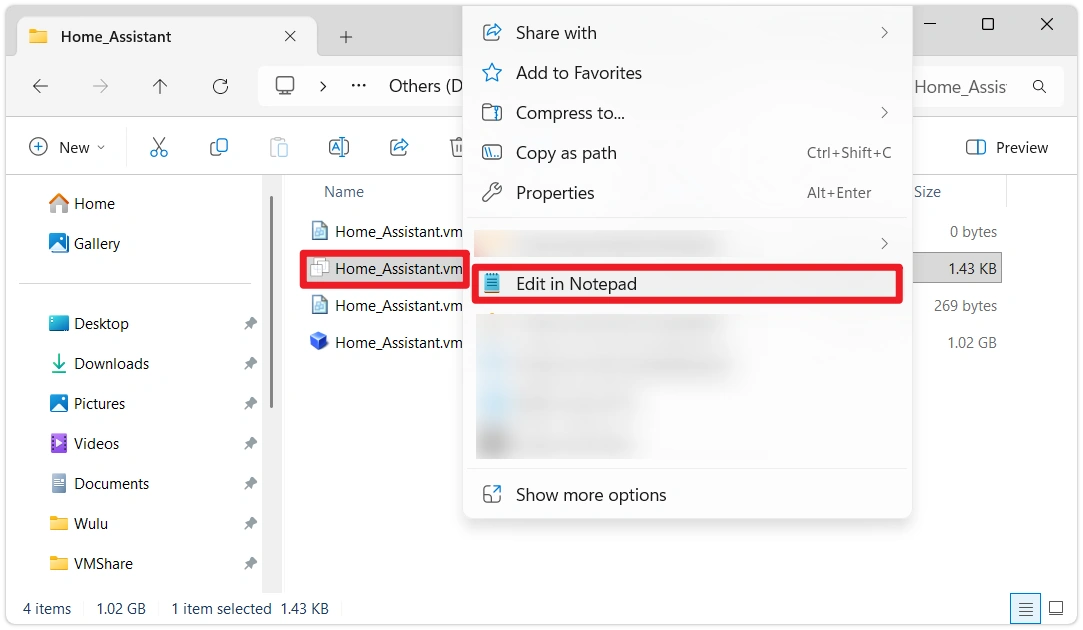
6. Start the Virtual Machine
-
After completing the above settings, start the virtual machine. If a "side-channel mitigations" prompt appears, click OK.

-
Observe the HAOS boot process. Normally, the screen will display a series of boot logs and eventually stop at the
homeassistant login:prompt — no login is needed.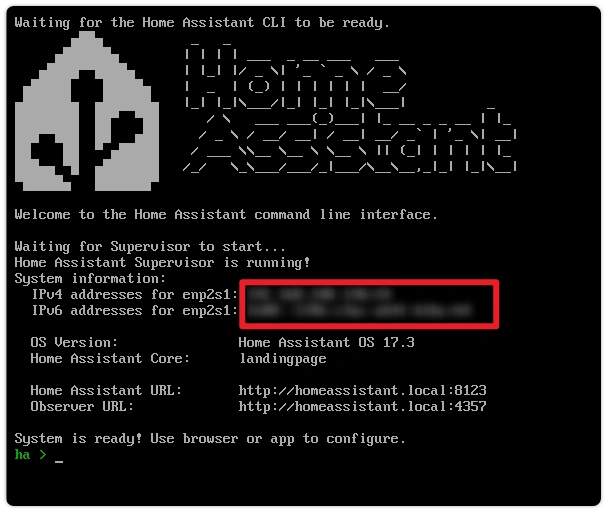
-
On a computer on the same network as the VM, open a browser and navigate to:
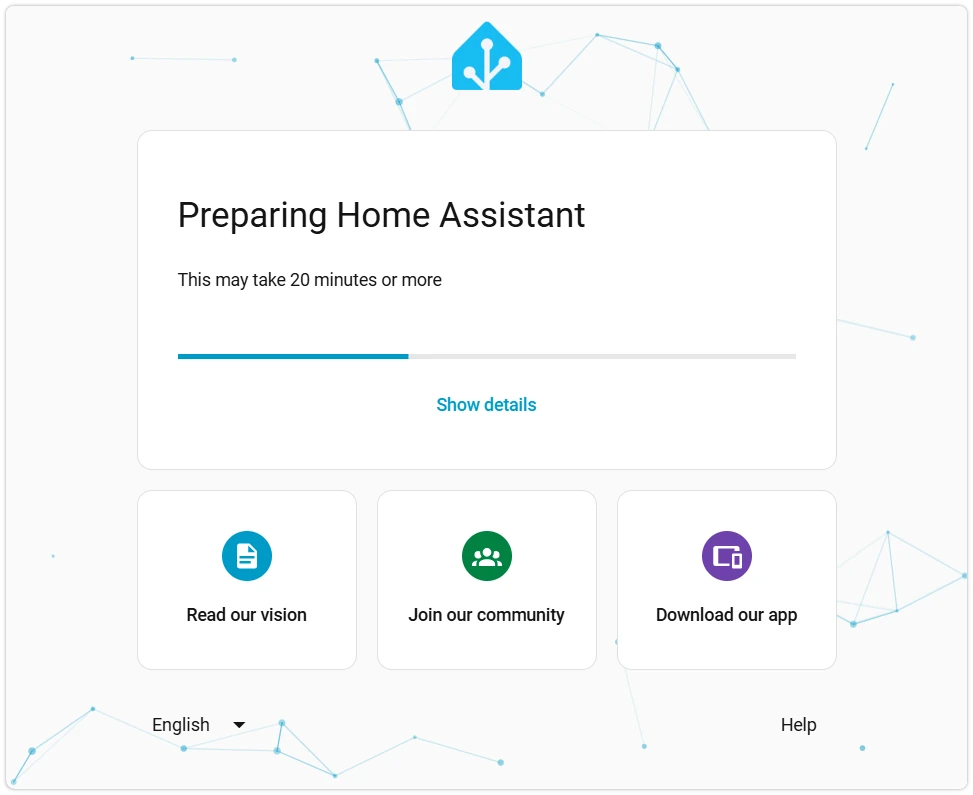
http://homeassistant.local:8123First Access Requires WaitingOn first boot, HAOS downloads the Supervisor and HA core images from the GitHub Container Registry (
ghcr.io), approximately 700 MB in size. This may take 5–15 minutes or longer depending on network conditions. The browser page will show "Preparing Home Assistant." This is expected — just wait and do not restart the VM.Click the "See details" button to view the download progress.
 If homeassistant.local Fails to Resolve
If the browser shows "This site can't be reached," mDNS may not be working in your current Windows or router environment. You can access HA via IP address instead. Two ways to find the IP:
- In the VMware VM window's HAOS boot screen, the IPv4 addresses line directly shows the VM's IP (e.g.,
192.168.x.x/24— take the part before the slash). - In the VM window, press Enter to open the console, type
ha network info, and check theipv4 → addressfield.
Navigate to
http://<that IP>:8123in your browser. - In the VMware VM window's HAOS boot screen, the IPv4 addresses line directly shows the VM's IP (e.g.,
-
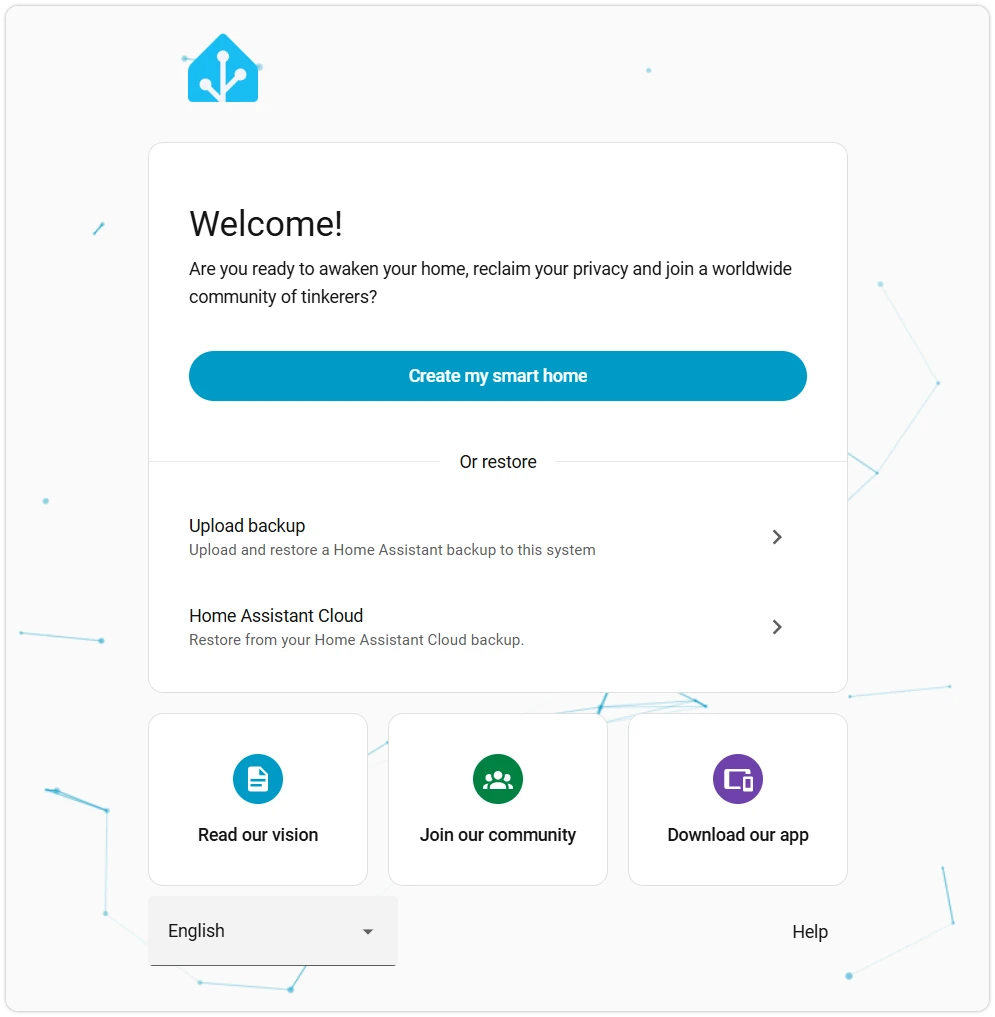
Wait for initialization to complete. The browser will automatically redirect to the Home Assistant welcome page.
7. Common Issues in This Section
- VM boots to a black screen /
Operating System not found: EFI is not enabled. Go back to the last step of "Replace with the HAOS Disk Image" and check iffirmware = "efi"is written in the.vmxfile. - VM reports "cannot find disk file": Check if the vmdk filename matches the name referenced by
scsi0:0.fileNamein the.vmx(pay attention to hyphens, underscores, and letter case). - No IP on Bridged network: In the VMware main menu → Edit → Virtual Network Editor, confirm that VMnet0 is bridged to the correct physical NIC.
homeassistant.localcannot be resolved: See the fallback solution in 6 — Start the Virtual Machine.- "Preparing Home Assistant" stuck for over 30 minutes: The
ghcr.ioimage download may have failed. You can runha core logsin the HAOS console to check specific errors, or try switching your network.