Working with ESP-IDF
This chapter includes the following sections:
- ESP-IDF Getting Started
- Setting Up the ESP-IDF Development Environment
- ESP32-P4-NANO-WIFI6-DB Example
ESP-IDF Getting Started
New to ESP32 ESP-IDF development and looking to get started quickly? We have prepared a general Getting Started Tutorial for you.
- Section 1: Environment Setup
- Section 2: Running Examples
- Section 3: Creating a Project
- Section 4: Using Components
- Section 5: Debugging
- Section 6: FreeRTOS
- Section 7: Peripherals
- Section 8: Wi-Fi Programming
- Section 9: BLE Programming
Please Note: This tutorial uses the ESP32-S3-Zero as a teaching example, and all hardware code is based on its pinout. Before you start, it is recommended that you check the pinout of your development board to ensure the pin configuration is correct.
Setting Up the ESP-IDF Development Environment
The ESP-IDF BSP in the ESP32-P4-NANO-WIFI6-DB repository requires ESP-IDF >=5.5. For component and configuration requirements of specific examples, please refer to the README in the corresponding example directory.
The following guide uses Windows as an example, demonstrating development using VS Code + the ESP-IDF extension. macOS and Linux users should refer to the official documentation.
The screenshots in this section use ESP-IDF V5.5.2 as an example. When installing, please select the ESP-IDF version that matches your board's example.
Install the ESP-IDF Development Environment
-
Download the installation manager from the ESP-IDF Installation Manager page. This is Espressif's latest cross-platform installer. The following steps demonstrate how to use its offline installation feature.
Click the Offline Installer tab on the page, then select Windows as the operating system and the ESP-IDF version you need (the version shown in the screenshot is for reference only — choose the version that fits your actual needs).
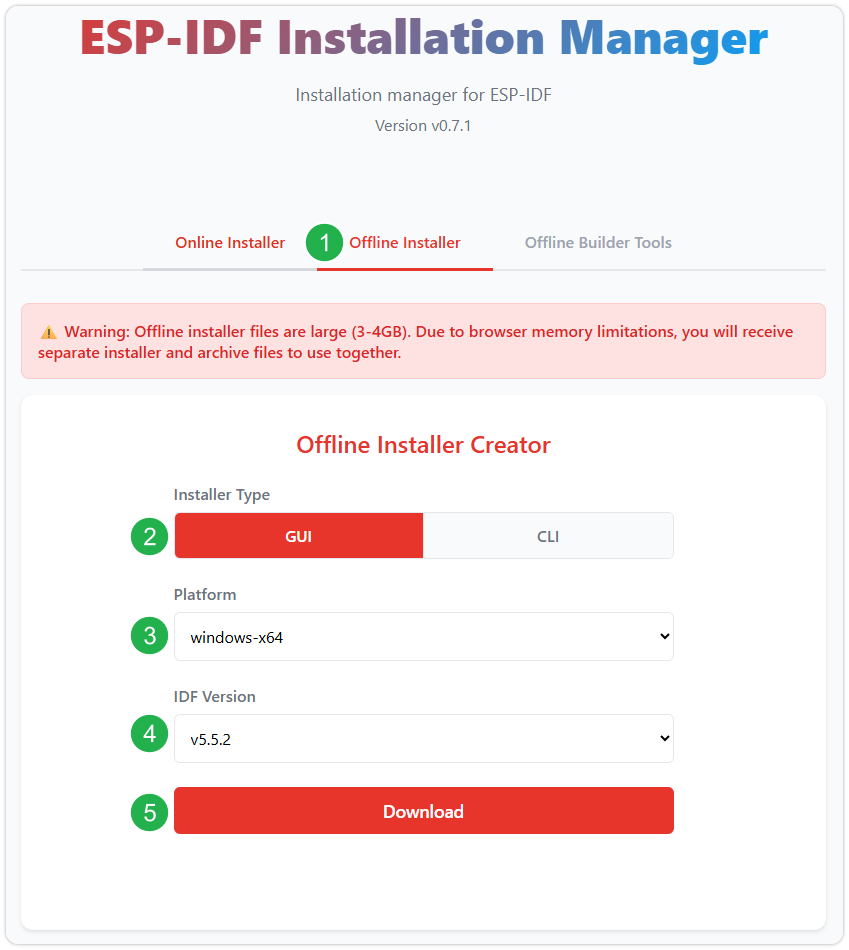
After confirming your selection, click the download button. The browser will automatically download two files: the ESP-IDF Offline Package (.zst) and the ESP-IDF Installer (.exe).
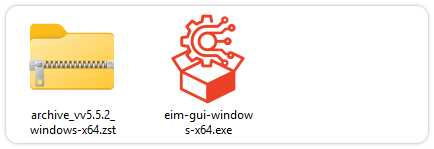
Please wait for both files to finish downloading.
-
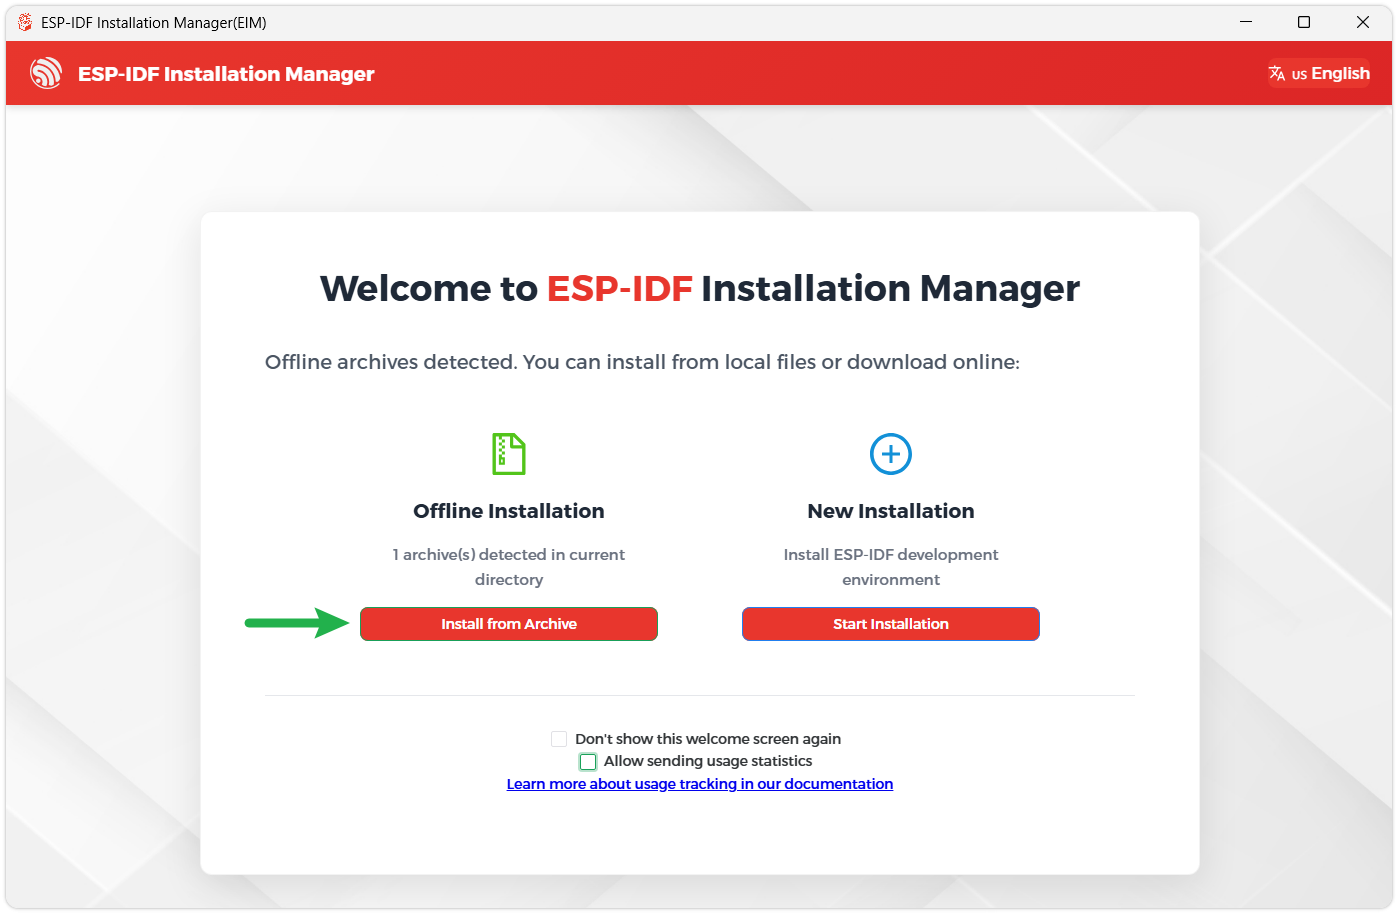
Once the download is complete, double-click to run the ESP-IDF Installer (eim-gui-windows-x64.exe).
The installer will automatically detect if the offline package exists in the same directory. Click Install from archive.
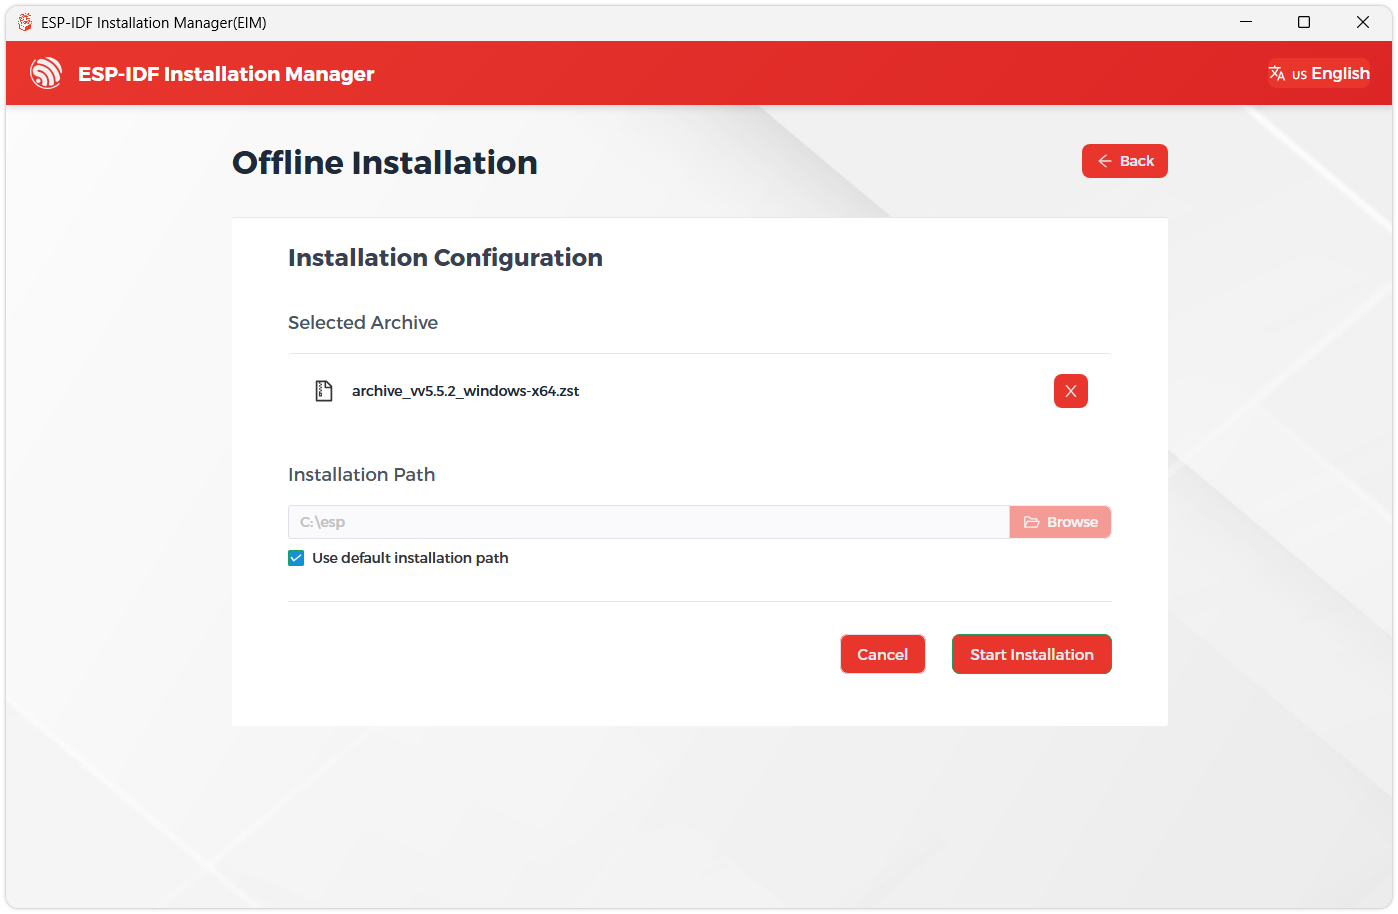
Next, select the installation path. We recommend using the default path. If you need to customize it, ensure the path does not contain Chinese characters or spaces. Click Start installation to proceed.
-
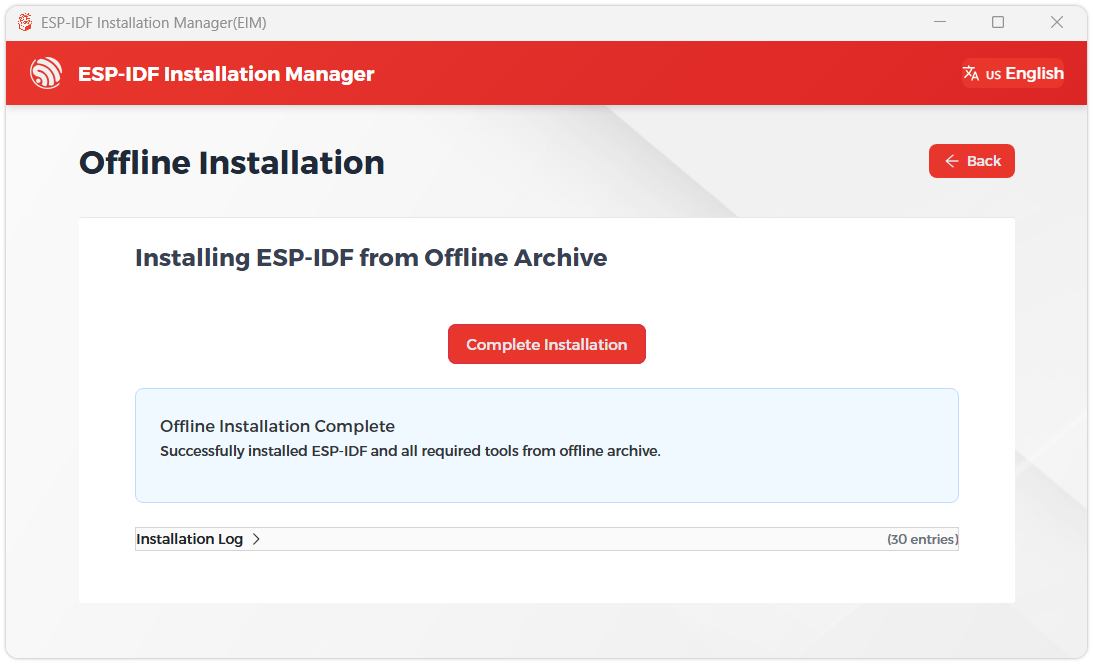
When you see the following screen, the ESP-IDF installation is successful.
-
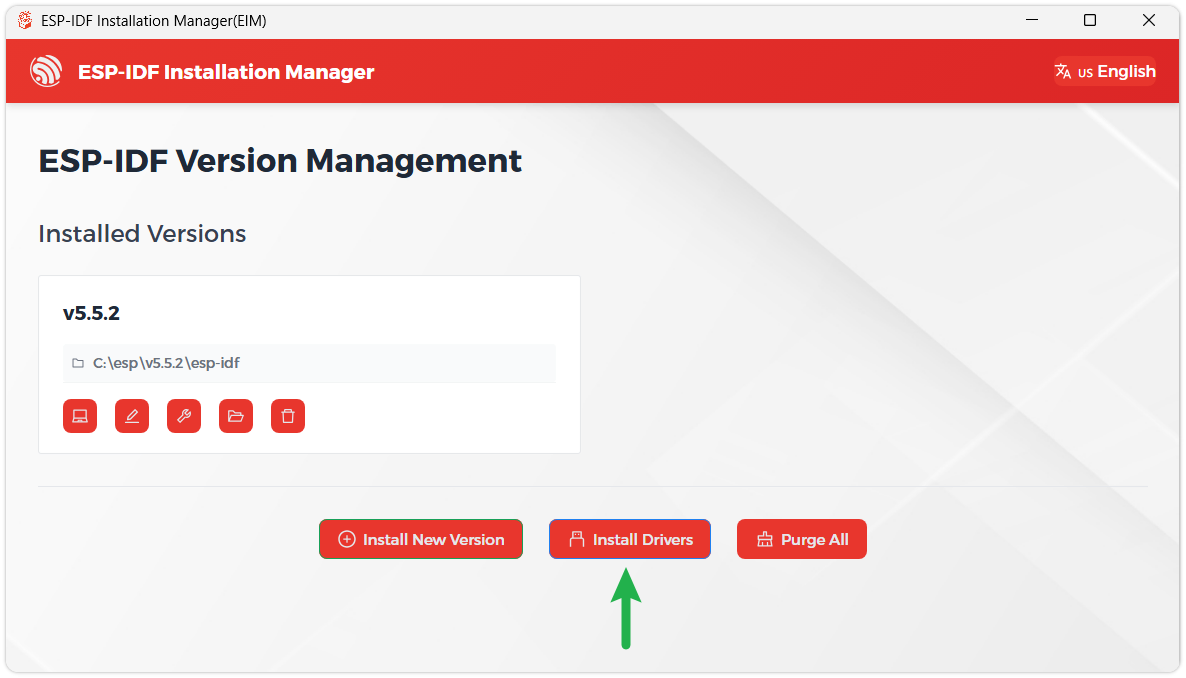
We recommend installing the drivers as well. Click Finish installation, then select Install driver.
Install Visual Studio Code and the ESP-IDF Extension
-
Download and install Visual Studio Code.
-
During installation, it is recommended to check Add "Open with Code" action to Windows Explorer file context menu to facilitate opening project folders quickly.
-
In VS Code, click the Extensions icon
 in the Activity Bar on the side (or use the shortcut Ctrl + Shift + X) to open the Extensions view.
 -
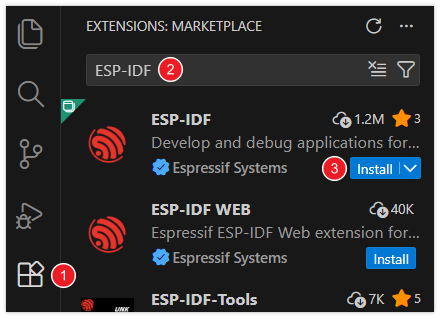
Enter ESP-IDF in the search box, locate the ESP-IDF extension, and click Install.
-
For ESP-IDF extension versions ≥ 2.0, the extension will automatically detect and recognize the ESP-IDF environment installed in the previous steps, requiring no manual configuration.
ESP32-P4-NANO-WIFI6-DB Example
The ESP-IDF BSP and example programs for the ESP32-P4-NANO-WIFI6-DB are maintained in the ESP32-P4-NANO-WIFI6-DB Example. You can obtain the board-level code and example programs from this repository.
The relevant directories in the repository are:
firmware/esp32_p4_nano_wifi6_db/: Board firmware configuration.examples/esp_idf/: ESP-IDF example programs.
The ESP-IDF BSP for the ESP32-P4-NANO-WIFI6-DB requires ESP-IDF >=5.5. The target chip for example projects is esp32p4, and the default serial baud rate is 115200.
Quick Run
The following commands use the 00_board_check example as an example. Change the current directory in the terminal to the example directory and run:
cd examples/esp_idf/00_board_check
idf.py set-target esp32p4
idf.py build
idf.py flash monitor
Recommended Validation Order
It is recommended to run the examples in the following order: first confirm the board-level peripherals, then verify the display, networking, and other functions:
00_board_check: Board-level peripheral check.01_i2c_tools: I2C bus check.02_sdmmc: SDMMC check.06_Displaycolorbar: Display test.03_wifistation: Wi-Fi Station test.
ESP-IDF Example Index
| Example Directory | Example Content |
|---|---|
00_board_check | Board-level peripheral check |
01_i2c_tools | I2C tools |
02_sdmmc | SDMMC |
03_wifistation | Wi-Fi Station |
04_ethernetbasic | Ethernet basic functionality |
05_I2SCodec | I2S codec |
06_Displaycolorbar | Display color bars |
07_lvgl_demo_v9 | LVGL v9 |
08_eth2ap | Ethernet to Wi-Fi AP |
09_simple_video_server | Simple video server |
10_video_lcd_display | Video LCD display |
11_usb_extend_screen | USB extended screen |
12_nvs_counter | NVS counter |
Pre-run Checks
- The ESP32-P4 itself does not integrate Wi-Fi or Bluetooth. The board implements wireless functionality via the ESP32-C5 wireless co-processor and ESP-Hosted/SDIO.
- The I2C bus uses GPIO7 (SDA) and GPIO8 (SCL), connecting to the ES8311, GT911, LCD backlight controller, and camera SCCB bus.
- The ES8311 I2S signals use GPIO13, GPIO12, GPIO10, GPIO9, and GPIO11.
- Amplifier enable uses GPIO53, and TF card power control uses GPIO45.
- ESP-Hosted/SDIO uses GPIO18, GPIO19, GPIO14, GPIO15, GPIO16, GPIO17, and GPIO54.
- For component versions, configuration requirements, and hardware connection details of specific examples, please refer to the README in the corresponding example directory and the board hardware documentation.