FAQ
Q: Which screens are supported by the development board?
A: Please first check the component documentation to confirm compatible screen types: esp32_p4_platform
If you have requirements for adapting other screens or wish to inquire about support for specific screens, you can submit an issue via Waveshare's official after-sales support or the following address:
We will follow up and respond to your requests promptly.
Q: How to check the ESP32-P4 chip version?
A: You can use Espressif's official Flash Download Tool to read the ESP32-P4 chip version. On a Windows PC, connect the ESP32-P4 download interface following the product hardware wiring to put the ESP32-P4 into download mode, and close the serial monitor occupying the corresponding port.
- Download and extract Espressif Flash Download Tool.
- Run the extracted
.exefile. Select "ESP32-P4" for "ChipType". Choose the remaining options according to your actual download interface, then click "OK".
- Switch to the "chipInfoDump" tab. In the "Device" section, select the port number corresponding to the ESP32-P4 under "port", and set "baudrate" to
115200.COM9shown in the figure is only an example; use the port recognized by your PC. - Click "Chip Info". Check the log below for
Chip is ESP32-P4 (revision vX.X). The value afterrevisionis the chip version. The figure showsv3.2as the read result; your actual version depends on the device reading.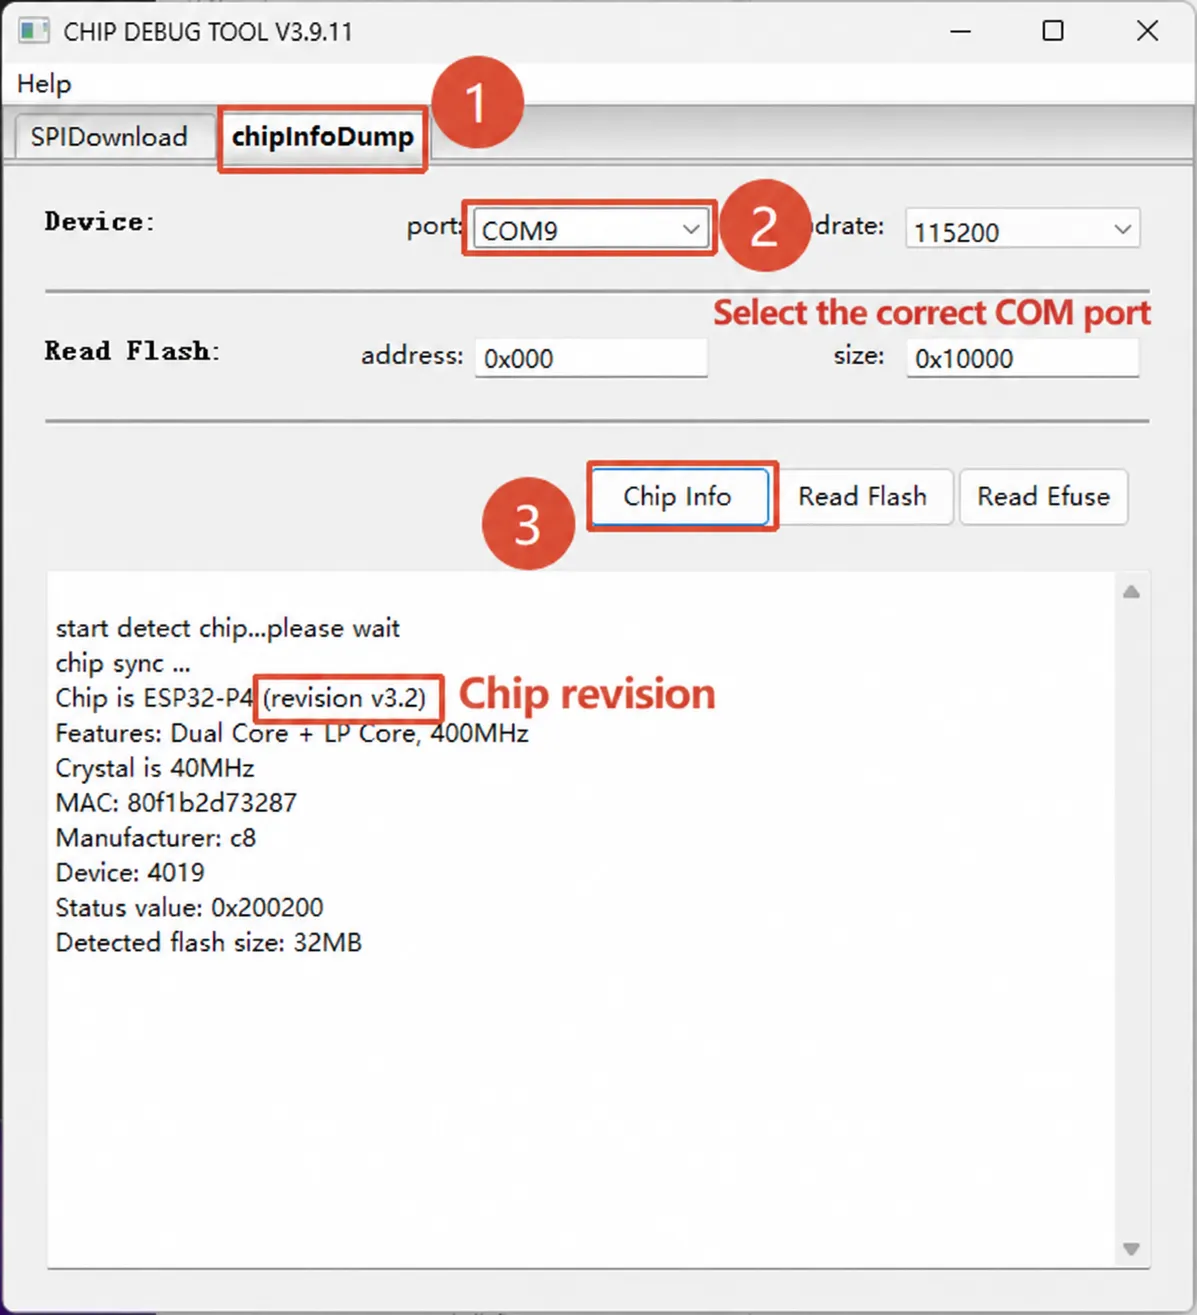
For tool operation instructions, see Espressif Flash Download Tool User Guide.
The ESP32-P4 Platform examples provide build configurations for chips rev v3.0 and later, rev v3.1 and later, and engineering samples of rev v0.x / v1.x. Confirm that the firmware configuration matches your actual chip version before flashing.
Q: I get a chip revision mismatch error when flashing. How do I fix it?
A: This message means the firmware's ESP32-P4 chip revision configuration doesn't match the chip on your board. Do not use --force to skip the check — rebuild with the correct chip revision instead.
The ESP32-P4 Platform repository provides shared configuration files:
- rev v3.1 or later:
config/esp32p4_rev_v3_1.defaults - rev v3.0 or later:
config/esp32p4_rev_v3_0.defaults - rev v0.x / v1.x engineering sample:
config/esp32p4_rev_pre_v3.defaults
Specify the matching config in the example directory via SDKCONFIG_DEFAULTS. See the detailed instructions under ESP-IDF examples.
Q: What is the maximum camera pixel resolution supported by the ESP32-P4?
A: The ESP32-P4's built-in ISP can process images up to 1920 × 1080 (approximately 2 megapixels), and its H.264 hardware encoding performance can reach 1080p@30fps. When using a higher-resolution camera, the output resolution still needs to be reduced under this processing and encoding mode, and it cannot utilize the camera's full pixel capability. Additionally, the interface and driver compatibility must be confirmed.
Q: How to flash firmware onto the ESP32-C6?
The ESP32-C6 ships with factory firmware. Please verify the firmware source, version, and recovery method first.
A: When powering on, pull C6_IO9 pin low (to put the C6 into download mode) , and also put the P4 into download mode. Then you can flash firmware to the C6 via the C6_U0RXD and C6_U0TXD pins.

Q: Are there example codes for other application scenarios?
A:
- During functionality testing, we have validated several features. Currently, there are developments such as using a Cat-4 module to provide network connectivity for the P4, or using the P4's MIPI-DSI to extend a host screen. However, for stability reasons, related example programs are not yet provided. They will be added to the wiki once the features and solutions are more mature.
- If you have great ideas or partially validated application scenarios, feel free to share them with us for evaluating feasible solutions.
Q: Can I develop using PlatformIO or MicroPython?
A:
- For stability, support for ESP32-P4 in PlatformIO requires the PlatformIO community to support the Arduino-esp32 SDK version 3.1x.
- During development, we have experimented with using MPY firmware for the ESP32-P4, which can run simple commands. However, this is still in the validation phase. Actual interfaces and peripheral applications are not yet fully adapted. Once adaptation is complete and stable, usage examples for ESP32-P4 in MicroPython will be released.
Q: Does the Type-C interface of the ESP32-P4-NANO support JTAG debugging
A:
No. The Type-C interface of this product is connected to UART0 of the ESP32-P4 via a CH343 USB-to-UART bridge chip. It only supports power supply, firmware flashing, and serial log printing; it does not provide JTAG functionality.
To perform JTAG debugging (breakpoints, single-stepping, etc.), you can directly connect to the USB pins of the ESP32-P4 and use its built-in USB Serial/JTAG controller.
Q: How do I configure wired networking when using XiaoZhi AI on ESP32-P4-NANO?
A:
To run the XiaoZhi firmware over a wired network on ESP32-P4-NANO, compile it from source. In idf.py menuconfig, open Xiaozhi Assistant and set the following options:
Network Type  ---> Ethernet
Board Type    ---> Waveshare ESP32-P4-NANO

After configuring these options, follow the XiaoZhi source build flow to build and flash the firmware.