ESP-IDF
This chapter contains the following sections. Please read as needed:
ESP-IDF Getting Started
New to ESP32 ESP-IDF development and looking to get started quickly? We have prepared a general Getting Started Tutorial for you.
- Section 1: Environment Setup
- Section 2: Running Examples
- Section 3: Creating a Project
- Section 4: Using Components
- Section 5: Debugging
- Section 6: FreeRTOS
- Section 7: Peripherals
- Section 8: Wi-Fi Programming
- Section 9: BLE Programming
Please Note: This tutorial uses the ESP32-S3-Zero as a teaching example, and all hardware code is based on its pinout. Before you start, it is recommended that you check the pinout of your development board to ensure the pin configuration is correct.
Setting Up the Development Environment
For the ESP32-S3-AUDIO-Board development board, ESP-IDF version V5.5.1 or above is required.
The following guide uses Windows as an example, demonstrating development using VS Code + the ESP-IDF extension. macOS and Linux users should refer to the official documentation.
The screenshots in this section use ESP-IDF V5.5.2 as an example. When installing, please select the ESP-IDF version that matches your board's example.
Install the ESP-IDF Development Environment
-
Download the installation manager from the ESP-IDF Installation Manager page. This is Espressif's latest cross-platform installer. The following steps demonstrate how to use its offline installation feature.
Click the Offline Installer tab on the page, then select Windows as the operating system and the ESP-IDF version you need (the version shown in the screenshot is for reference only — choose the version that fits your actual needs).

After confirming your selection, click the download button. The browser will automatically download two files: the ESP-IDF Offline Package (.zst) and the ESP-IDF Installer (.exe).

Please wait for both files to finish downloading.
-
Once the download is complete, double-click to run the ESP-IDF Installer (eim-gui-windows-x64.exe).
The installer will automatically detect if the offline package exists in the same directory. Click Install from archive.

Next, select the installation path. We recommend using the default path. If you need to customize it, ensure the path does not contain Chinese characters or spaces. Click Start installation to proceed.

-
When you see the following screen, the ESP-IDF installation is successful.

-
We recommend installing the drivers as well. Click Finish installation, then select Install driver.

Install Visual Studio Code and the ESP-IDF Extension
-
Download and install Visual Studio Code.
-
During installation, it is recommended to check Add "Open with Code" action to Windows Explorer file context menu to facilitate opening project folders quickly.
-
In VS Code, click the Extensions icon
 in the Activity Bar on the side (or use the shortcut Ctrl + Shift + X) to open the Extensions view.
 -
Enter ESP-IDF in the search box, locate the ESP-IDF extension, and click Install.

-
For ESP-IDF extension versions ≥ 2.0, the extension will automatically detect and recognize the ESP-IDF environment installed in the previous steps, requiring no manual configuration.
Example
The ESP-IDF examples are located in the ESP-IDF directory of the example package.
| Example | Basic Description |
|---|---|
| 01_factory | Factory program, runs voice wake-up and recognition, with button control for MP3 playback and lighting effects |
| 02_esp_sr | Runs the ESP-SR example, implementing voice wake-up and recognition |
| 03_mp3_play | Plays MP3 files from the TF card |
| 04_lvgl9_3_example | Runs the LVGL9.3 example |
01_factory
Example Description
- This example integrates voice wake-up and recognition, supports button control for MP3 playback, and includes RGB light effects.
- The program requires a TF card with MP3 files for button-controlled MP3 playback.
Hardware Connection
- Insert the TF card into the development board
- Connect the development board to the computer.
Code Analysis
esp_board_init: Initializes peripherals such as I2C, I2S, ES8311, and ES7210.- Configures I2C parameters, including setting the master device mode, specifying the SDA and SCL pins, enabling the pull-up resistor, and determining the clock frequency
- Configures I2S parameters and applies the configuration to actual hardware
- Initializes the ES8311 audio codec for playback
- Initialize ES7210
tca9555_driver_init:- Mounts the TCA555 to the I2C bus device
- Configures I/O port for input and output
esp_sdcard_init: Mounts the TF cardSpeech_Init: Initialize esp-sr to achieve voice wake-up and recognition:- Creates two tasks: one feeds I2S data to the ESP-SR model, the other parses the recognition results.
Speech_register_callback()registers a callback function for recognition results. Users can define the callback's handling logic as needed; the same recognition result can trigger multiple business actions without modifying the voice recognition module itself.
Audio_Play_Init: Initializes the MP3 player, supporting play, pause, resume, stop, and volume adjustment.RGB_Example: Initializes WS2812 and demonstrates effects.key_module_init: Initializes buttons, supporting short press and long press.key_register_callback()registers callback functions for buttons to handle user logic.
Search_mp3_Music: Finds MP3 files in the root directory of the TF card, stores filenames, and counts the number of MP3 files.
Operation Result
Wake word and recognition commands
- Wake word: Hi,Esp
- Command words:
- 灯光变成红色
- 灯光变成蓝色
- 灯光变成绿色
- 灯光变成白色
- This example does not light up the screen.
- The program enables voice recognition by default, with the wake word "hi esp" (recognition is strict; pronunciation must be standard and speaking speed slowed down).
- A MIC test audio is provided (note: if "hi esp" fails to wake, reposition the audio to the wake word playback point and replay it).
- The reason the test audio plays the wake word twice is that the current firmware version requires a focus step for the first wake-up (metaphorically), and the current firmware does not allow disabling this feature.
- The K2 button controls MP3 play/pause.
- The K1 short press increases volume, long press plays previous track.
- The K3 short press decreases volume, long press plays next track.
- The lights will cycle on when playing, and after recognizing the wake word "hi,esp", the lights will start to flash. If no other words are recognized within 6 seconds, it will time out and exit recognition

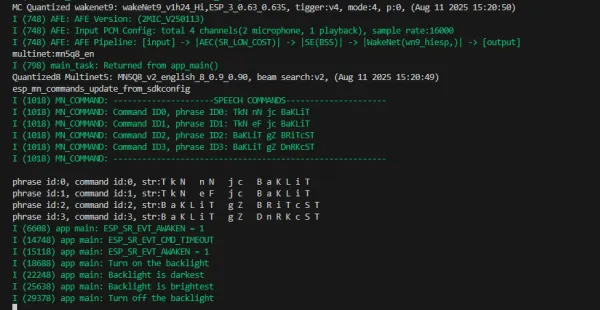
02_esp_sr
Example Description
- This example runs the ESP-SR example program, demonstrating voice wake-up and recognition.
Hardware Connection
- Connect the development board to the computer.
Operation Result
Wake word and recognition commands
- Wake word: Hi, Esp
- Command words:
- Turn on the backlight
- Turn off the backlight
- Backlight is brightest
- Backlight is darkest
- This example does not light up the screen.
- Open the serial monitor
- The program enables voice recognition by default, with the wake word "hi esp" (recognition is strict; pronunciation must be standard and speaking speed slowed down).
- A MIC test audio is provided (note: if "hi esp" fails to wake, reposition the audio to the wake word playback point and replay it).
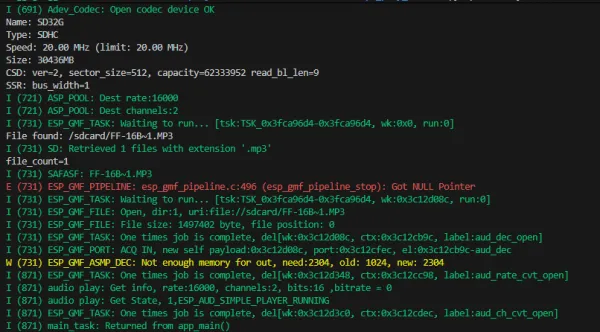
03_mp3_play
Example Description
- This example scans and plays MP3 files from the root directory of the TF card at startup
Hardware Connection
- Insert the TF card into the development board
- Connect the development board to the computer.
Operation Result
- This example does not light up the screen.
- It automatically scans for MP3 files in the TF card's root directory.
04_lvgl9_3_example
Example Description
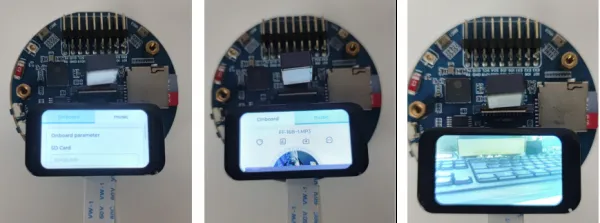
- This example demonstrates the functionality of the onboard devices. Screen 2 displays parameters such as TF Card and Flash Size, while Screen 1 is the music playback interface. Additionally, this example adds speech recognition functionality.
- The program runs fully only when the TF card (containing MP3 files), screen, and camera are connected.
Hardware Connection
- Insert the TF card into the development board.
- Connect the development board to the computer.
- Connect the 1.47inch LCD screen.
Code Analysis
lcd_driver_init(): Initializes the screen.touch_driver_init(): Initializes touch.lvgl_driver_init(): Initializes LVGL.Camera_Driver_Init(): Initializes camera configuration parameters.
Operation Result
LCD screen parameter descriptions (click to expand)
| Parameter | Function | Description |
|---|---|---|
| SD Card | Displays the TF card size | Connect a TF card. If recognition fails, please format the TF card to FAT32 (if initial recognition fails, wait a moment and then reset to check again) |
| Flash Size | Displays the Flash size | Onboard 16MB Flash |
| RTC Time | Displays the RTC time | Displays the current RTC time. If the RTC time is inconsistent with the current time, it is because the RTC does not retain data when powered off. To keep the RTC time accurate, connect an RTC battery and update the RTC time |
| Backlight brightness | Brightness slider | Adjusts screen brightness |
- Page 2 is the UI page for playing mp3 audio files located in the root directory of the TF card
- The program enables voice recognition by default, with the wake word "hi esp". After waking, the backlight dims, and you can speak a command (if the backlight does not dim, the device was not woken; recognition is strict, pronunciation must be standard, and speaking speed should be slowed down).
- Several MIC test audio formats are provided below (Note: if the "hi esp" wake-up fails, please reposition the audio to the point where the wake word is played and try again)
- The reason the test audio plays the wake word twice is that the current firmware version requires a focus step for the first wake-up (metaphorically), and the current firmware does not allow disabling this feature.