MicroPython
This chapter contains the following sections. Please read as needed:
MicroPython Getting Started Tutorials
New to ESP32 MicroPython development and want to get started quickly? We have prepared a general introductory tutorial ESP32 MicroPython Getting Started for you.
- Section 1 Set Up Development Environment
- Section 2 Basics
- Section 3 GPIO Digital Output/Input
- Section 4 ADC Analog Input
- Section 5 PWM Output
- Section 6 UART Communication
- Section 7 I2C Communication
- Section 8 SPI Communication
- Section 9 Wi-Fi Networking Basics
- Section 10 Web Server
- Section 11 Bluetooth
- Section 12 Comprehensive Projects
Setting Up Development Environment
1. Flash MicroPython Firmware and Configure Thonny
Please refer to the Set Up MicroPython Development Environment to flash the MicroPython firmware.
2. Other Tips
-
MicroPython Firmware Download Link: https://micropython.org/download/ESP32_GENERIC_S3/
-
If flashing the MicroPython firmware using the Espressif Flash Download Tool, the flashing address is
0x0.
Example
| Example | Basic Description |
|---|---|
| lcd_example | Uses the ESP32-S3-GEEK to turn on the LCD screen, display text information and BMP images |
| SD | Reads the TF card |
| Uart0 | Serial communication |
| WS_Bluetooth | Turns on Bluetooth on the ESP32-S3-GEEK and communicates with a mobile phone Bluetooth debug assistant |
| WIFI_AP | Opens Wi-Fi AP mode, allowing a PC to connect to its Wi-Fi |
| WIFI_STA | Opens Wi-Fi STA mode, allowing it to connect to a hotspot created by a PC or other Wi-Fi networks |
lcd_example
Example Description
- This example uses the ESP32-S3-GEEK to turn on the LCD screen, display text information, and display BMP images.
- Run
lcd_example.pywhen executing.
Hardware Connection
- Connect the development board to the computer
Code Analysis
lcd_example.pymainly defines a classLCD_1inch14for controlling an LCD display of a specific size. It includes functions for initializing the display hardware, sending commands and data to the display, operating the display buffer, and displaying images and text.- First, a
BMPReaderobjectimgis created and passed a BMP image file path./ESP32-S3-GEEK.bmp. This calls the constructor of theBMPReaderclass in the second code block, which in turn calls the_read_img_infomethod to read the image file information. - Then, through a loop, it calls the
img.get_buf(270, 270*x)method to read data of a specific length from the BMP image and inserts it into the LCD frame buffer (by calling theinsmethod of theLCD_1inch14class in the first code block). Theget_bufmethod's parametersdata_lenandstartcontrol the length and starting position of the data read, ensuring proper extraction from the BMP image and display on the LCD.
- First, a
bmp_reader.pydefines aBMPReaderclass for reading BMP image files. It can parse specific information from a BMP file and extract data at specific positions and lengths, converting it into a byte array in RGB565 format.
Operation Result
- LCD Screen Display

SD
Example Description
- This example reads the TF card slot of the ESP32-S3-GEEK. Opening the
sdfolder on the ESP32-S3-GEEK allows browsing the files on the TF card. The TF card must be inserted into the slot before use. Suitable for ESP32 interaction with a TF card, initializing the TF card and mounting the file system, testing stability and reliability.
Hardware Connection
- Insert the TF card into the board
- Connect the development board to the computer
Code Analysis
boot.py:- Connects to the TF card by setting the chip select (CS) pin and initializing the SPI bus.
- Creates an
sdcard.SDCardinstance and mounts it to the file system usinguos.mount(sd, '/sd'). Once mounted, file system operations such asos.listdir('/sd')can be used to view the contents of the TF card, traverse files and directories, read file contents, etc.
sd_card.py:- Defines the
SDCardclass, which provides methods for interacting with the TF card, including initializing the TF card, sending commands, reading and writing data blocks, etc. - This code does not directly display TF card contents but provides a low-level interface for upper-layer code. Through these interfaces, you can read files from the TF card and display their contents, for example, reading the content of a specific file and printing it.
- Defines the
- The two code blocks work together to implement access to and display of the TF card contents in a MicroPython environment. The first part is typically used by the user, calling the functionality implemented in the second part to perform specific tasks.
Operation Result
- ①②. Ensure both folders have been uploaded to the development board.
- ③. Click STOP; you will see the
sdfolder appear on the device. - ④. The
sdfolder contains the contents of the inserted TF card.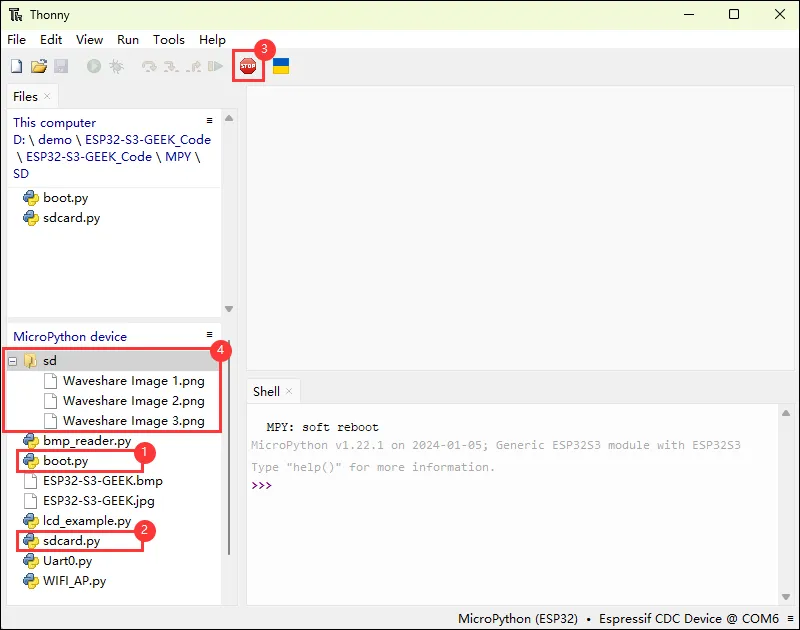
Uart0
- This example opens the UART0 serial port on the ESP32-S3-GEEK. By opening a serial debug assistant, serial communication can be performed. Suitable for MicroPython interaction with UART, initializing UART, sending and receiving data, testing stability and reliability.
Hardware Connection
- Connect the development board to the computer.
- You can connect a USB to UART Universal Serial Communication Module or other devices for serial communication.
Code Analysis
- Module import and UART initialization
import machine: Imports the MicroPythonmachinemodule for controlling hardware resources.- Creates a UART object
uart, specifying UART1, setting baud rate to 115200, and configuring the hardware connection by specifying transmit pin asmachine.Pin(43)and receive pin asmachine.Pin(44).
- Function definitions
send_datafunction: Accepts a data parameter and sends the data using the UART'swritemethod.receive_datafunction: Checks whether there is readable data on the UART; if so, reads the data and prints it.
Operation Result
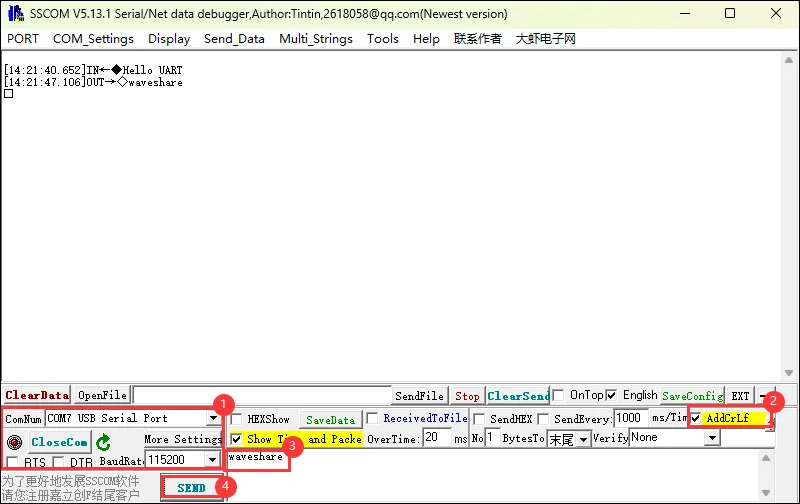
- After running, send the string "Hello UART".
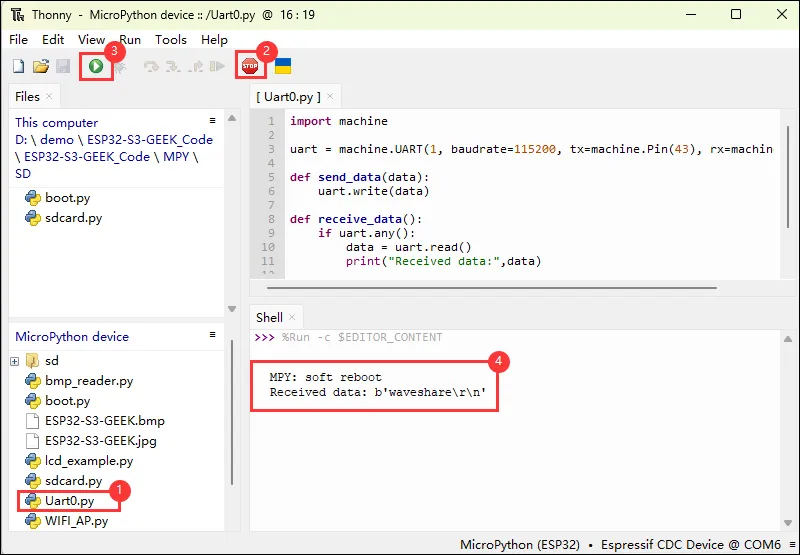
- Use a serial monitor to test communication.
WS_Bluetooth
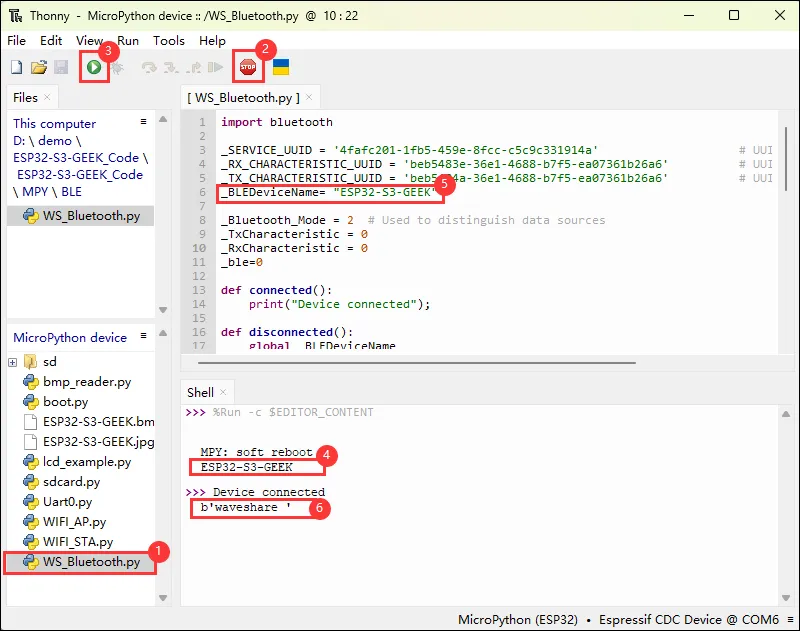
- This example turns on Bluetooth on the ESP32-S3-GEEK and communicates with a mobile phone Bluetooth debug assistant.
Hardware Connection
- Connect the development board to the computer.
Code Analysis
ble_irq: Bluetooth interrupt handler, which takes different actions based on the event.- If the event is a connection (event value 1), calls the
connectedfunction. - If the event is a disconnection (event value 2), calls the
disconnectedfunction. - If the event is receiving data (event value 3), reads the value of the receive characteristic and prints it.
- If the event is a connection (event value 1), calls the
advertiser:- Converts the device name to a byte array and builds the advertising data.
- Uses the
gap_advertisemethod of the Bluetooth instance to advertise.
Bluetooth_Init:- Initializes the Bluetooth device.
- Creates a Bluetooth instance, activates Bluetooth, sets the device name, registers the interrupt handler, registers services, and broadcasts device information.
Operation Result
- After the program runs, the board model is printed.
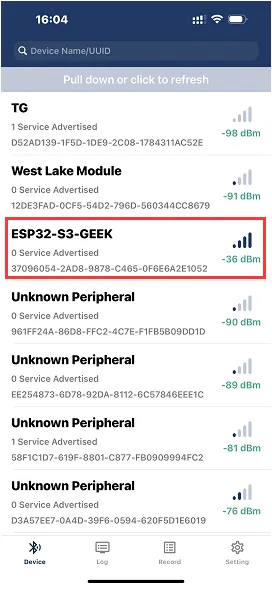
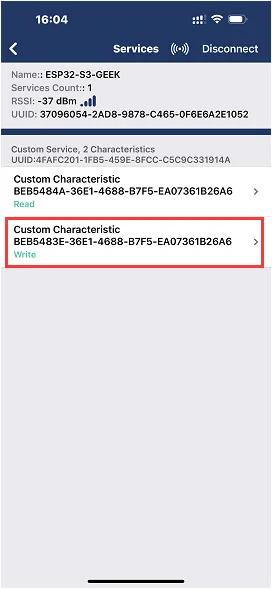
- Use a mobile phone Bluetooth debug assistant to communicate with it.

WIFI_AP
- This example puts the ESP32-S3-GEEK into Wi-Fi AP mode, allowing a PC to connect to its Wi-Fi. Suitable for creating a Wi-Fi access point on the ESP32-S3-GEEK under MicroPython, testing stability and reliability.
Hardware Connection
- Connect the development board to the computer.
Code Analysis
redian- Creates a Wi-Fi Access Point (AP) object
apusingnetwork.WLAN(network.AP_IF). - Activates the access point with
ap.active(True), making the device start working as a Wi-Fi hotspot. - Configures the access point parameters using
ap.config, including the network name (ESSID) as 'ESP32-S3-GEEK', authentication mode asnetwork.AUTH_WPA_WPA2_PSK(i.e., WPA/WPA2-PSK encryption), and password as 'Waveshare'. - Prints the IP address of the access point by retrieving it with
ap.ifconfig()[0].
- Creates a Wi-Fi Access Point (AP) object
Operation Result
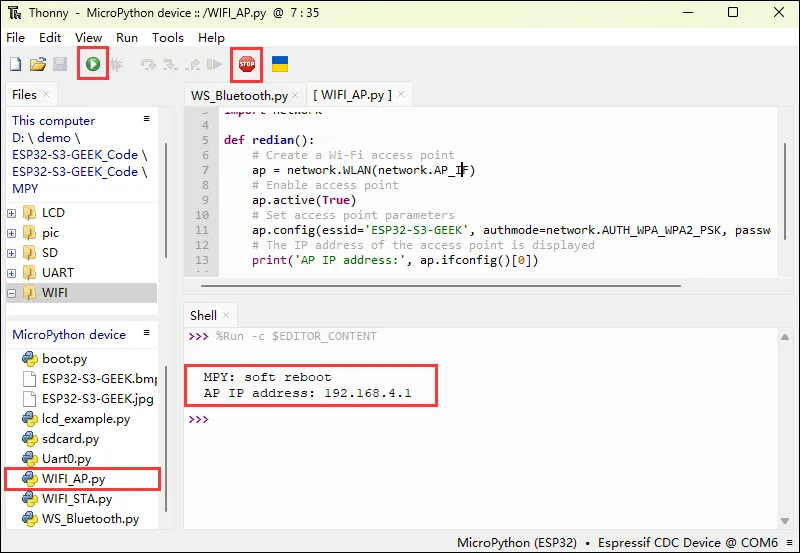
- After the code runs, the IP address of the access point is printed.
- You can connect to the Wi-Fi from a PC. Wi-Fi name: ESP32-S3-GEEK, password: Waveshare.
WIFI_STA
- This example puts the ESP32-S3-GEEK into Wi-Fi STA mode, allowing it to connect to a hotspot created by a PC or other Wi-Fi networks. Suitable for connecting an ESP32 to a specific Wi-Fi network under MicroPython, testing stability and reliability.
Hardware Connection
- Connect the development board to the computer.
Code Analysis
do_connect: Main program entry, initializes the display and shows three font names.- Creates a Wi-Fi station interface object
wlanusingnetwork.WLAN(network.STA_IF). - Activates the Wi-Fi interface with
wlan.active(True), enabling the device to connect to an external Wi-Fi network. - If the device is not currently connected to a network, prints "connecting to network..." and attempts to connect to the specified Wi-Fi network (network name 'ESP32-S3-GEEK', password 'Waveshare').
- Enters a loop to continuously check for a successful connection until
wlan.isconnected()returnsTrue. - Once connected, prints the current network configuration information, including IP address, subnet mask, gateway address, etc., obtained via
wlan.ifconfig().
- Creates a Wi-Fi station interface object
Operation Result
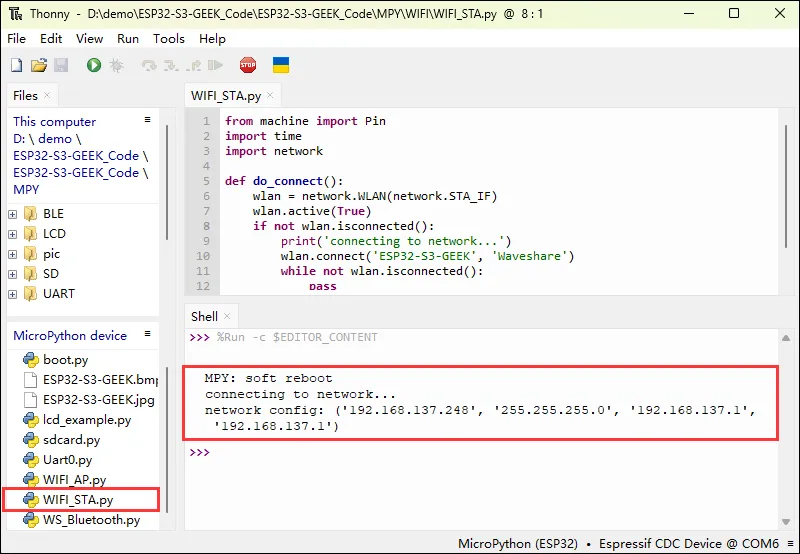
- Enable a PC hotspot with name
ESP32-S3-GEEKand passwordWaveshare. - The board prints network configuration information after successful Wi-Fi connection.