Meshtastic Tutorial
Meshtastic® is an open-source project that utilizes LoRa technology to achieve long-distance, low-power, off-grid mesh network communication. Leveraging its powerful ESP32-S3 dual-core processor and Semtech LR1121 RF chip, the ESP32-S3-LR1121 can perfectly run the Meshtastic firmware, providing you with a reliable outdoor communication solution.
1. Features
- Mesh Networking: Each node acts as both an endpoint and a repeater, automatically finding paths to extend communication range.
- Ultra-long Range: Utilizing LoRa modulation technology, it can achieve communication over several kilometers in line-of-sight conditions.
- Low Power Consumption: Designed for battery power, suitable for outdoor hiking, expeditions, rescue missions, etc.
- Multi-platform Support: Provides Android, iOS, Web, and desktop clients to interact with the device via serial, Bluetooth, or Wi-Fi.
- High Security: Supports AES-256 encryption to ensure the privacy of communication data.
- Off-grid Maps: When paired with a mobile app, it enables location sharing and off-grid map navigation.
2. Hardware Preparation
- ESP32-S3-LR1121*2: Development boards
- Antenna: Please ensure the antenna is connected before powering on; otherwise, the RF chip may be damaged.
- USB Type-C Data Cable*2: For firmware flashing.
3. Firmware Flashing
It is recommended to use the official Meshtastic Web Flasher for a simple and quick process.
We also provide pre-compiled firmware, which you can find in Waveshare's ESP32-S3-LR1121 Resource Package.
-
Enter Flashing Mode:
- Connect the development board to your computer using a USB data cable.
- Press and hold the onboard BOOT button.
- Press the RST button once.
- Release the BOOT button.
- The device should now enter download mode.
-
Using the Web Flasher:
- Access the Meshtastic Web Flasher using Chrome or Edge browser.
- Click Connect and select the corresponding serial port.
- In the firmware selection list, look for firmware versions that support ESP32-S3 and LR1121.
- Note: If the official list does not yet contain dedicated firmware for this model, please refer to the pre-compiled firmware in the resource package.
- Select the latest stable version and click Flash to start the process.
-
Wait for Completion:
- After flashing is complete, the device will automatically restart.
4. Device Management and Configuration
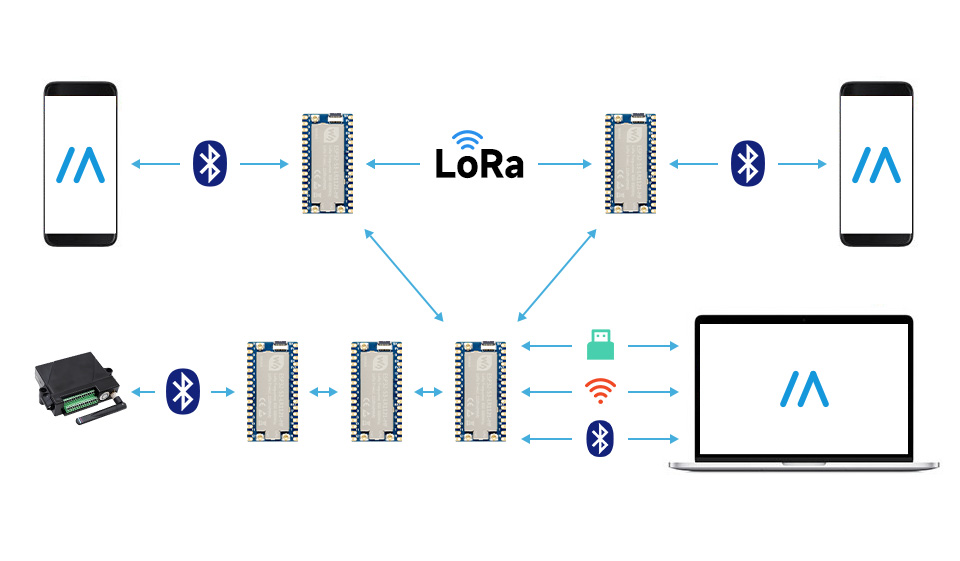
Meshtastic offers three primary management methods: Web Interface (suitable for in-depth configuration), App Interface (ideal for daily mobile use), and CLI (for advanced developers).
4.1 Web Interface Configuration (Bluetooth/USB/HTTP)
If you connect the device to your computer via USB, or if the device is connected via Bluetooth, you can use the Web configurator for intuitive management.
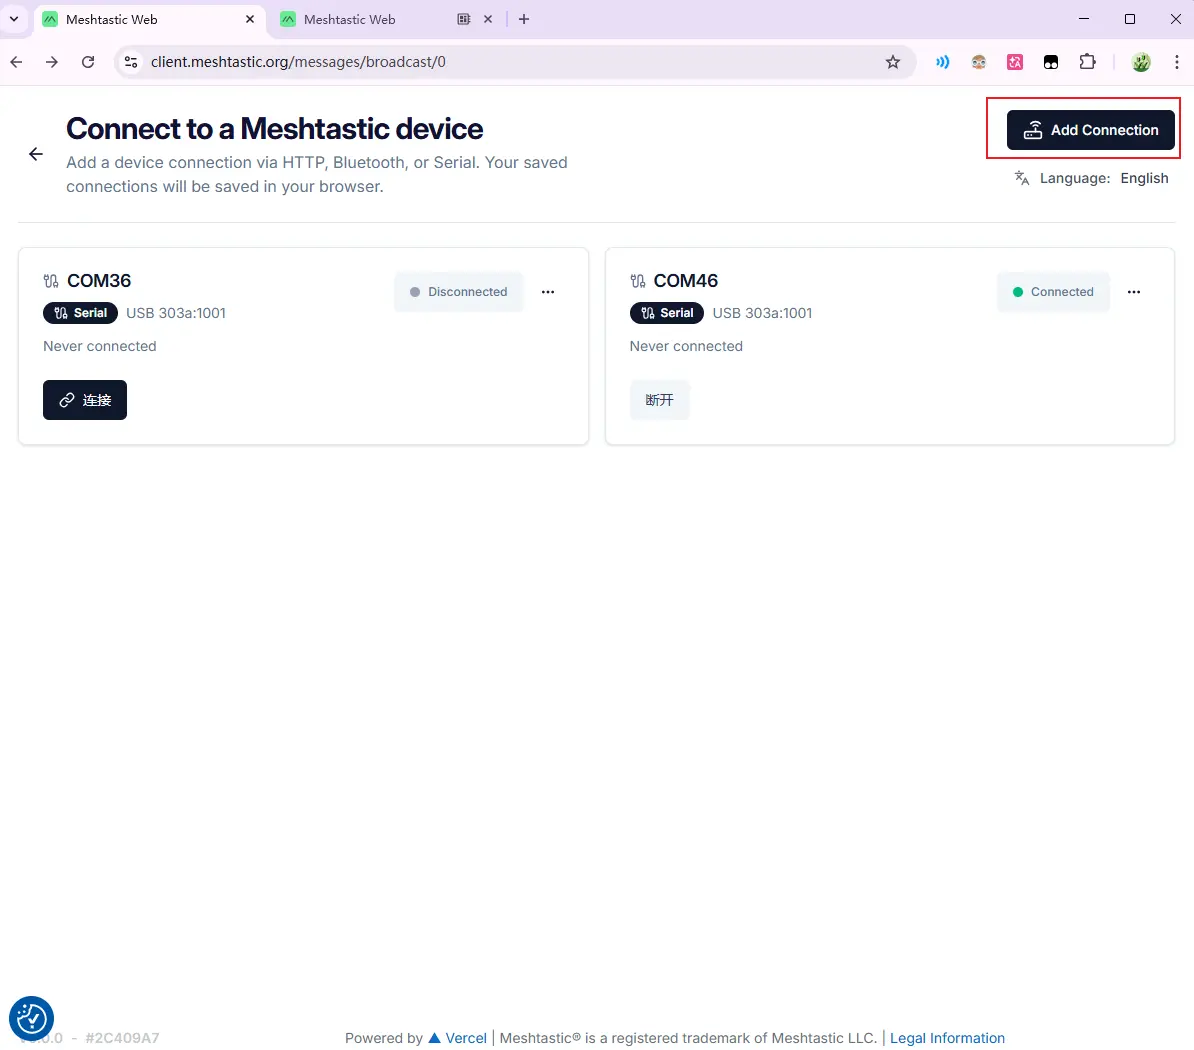
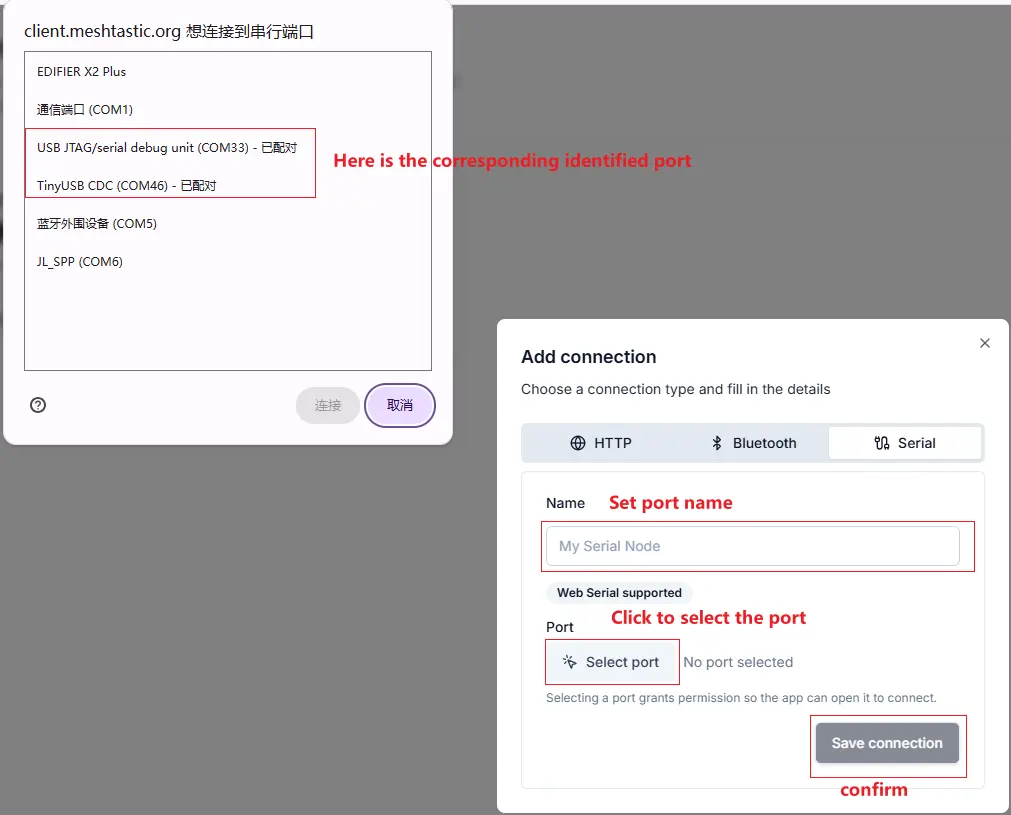
- Connect Device: Visit client.meshtastic.org.
- Configuration Interface:
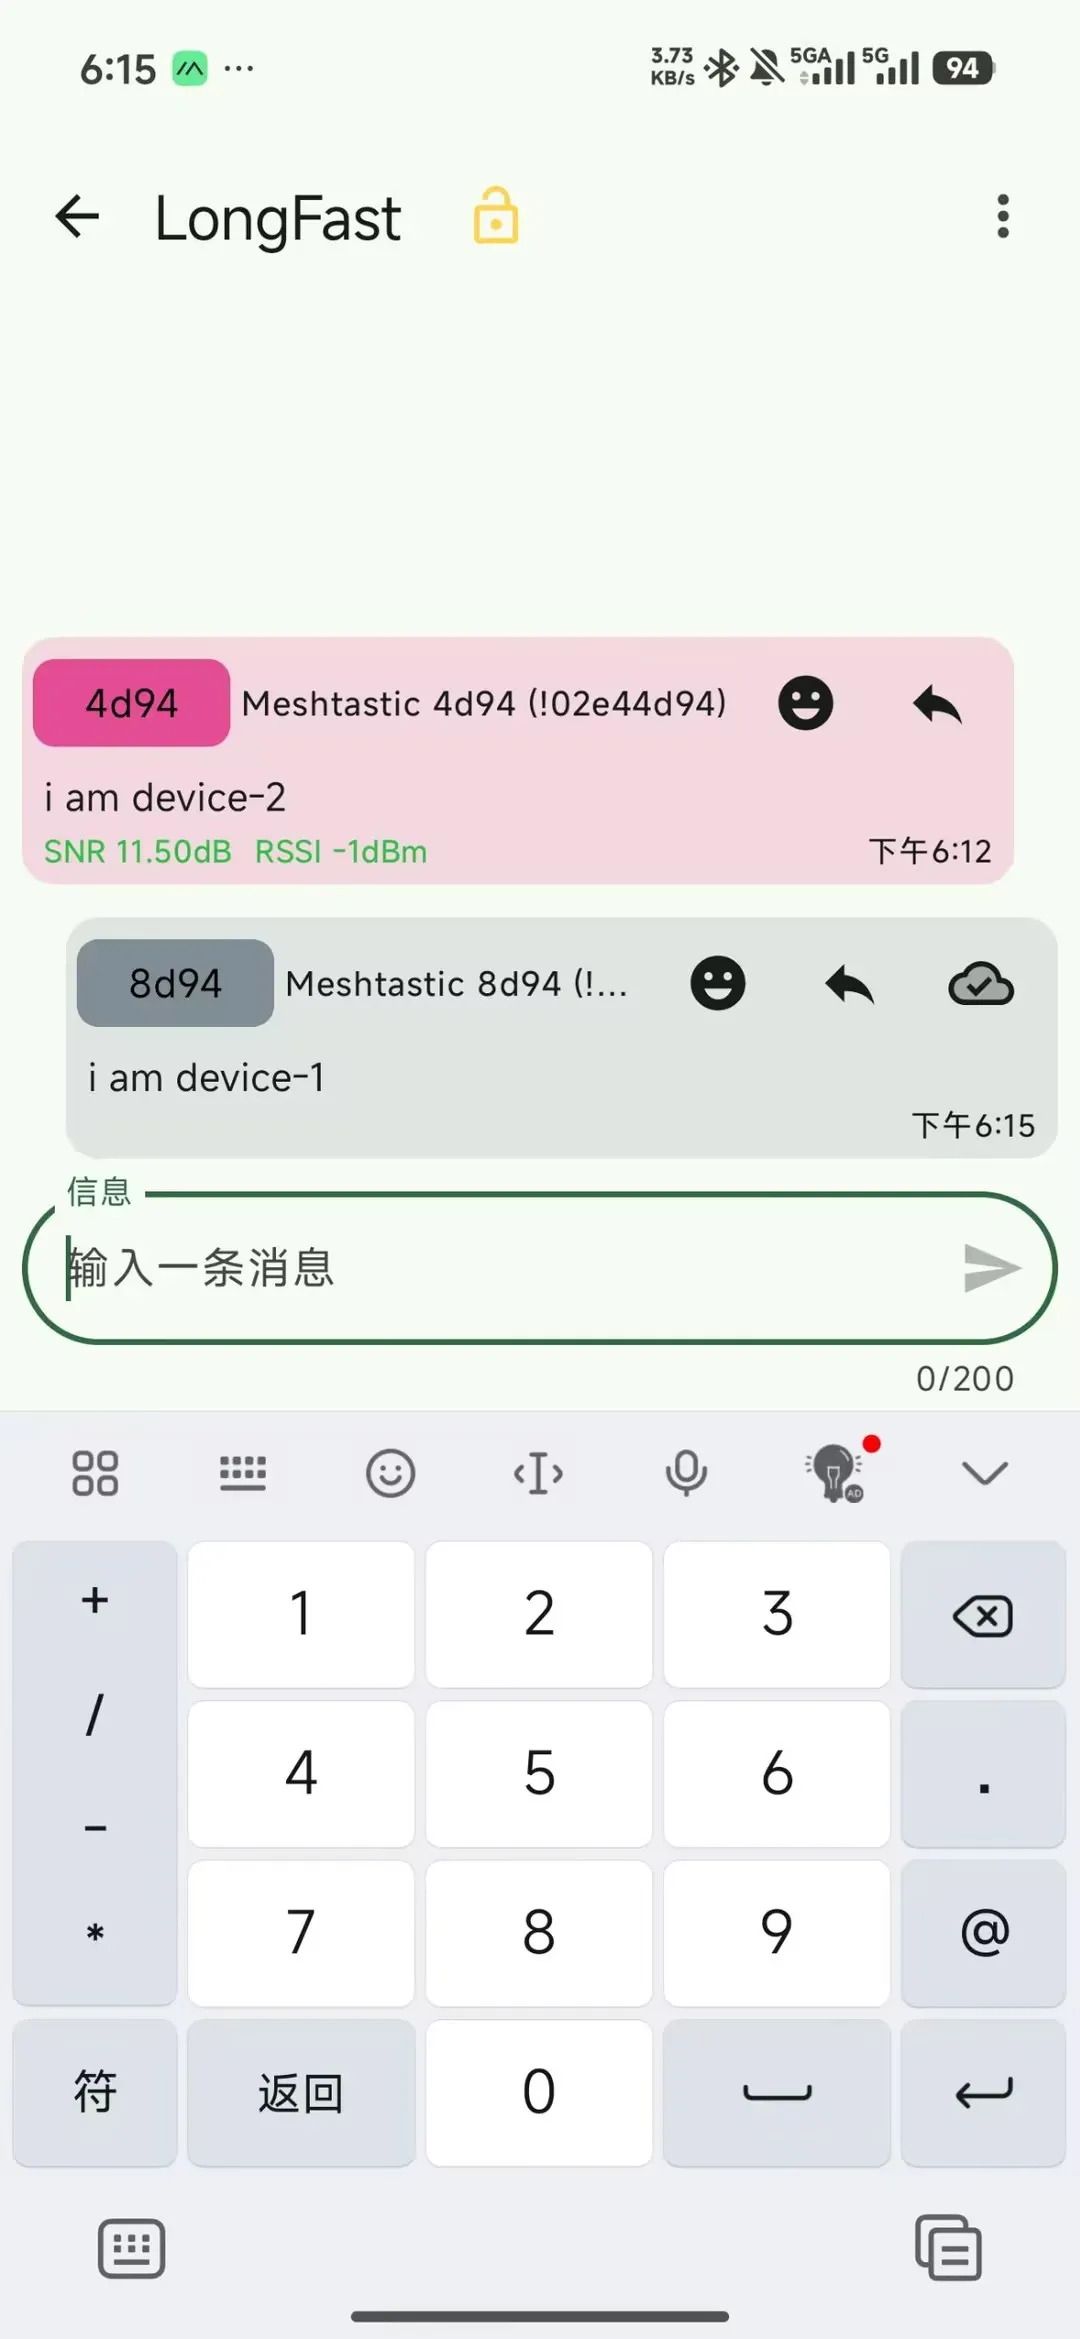
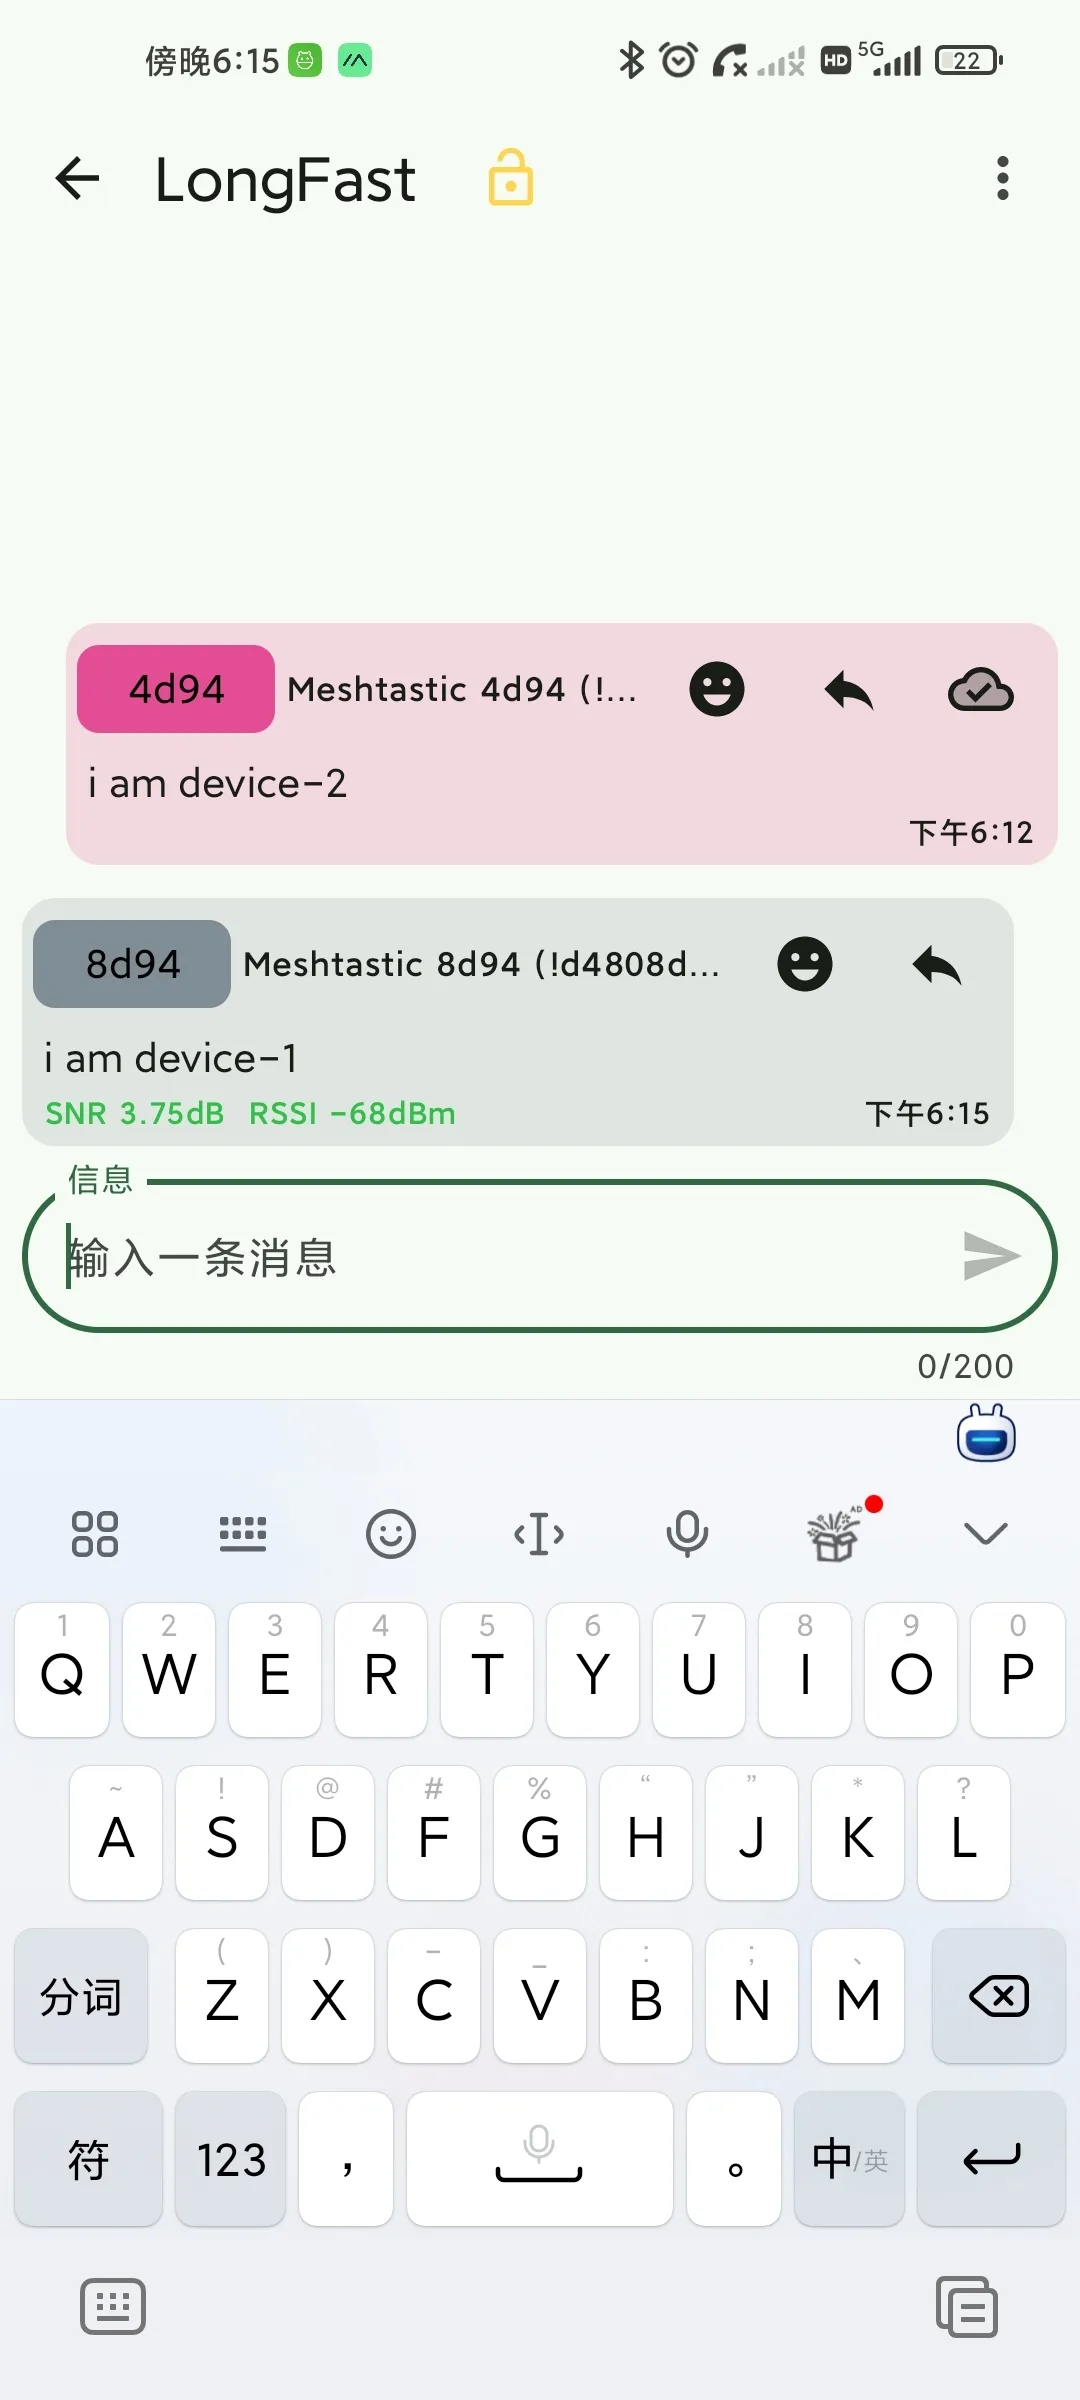
Demonstrating how to send a public message
Step 1: Do not select any device in the right sidebar, directly check the "# Primary" public channel
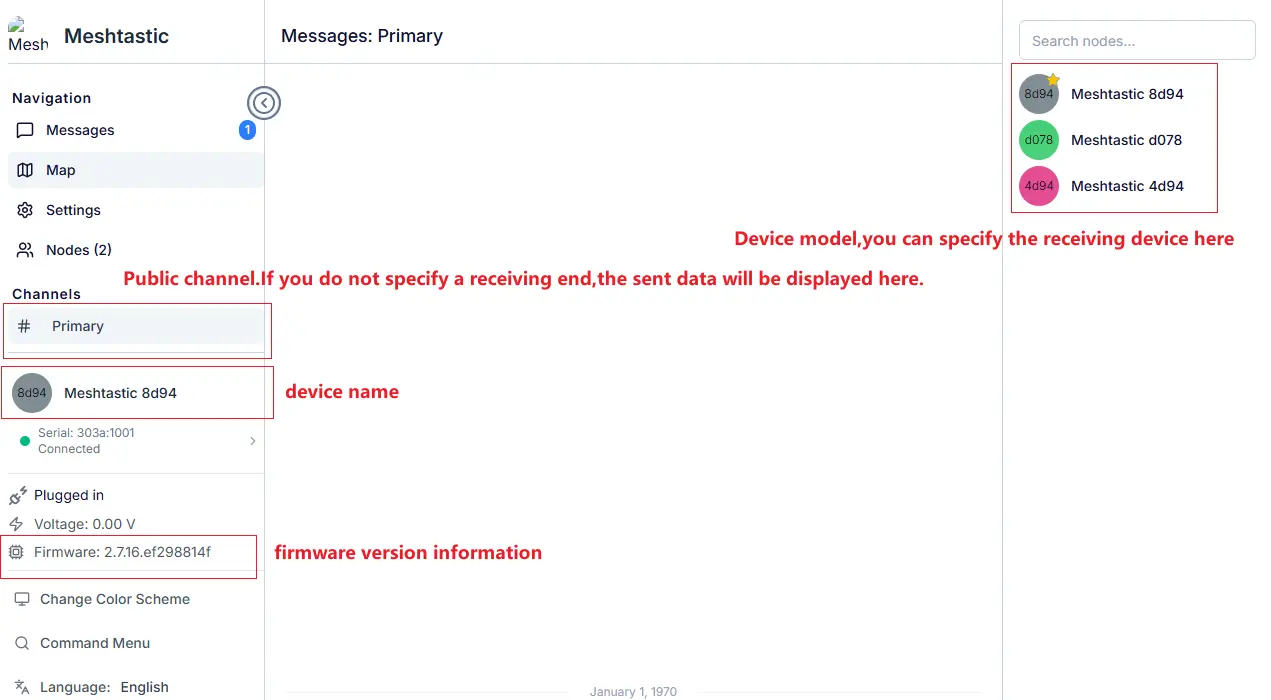
Step 2: Send the message as usual

Demonstrating how to send a message to a specific target
Step 1: Select the target device
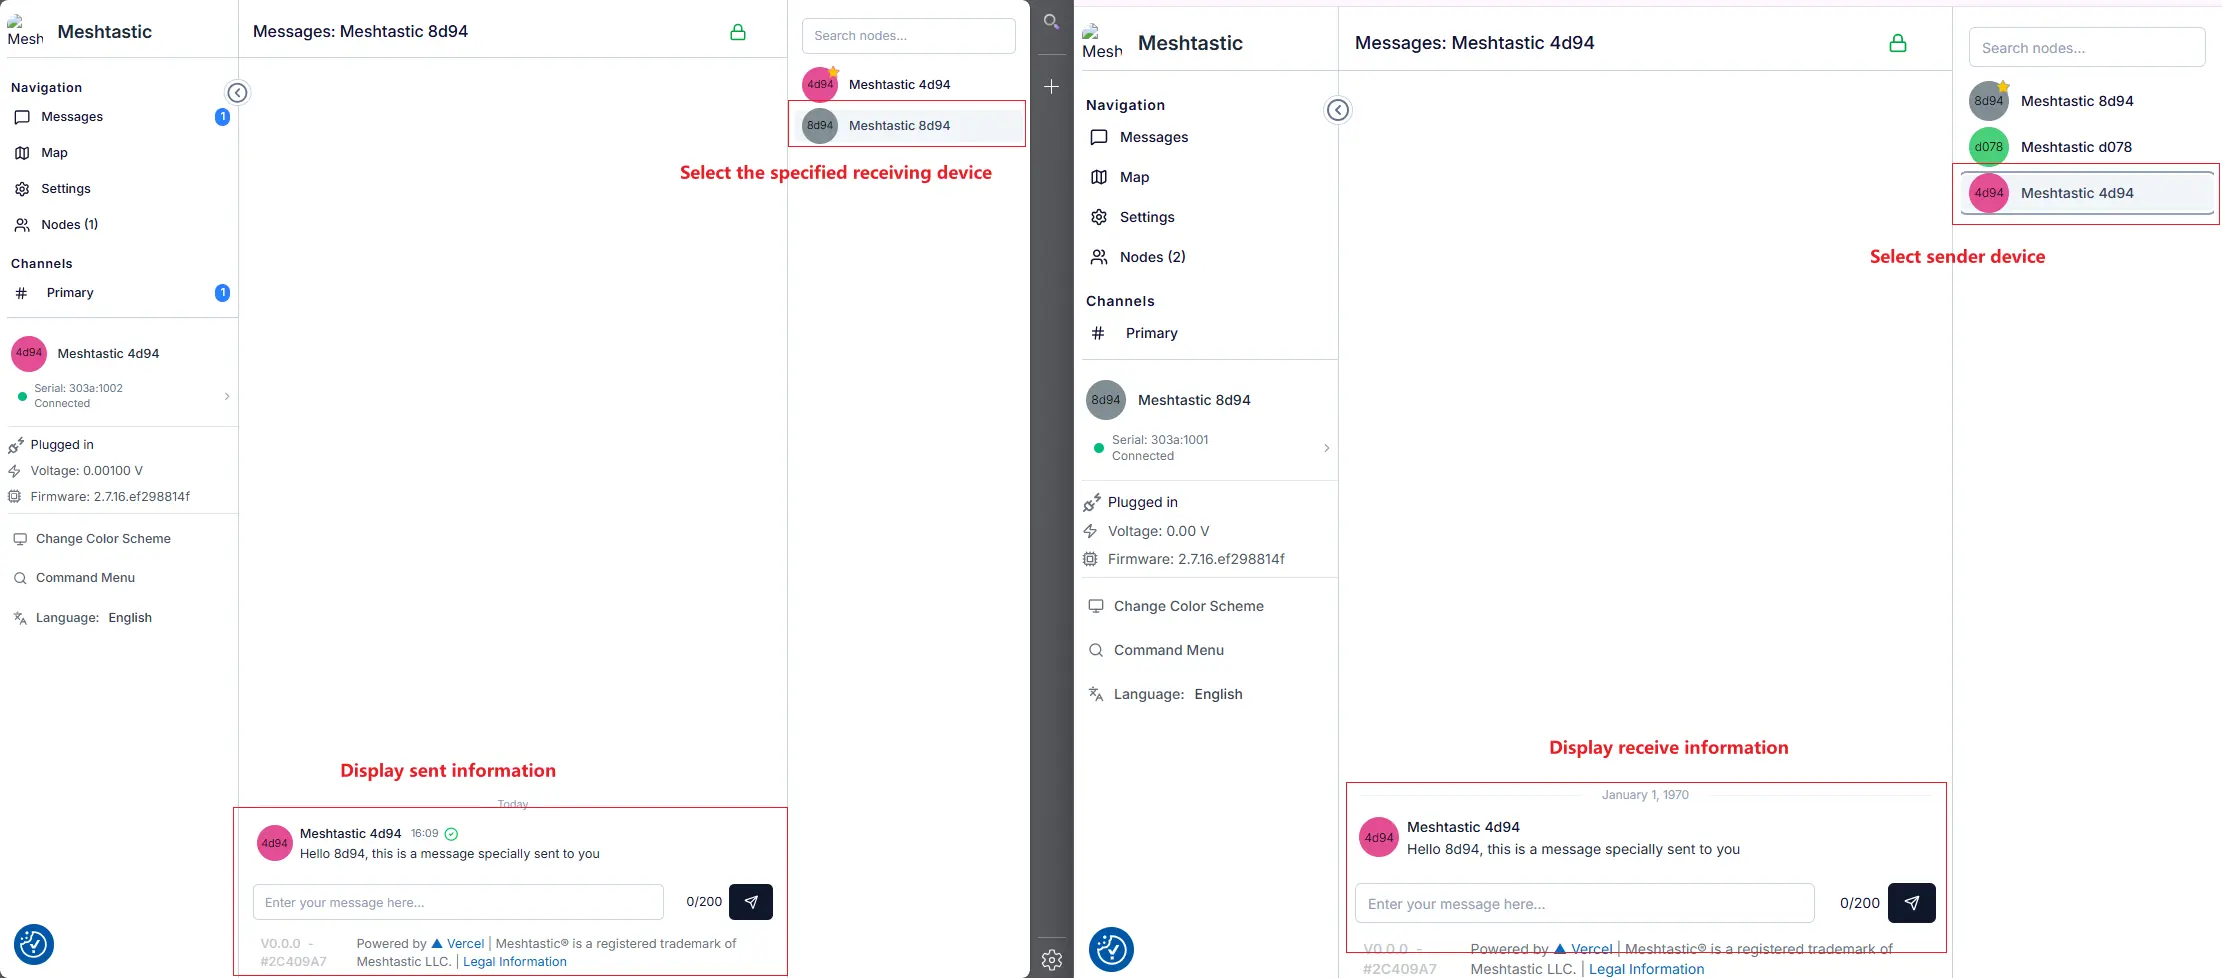
Step 2: The absence of message printouts in the public channel confirms that the message was sent directly to the target
4.2 App Interface Usage (Bluetooth)
The mobile app is the most convenient way to use the device outdoors, currently supporting Android and iOS platforms. During Bluetooth pairing, you need to connect the device to a PC and monitor the Bluetooth connection status via the serial port.
- Monitor Serial Information: View the Bluetooth connection status between the device and PC via the serial monitor.
(1). Select the corresponding serial port
(2). Compile and download (can be omitted if the firmware is already flashed)
(3). Monitor the corresponding serial port

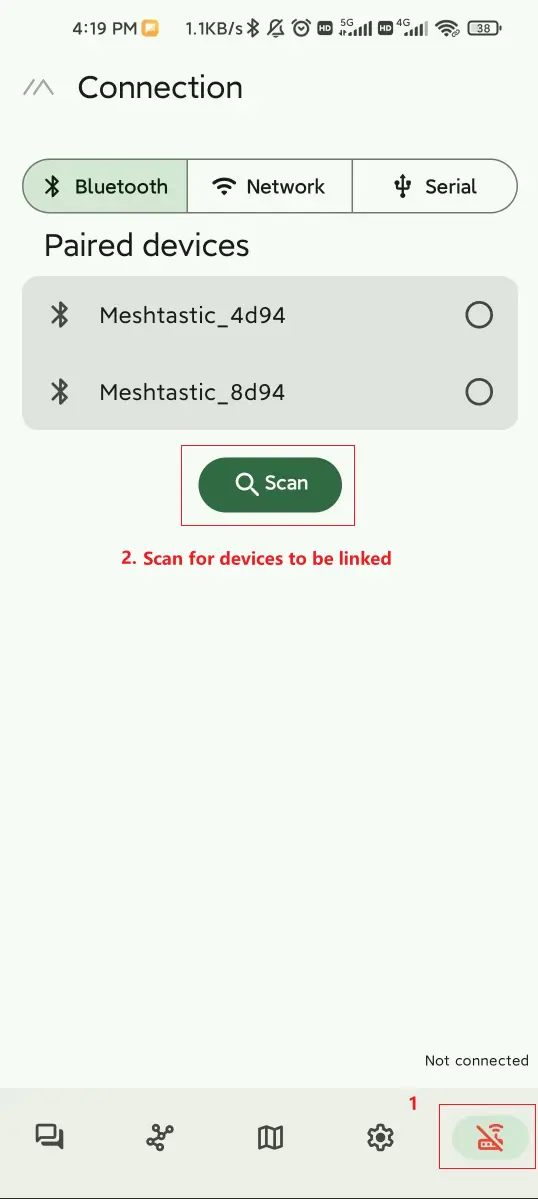
- Bluetooth Connection: Open the app, click the "+" button to search for and pair with the device (the current app version used is 2.7.6).
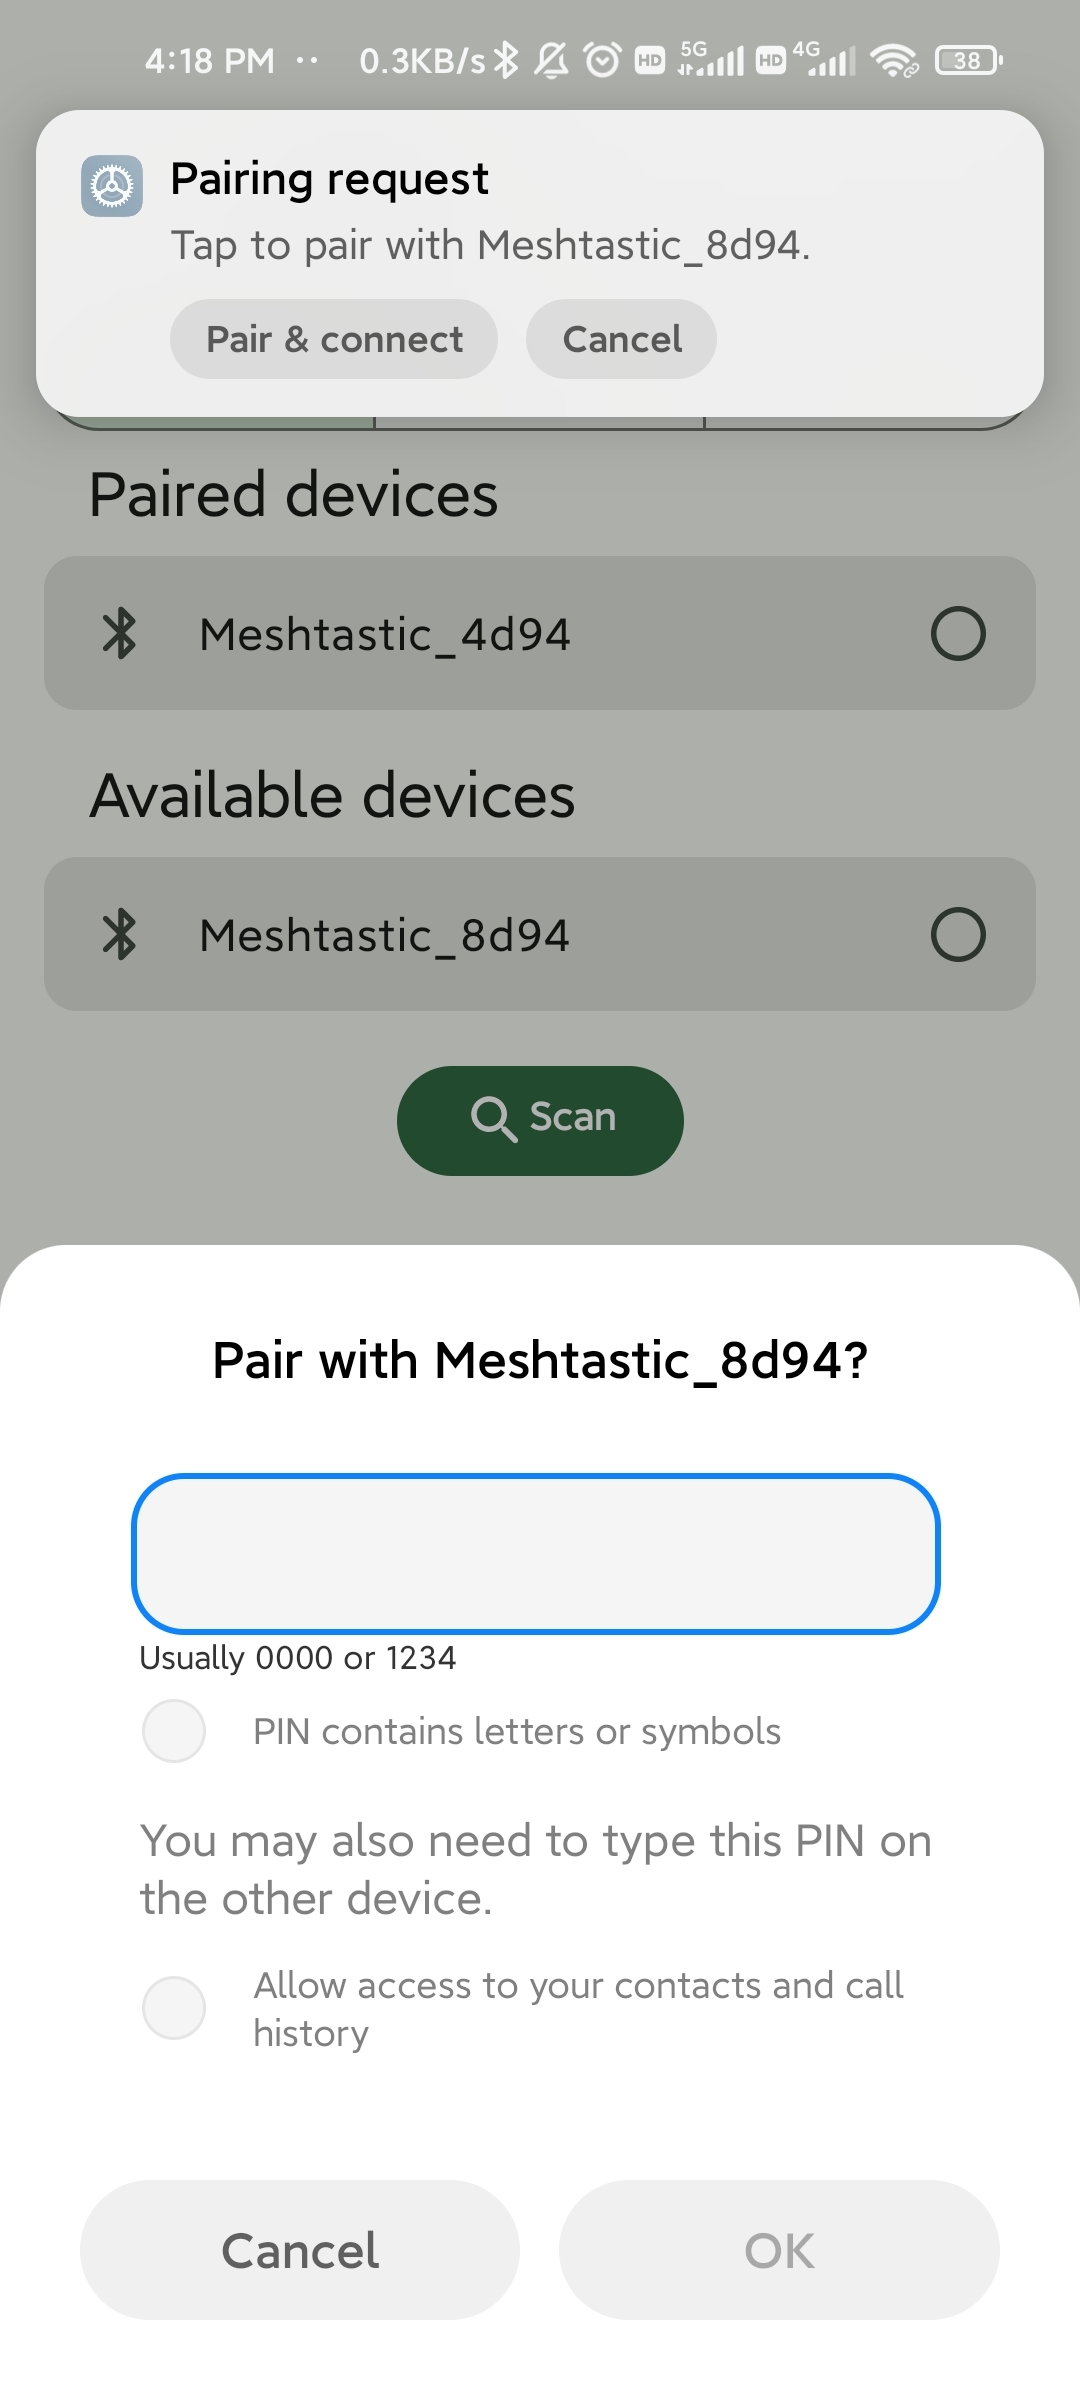
Based on the information below, the pairing password is 123456
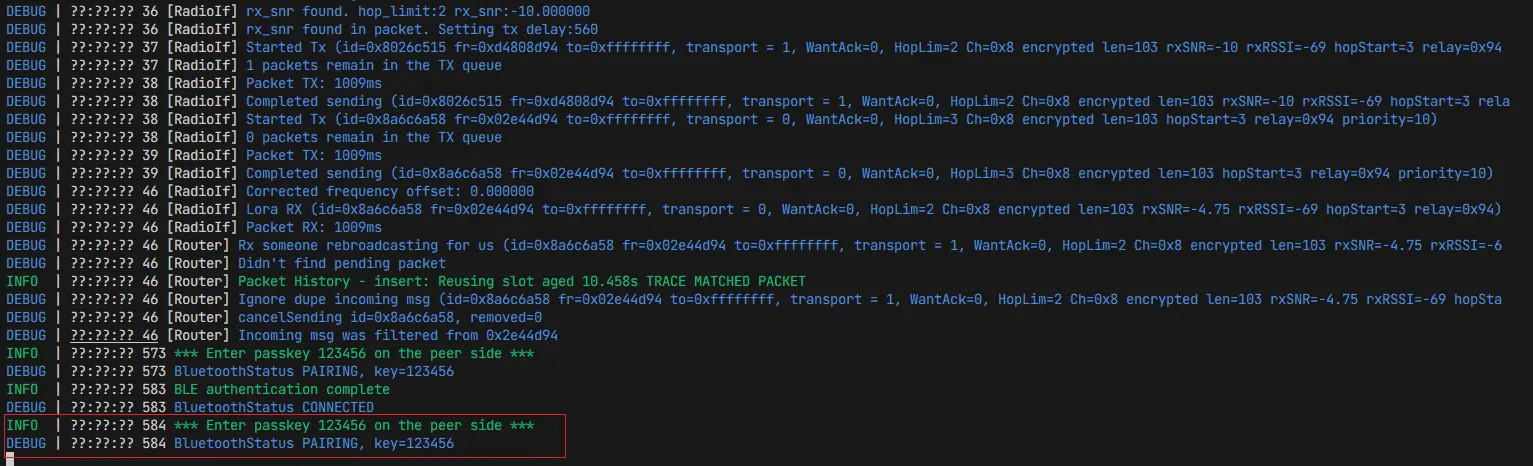
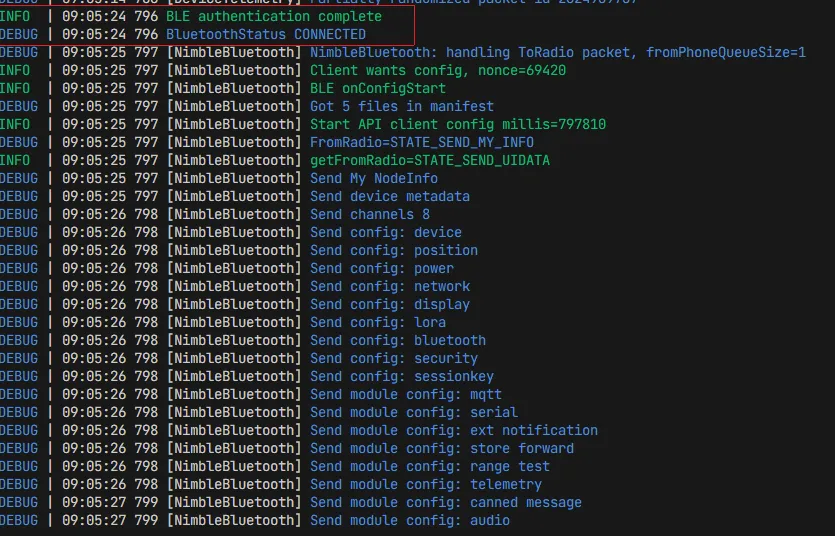
The following serial output indicates a successful Bluetooth connection
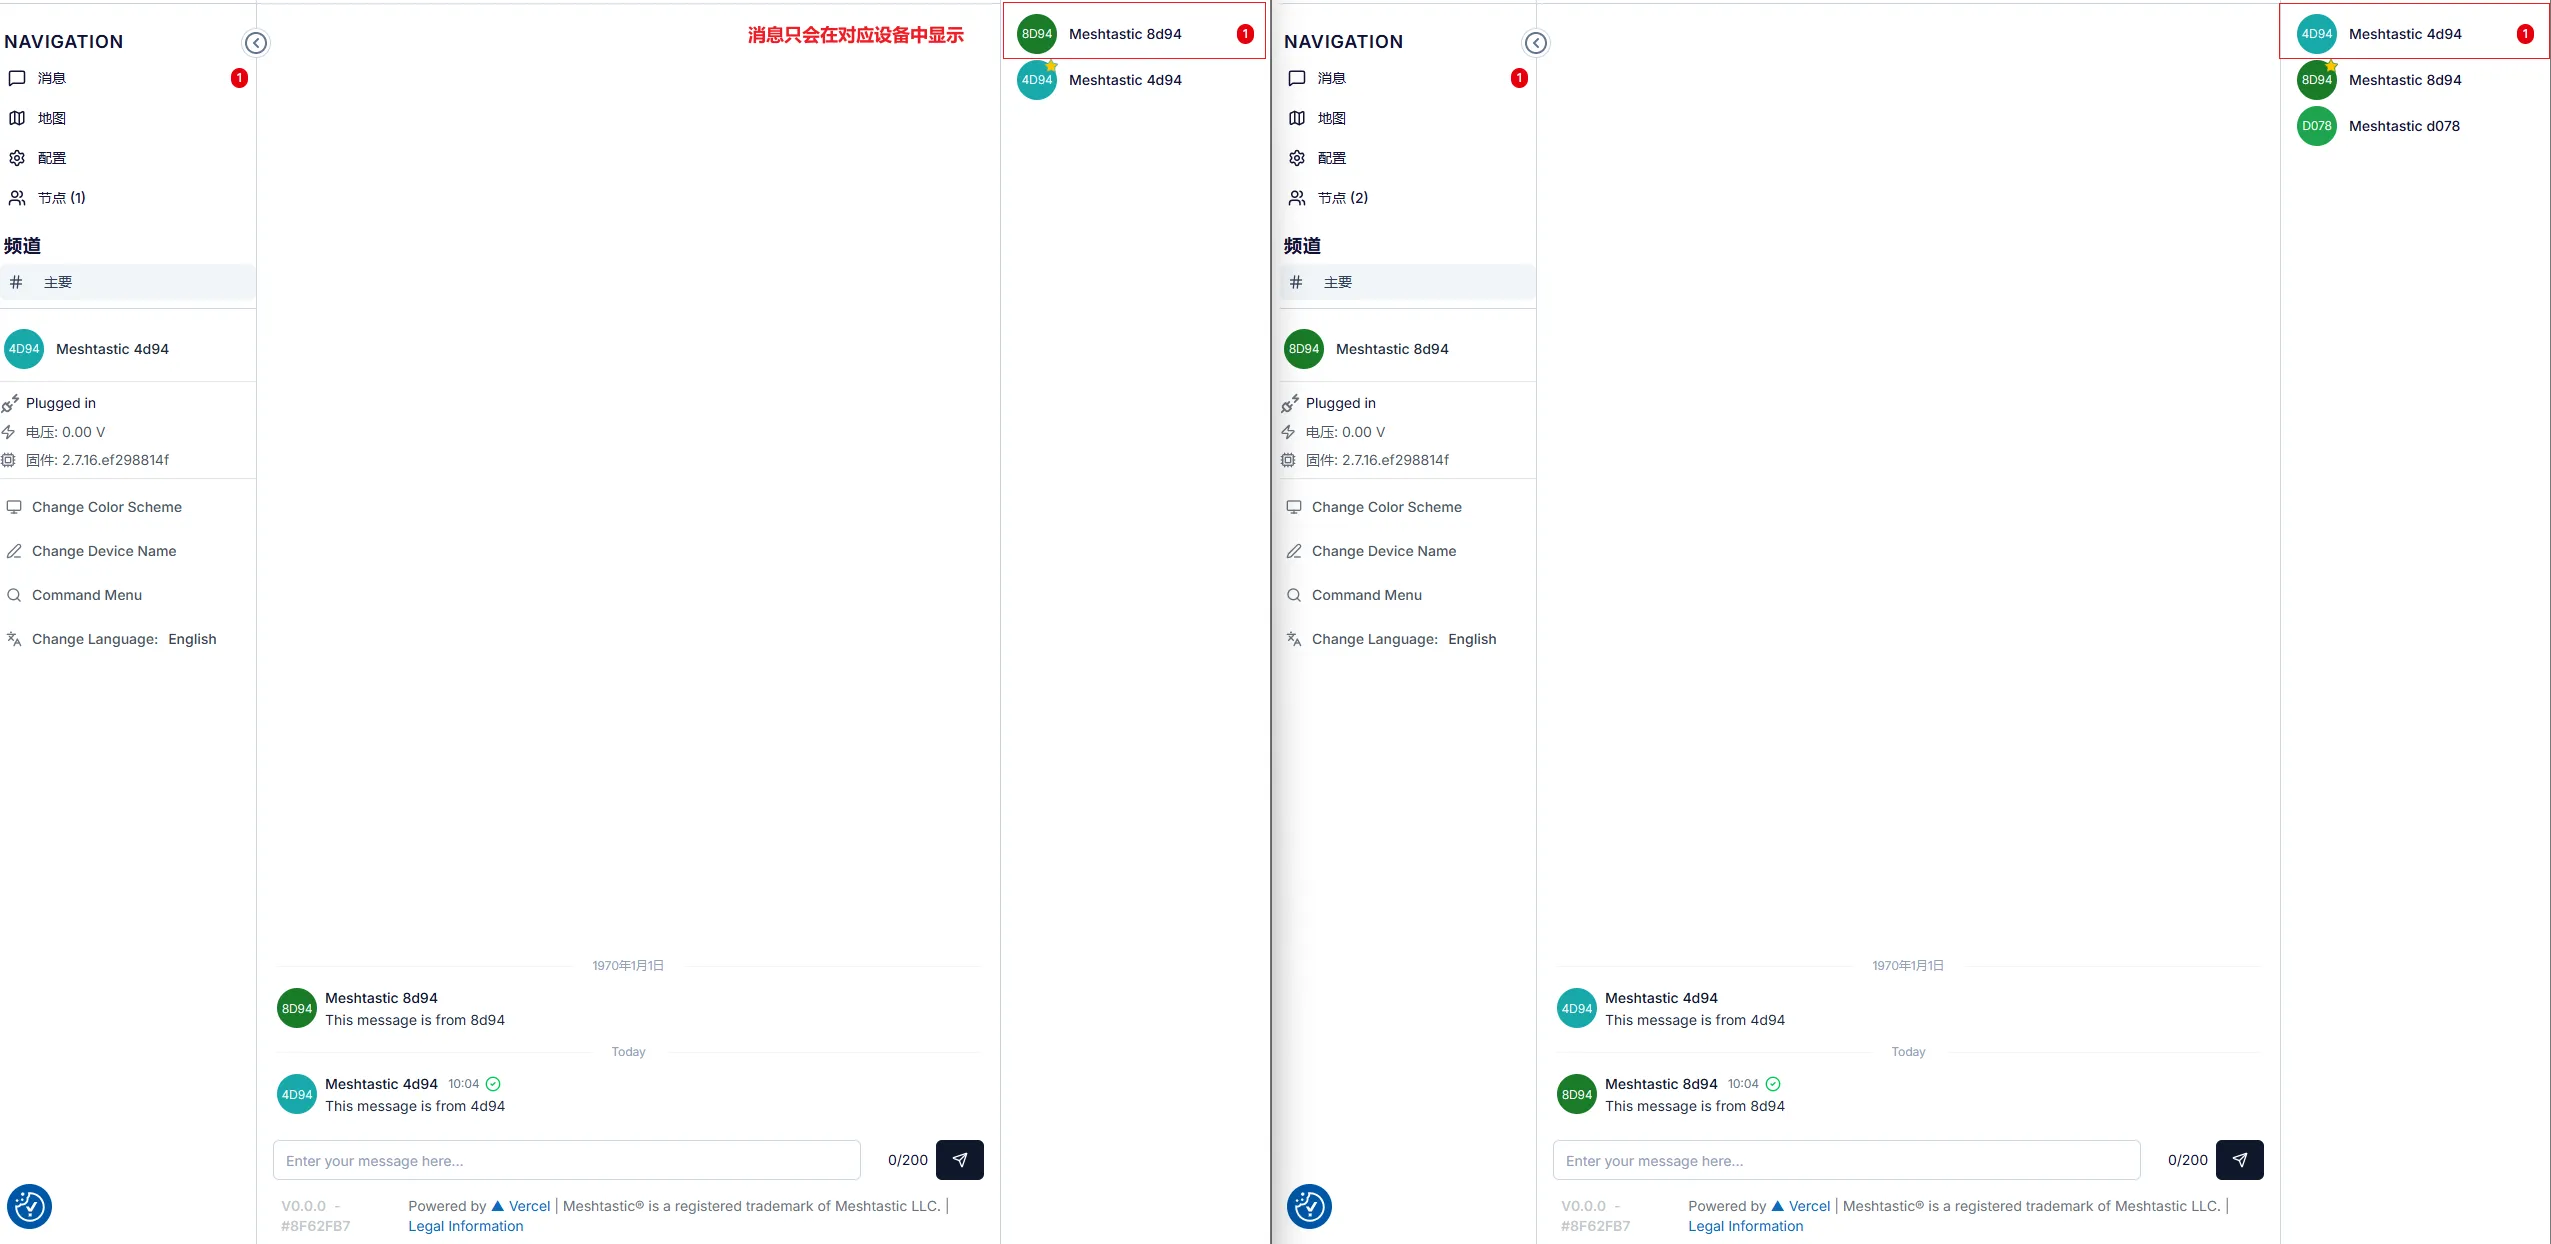
Sending a message to the device via the App
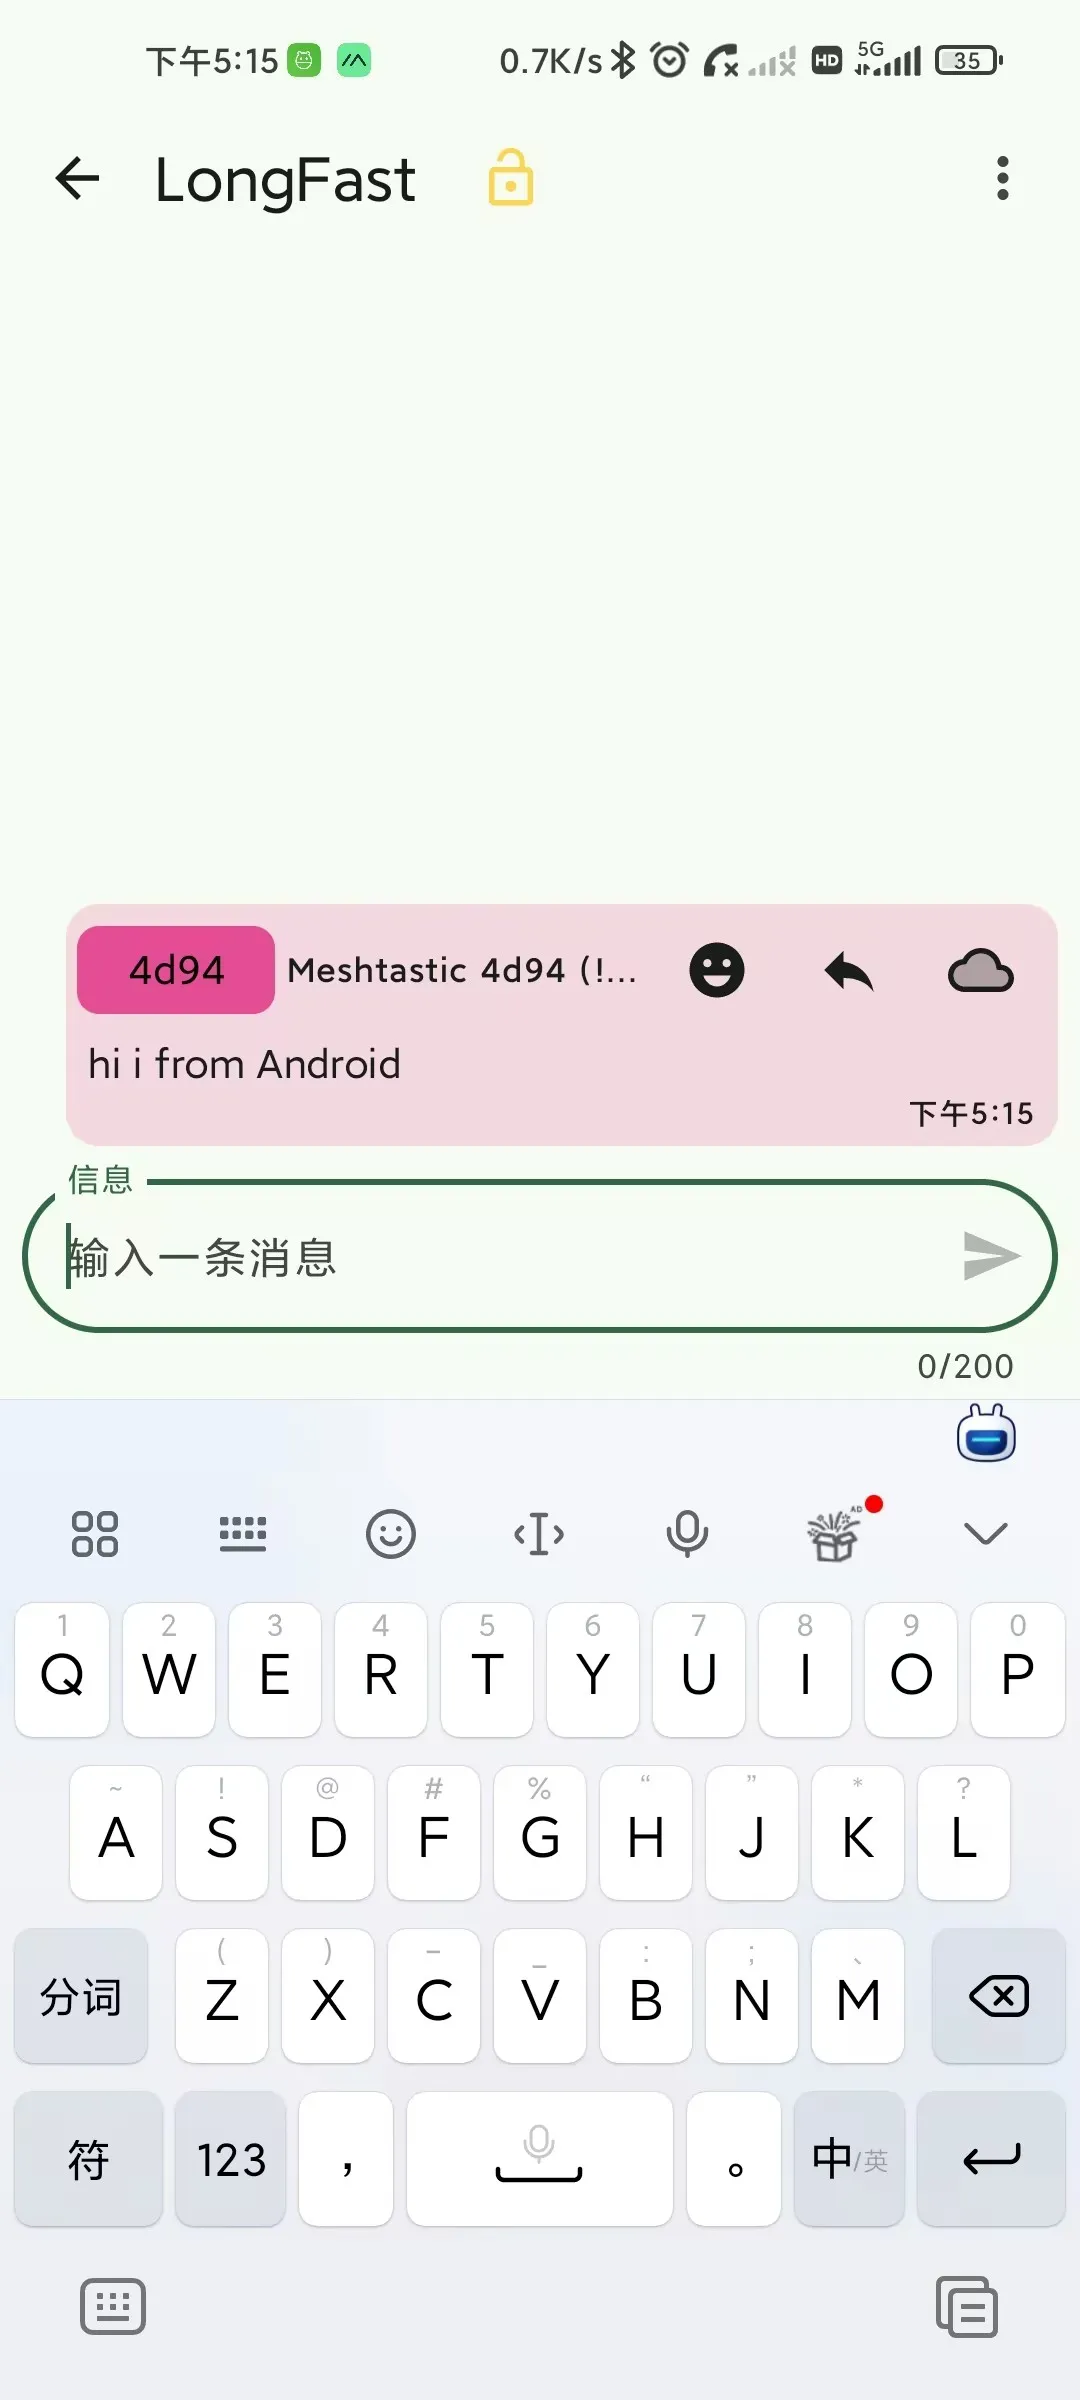
The device receives the message

After another phone connects to a different device (following the same steps), they can send messages to each other via the app
4.3 CLI Management (Advanced)
For users who need batch configuration or automated scripting, the Python CLI tool can be used.
- Environment Setup: Ensure a Python environment is installed.
- Recommended version: Python 3.8 or higher
- After installation, verify the version:
python --version
- Install Tool:
pip install meshtastic.- Upgrade command:
pip install --upgrade meshtastic
- After installation, verify the version:
meshtastic --version
A version number appearing indicates successful installation.

- Common Commands:
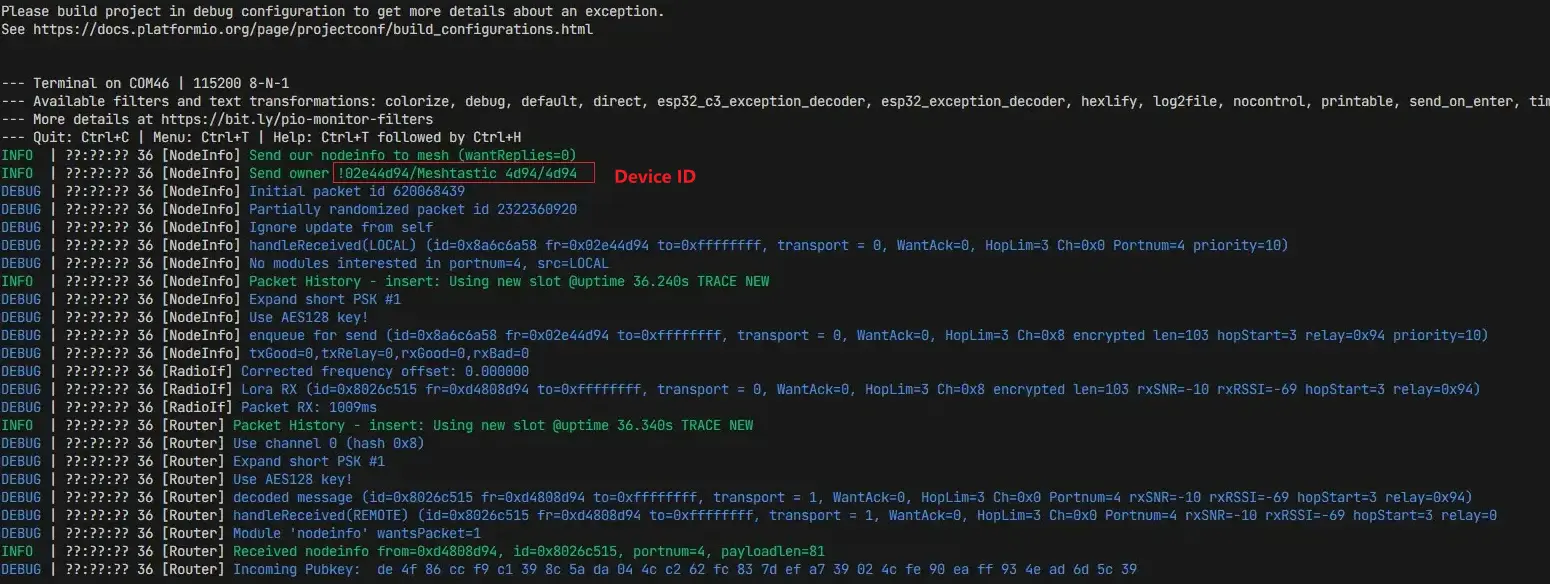
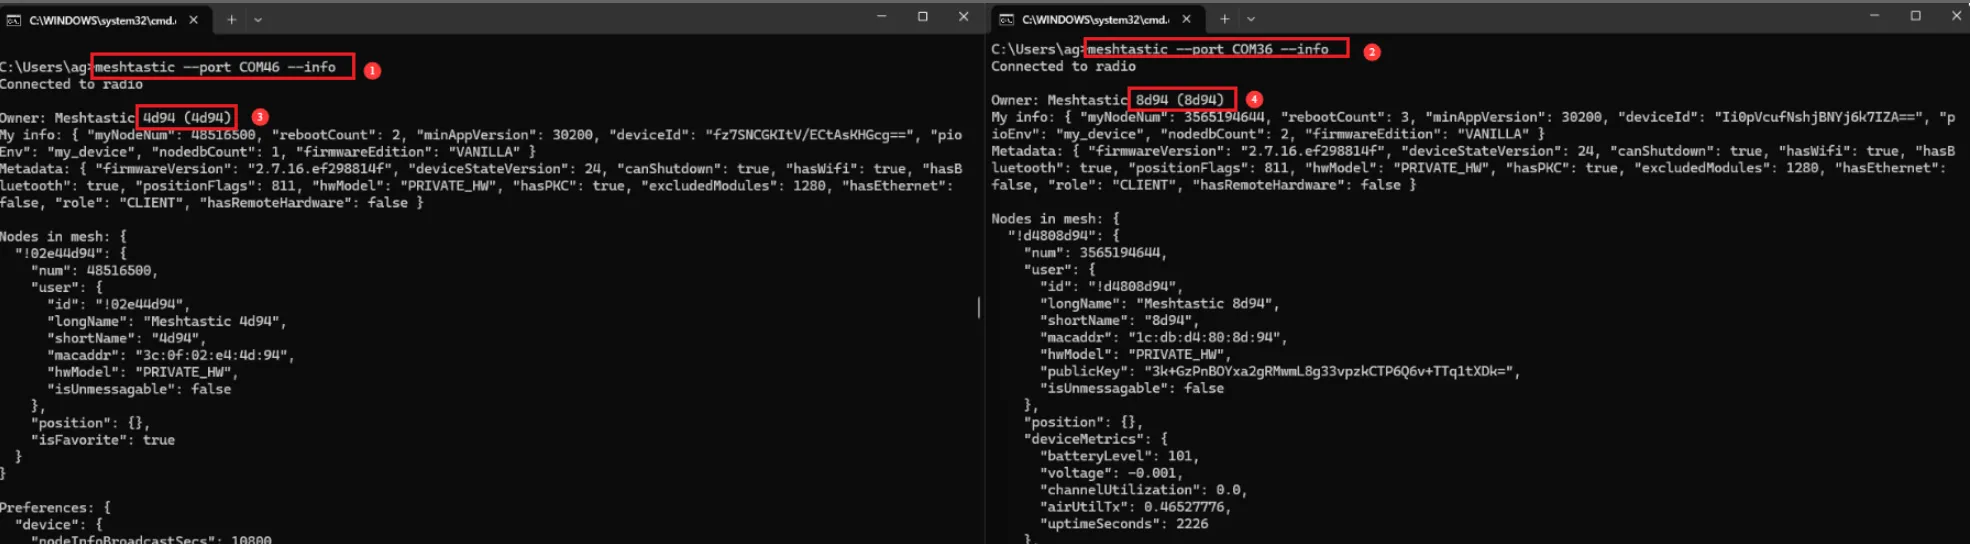
Enter meshtastic --port your-com --info to view information for the device on the specified port.
1 and 2 indicate viewing device info for the serial connection, 3 and 4 indicate the device IDs.
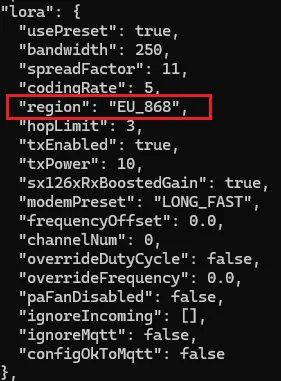
Use meshtastic --port your-com --set lora.region EU_868 to unify the operating frequency for both parties (please pay attention to the frequency range permitted by local regulations).

Re-check the device info using the meshtastic --port your-com --info command.
![]()
The presence of the content shown below in the "lora" field indicates that the region has been successfully set.
Enter meshtastic --port your-com --listen to listen on the specified port.

The appearance of the corresponding ID indicates successful listening.
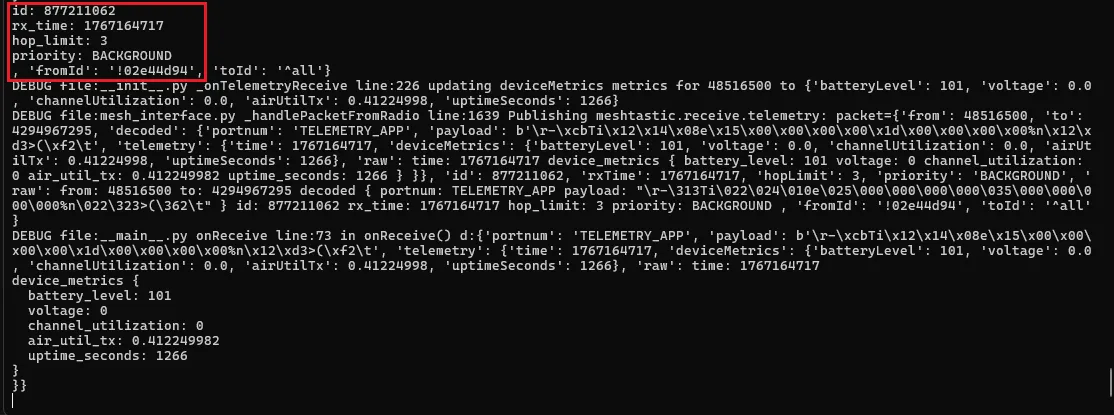
-
Send a message using
meshtastic --port your-com --sendtext "hello mesh i from COM34" -
The content in
decodecan be used to verify if the data was transmitted correctly. -
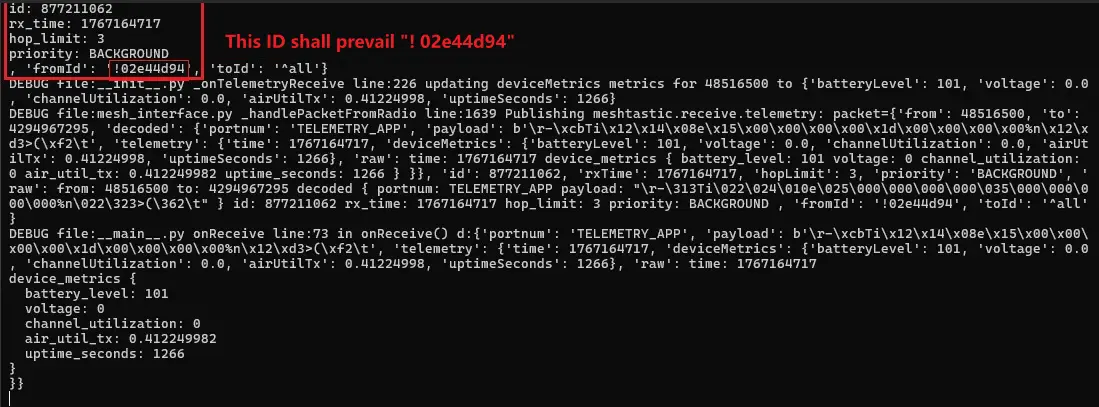
It shows the sender ID (fromId) and the destination ID (toId: here meaning broadcast).
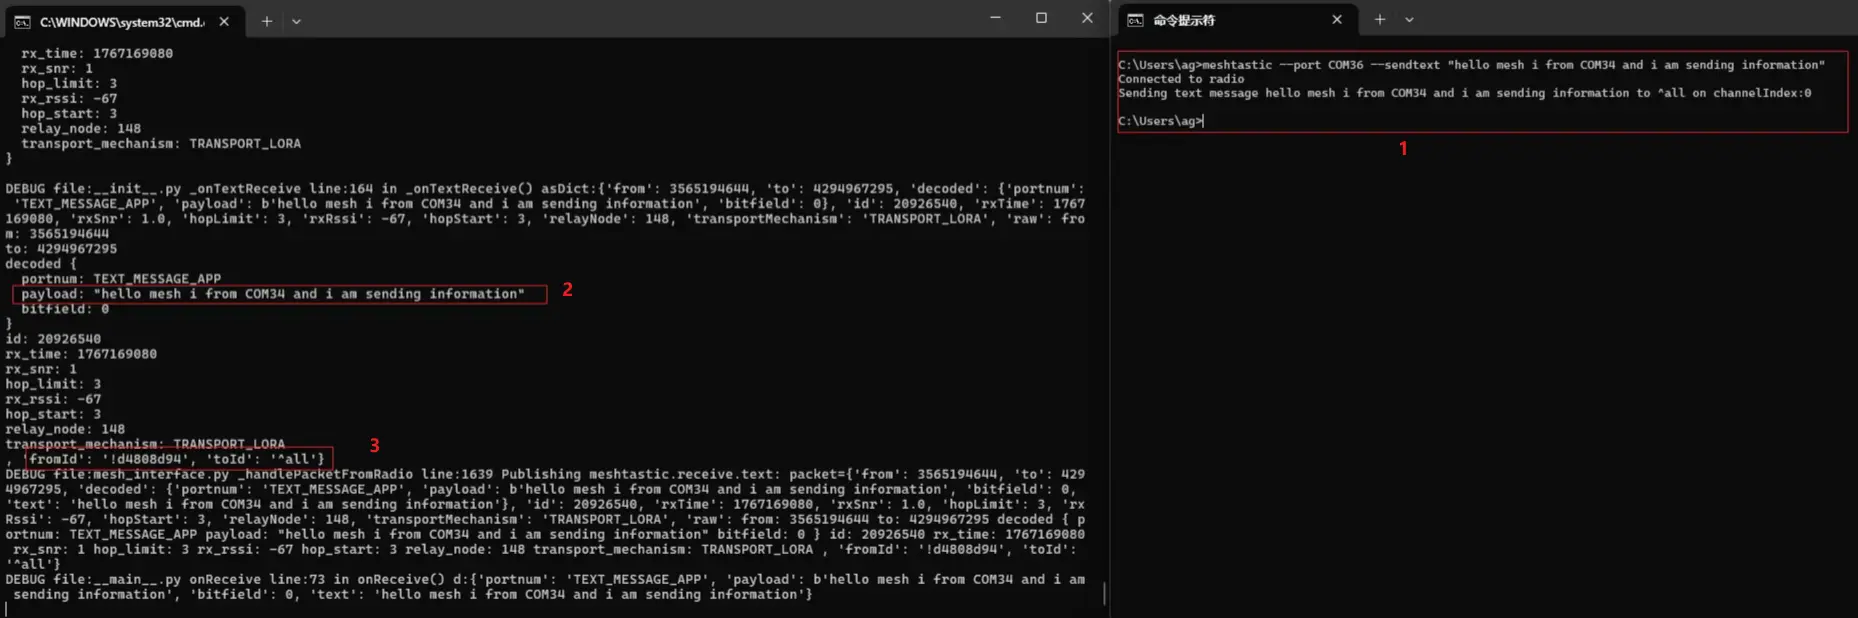
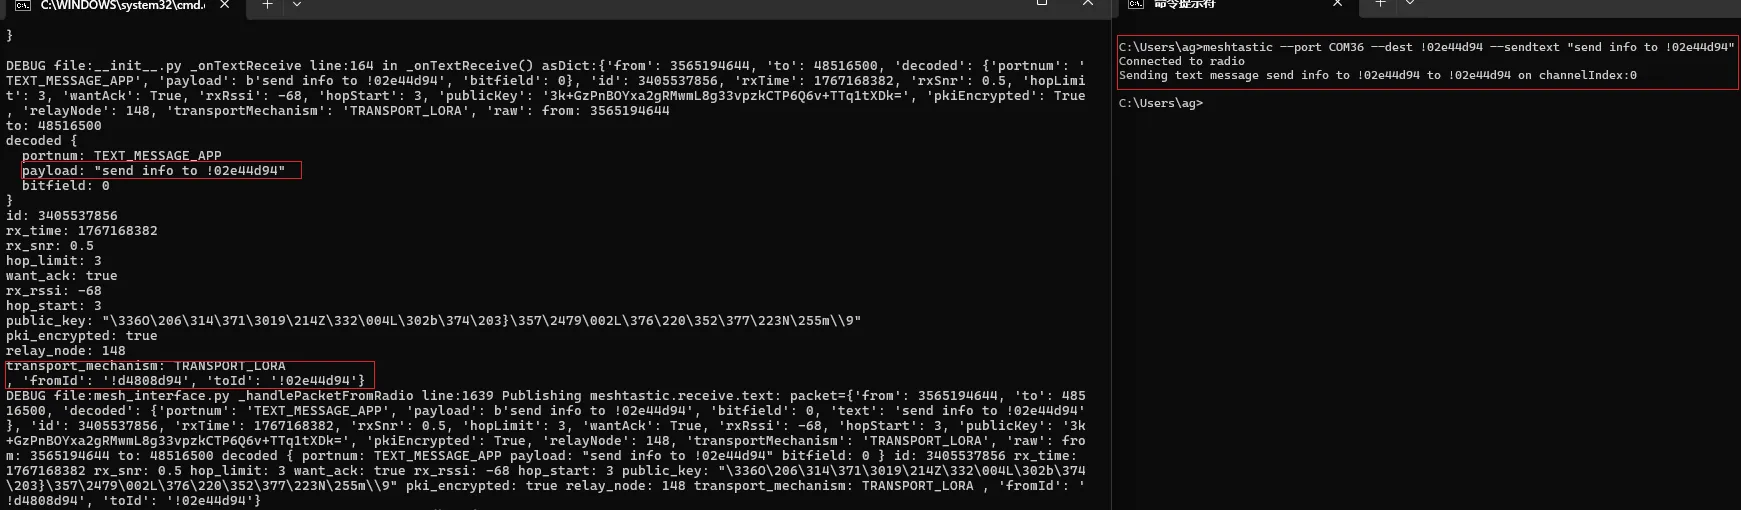
Below demonstrates sending a message to a specific ID.
The (fromId) and (toId) fields in the listener's output indicate the sender ID and the intended recipient ID for this packet.
Send a message using meshtastic --port COM36 --dest !02e44d94 --sendtext "send info to !02e44d94”
5. Key Operation Guide
5.1 Changing the Node Name
To distinguish between nodes in the network, it is recommended to change the name to an easily readable string.
- Web Interface: Modify under the
Change Device Namemenu. - App Interface: Modify in
Settings -> User.
5.2 Frequency Region Setting
Important: The correct frequency region must be set upon first use.
- China:
CN_470orCN_779 - Europe:
EU_868 - United States:
US_915
5.3 Channel Encryption and Networking
Meshtastic uses a public channel by default. If you require private communication:
- Create a new channel name.
- Enable
Encryption. - Share the generated QR Code with teammates. Scanning the code allows them to join the encrypted channel.
- Official Channel Configuration Guide: https://meshtastic.org/docs/configuration/radio/channels/
- Official QR Code/Channel URL Sharing Guide: https://meshtastic.org/docs/faq/#how-do-i-share-my-meshtastic-channel-with-other-people
5.4 MQTT Gateway / Internet Bridge
- Official Guide and Usage: https://meshtastic.org/docs/software/integrations/mqtt/
- MQTT Module Parameters: https://meshtastic.org/docs/configuration/module/mqtt/
5.5 ATAK Integration
- Official ATAK Plugin Guide: https://meshtastic.org/docs/software/integrations/integrations-atak-plugin/
- Plugin Project and Releases: https://github.com/meshtastic/ATAK-Plugin
5.6 Meshtastic Python CLI Command Details
- Official CLI Command Introduction: https://meshtastic.org/docs/software/python/cli/
6. Advanced Notes
- LR1121 Features: This chip supports multiple frequency bands (Sub-GHz, 2.4GHz). Meshtastic is continuously optimizing its support for the full frequency range of this chip.
- Low Power Optimization: For prolonged outdoor use, it is recommended to turn off unnecessary sensors or reduce the heartbeat packet frequency to extend battery life.