ESP-IDF
This chapter contains the following sections. Please read as needed:
ESP-IDF Getting Started
New to ESP32 ESP-IDF development and looking to get started quickly? We have prepared a general Getting Started Tutorial for you.
- Section 1: Environment Setup
- Section 2: Running Examples
- Section 3: Creating a Project
- Section 4: Using Components
- Section 5: Debugging
- Section 6: FreeRTOS
- Section 7: Peripherals
- Section 8: Wi-Fi Programming
- Section 9: BLE Programming
Please Note: This tutorial uses the ESP32-S3-Zero as a teaching example, and all hardware code is based on its pinout. Before you start, it is recommended that you check the pinout of your development board to ensure the pin configuration is correct.
Setting Up Development Environment
The following guide uses Windows as an example, demonstrating development using VS Code + the ESP-IDF extension. macOS and Linux users should refer to the official documentation.
The screenshots in this section use ESP-IDF V5.5.2 as an example. When installing, please select the ESP-IDF version that matches your board's example.
Install the ESP-IDF Development Environment
-
Download the installation manager from the ESP-IDF Installation Manager page. This is Espressif's latest cross-platform installer. The following steps demonstrate how to use its offline installation feature.
Click the Offline Installer tab on the page, then select Windows as the operating system and the ESP-IDF version you need (the version shown in the screenshot is for reference only — choose the version that fits your actual needs).

After confirming your selection, click the download button. The browser will automatically download two files: the ESP-IDF Offline Package (.zst) and the ESP-IDF Installer (.exe).

Please wait for both files to finish downloading.
-
Once the download is complete, double-click to run the ESP-IDF Installer (eim-gui-windows-x64.exe).
The installer will automatically detect if the offline package exists in the same directory. Click Install from archive.

Next, select the installation path. We recommend using the default path. If you need to customize it, ensure the path does not contain Chinese characters or spaces. Click Start installation to proceed.

-
When you see the following screen, the ESP-IDF installation is successful.

-
We recommend installing the drivers as well. Click Finish installation, then select Install driver.

Install Visual Studio Code and the ESP-IDF Extension
-
Download and install Visual Studio Code.
-
During installation, it is recommended to check Add "Open with Code" action to Windows Explorer file context menu to facilitate opening project folders quickly.
-
In VS Code, click the Extensions icon
 in the Activity Bar on the side (or use the shortcut Ctrl + Shift + X) to open the Extensions view.
 -
Enter ESP-IDF in the search box, locate the ESP-IDF extension, and click Install.

-
For ESP-IDF extension versions ≥ 2.0, the extension will automatically detect and recognize the ESP-IDF environment installed in the previous steps, requiring no manual configuration.
Example
IDF example: ESP32-S3-RGB-Matrix Example - GitHub
Below are the purpose, key points, and operational effects for each example (for quick start).
| Example | Basic Description |
|---|---|
| 01_Matrix_RGBW | Simple test of RGBW LED color switching |
| 02_Matrix_Font_5x7 | Test 5x7 font display |
| 03_Matrix_QMI | Test QMI functionality display |
| 04_Matrix_RTC | Test RTC time display |
| 05_Matrix_SDCard | Test TF card mounting and capacity reading |
| 06_Matrix_SHTC3 | Test SHTC3 temperature and humidity sensor |
| 07_Matrix_WiFi | Test Wi-Fi connection |
| 08_Matrix_Audio | Test audio playback |
- The three examples 03_Matrix_QMI, 06_Matrix_SHTC3, and 08_Matrix_Audio are designed for a 64x64 pixel screen. If used with other screen sizes, text display may overlap or become misaligned.
01_Matrix_RGBW
Code Analysis
rgbw_start(): Cycles through the onboard RGBW LED colors to verify that the LED driver and logging output are functioning properly.sizeof(rgbw_colors) / sizeof(rgbw_colors[0]): Calculates the length of the preset color array for cycling.bsp_display_lock(): Locks the display before operating to avoid conflicts with other display tasks.lv_obj_set_style_bg_color(screen, lv_color_hex(0x000000), 0): Sets the current screen background to black, reducing on-screen interference during the LED test.rgbw_set_color(rgbw_colors[color_index].hex_color): Outputs the current color value to the RGBW LED.ESP_LOGI(TAG, "Current color: %s", ...): Prints the current color name for debugging and observing the switching sequence.vTaskDelay(pdMS_TO_TICKS(2000)): Keeps each color for 2 seconds for easy observation.if (color_index >= num_colors): Returns to the start after reaching the end of the color array, enabling cyclic switching.
void rgbw_start(void) {
  /* =======================
   * 1. Basic Parameters
   * ======================= */
  int color_index = 0;
  const int num_colors = sizeof(rgbw_colors) / sizeof(rgbw_colors[0]);

  /* =======================
   * 2. Init Screen
   * ======================= */
  bool locked = bsp_display_lock(1000);
  if (locked) {
    lv_obj_t *screen = lv_scr_act();
    lv_obj_set_style_bg_color(screen, lv_color_hex(0x000000), 0);
    bsp_display_unlock();
  }
  /* =======================
   * 3. Loop Colors
   * ======================= */
  while (true) {
    locked = bsp_display_lock(1000);
    if (locked) {
      rgbw_set_color(rgbw_colors[color_index].hex_color);
      bsp_display_unlock();
    }
    ESP_LOGI(TAG, "Current color: %s", rgbw_colors[color_index].name);
    vTaskDelay(pdMS_TO_TICKS(2000));
    color_index++;
    if (color_index >= num_colors) {
      color_index = 0;
    }
  }
}
Operation Result
 |  |
 | 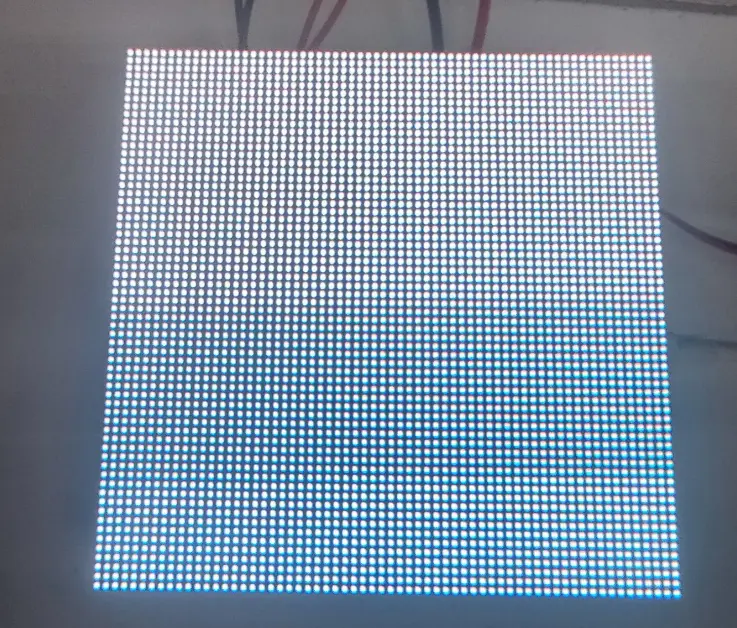 |
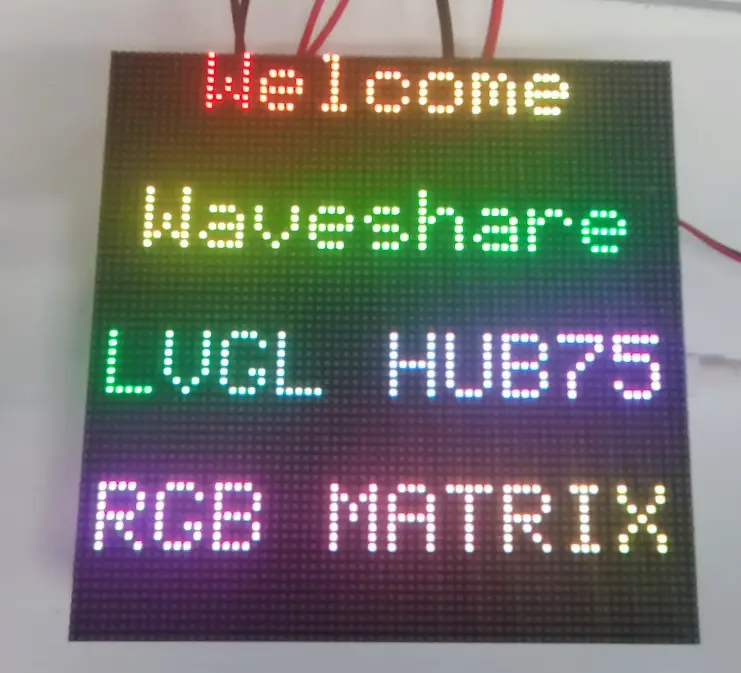
02_Matrix_Font_5x7
Code Analysis
font_5x7_start(): Starts the 5x7 font example interface and keeps the task running continuously.ESP_LOGI(TAG, "Matrix Font 5x7 start"): Outputs a start log to confirm that the example has entered the running state.bsp_display_lock(0): Locks before entering the LVGL display context to ensure safe interface initialization.font_5x7_ui_init(): Creates the UI objects needed for the 5x7 font example.font_5x7_ui_apply(): Applies the font, layout, default text, etc., to the interface.while (true): Keeps the task alive to prevent the example from exiting immediately after initialization.vTaskDelay(pdMS_TO_TICKS(1000)): Idle wait to reduce busy looping.
void font_5x7_start(void) {
  /* =======================
   * 1. Start Display
   * ======================= */
  ESP_LOGI(TAG, "Matrix Font 5x7 start");
  /* =======================
   * 2. Init UI (LVGL Locked)
   * ======================= */
  bool locked = bsp_display_lock(0);
  if (locked) {
    font_5x7_ui_init();
    font_5x7_ui_apply();
    bsp_display_unlock();
  }

  /* =======================
   * 3. Idle Loop
   * ======================= */
  while (true) {
    vTaskDelay(pdMS_TO_TICKS(1000));
  }
}
Operation Result
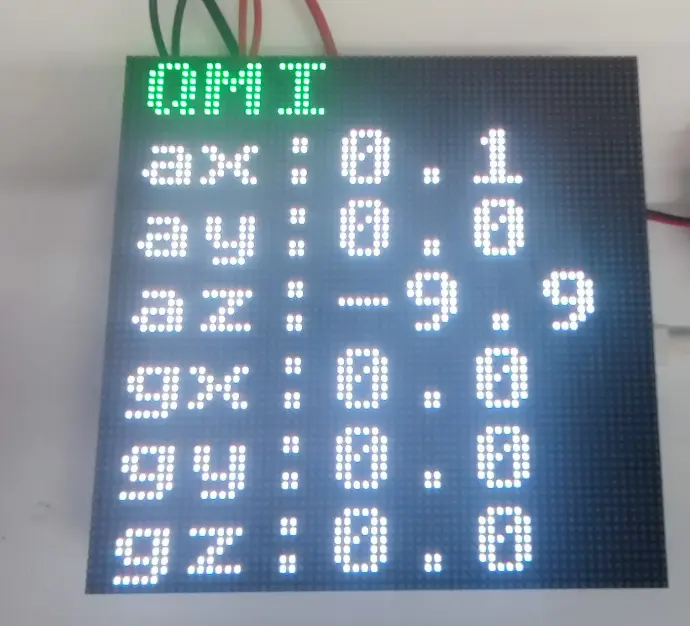
03_Matrix_QMI
Code Analysis
qmi_start(): Initializes the QMI8658 sensor UI, starts the driver, and configures periodic refreshing.qmi_ui_init(): Creates the UI for QMI8658 data display.middle_init_qmi8658(): Initializes the QMI8658 sensor driver.qmi_state.qmi_init_ret: Stores the sensor initialization result for the UI layer to determine status and show prompts.example_ui_install_timer(100, qmi_data_update): Installs a 100 ms periodic timer to refresh orientation or acceleration data.qmi_data_update: Updates sensor data and UI display in the timer callback.while (true): Keeps the task alive.vTaskDelay(pdMS_TO_TICKS(1000)): Idle wait to reduce resource usage.
void qmi_start(void) {
  /* =======================
   * 1. Start Display & UI
   * ======================= */
  bool locked = bsp_display_lock(0);
  if (locked) {
    qmi_ui_init();
    bsp_display_unlock();
  }

  /* =======================
   * 2. Start Sensor & Timer
   * ======================= */
  qmi_state.qmi_init_ret = middle_init_qmi8658();
  locked = bsp_display_lock(0);
  if (locked) {
    example_ui_install_timer(100, qmi_data_update);
    bsp_display_unlock();
  }

  /* =======================
   * 3. Idle Loop
   * ======================= */
  while (true) {
    vTaskDelay(pdMS_TO_TICKS(1000));
  }
}
Operation Result
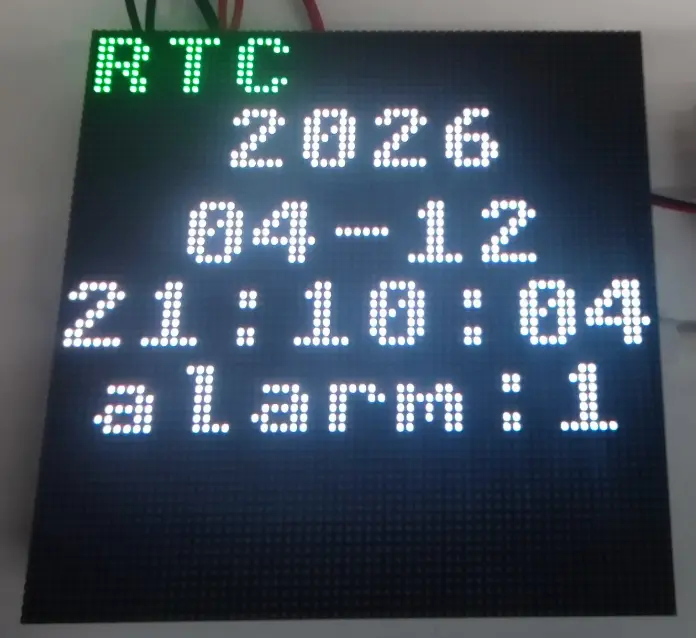
04_Matrix_RTC
Code Analysis
rtc_start(): Initializes the RTC UI, sets the time, configures the alarm, and enables real-time refresh.rtc_ui_init(): Creates UI elements for time display.middle_rtc_init(): Initializes the RTC driver and underlying hardware interface.middle_rtc_set_time(rtc_state.rtc_time): Writes the initial time (from the state structure) to the RTC chip.middle_rtc_alarm(3): Configures an RTC alarm test condition to verify alarm functionality.example_ui_install_timer(1, rtc_data_update): Installs a high-frequency refresh timer to keep the UI synchronized with the current time.rtc_data_update: Reads RTC data in the callback and updates the display content.while (true): Keeps the RTC example task running.
void rtc_start(void) {
  bool locked = bsp_display_lock(0);
  if (locked) {
    rtc_ui_init();
    bsp_display_unlock();
  }
  middle_rtc_init();
  middle_rtc_set_time(rtc_state.rtc_time);
  middle_rtc_alarm(3);
  locked = bsp_display_lock(0);
  if (locked) {
    example_ui_install_timer(1, rtc_data_update);
    bsp_display_unlock();
  }
  while (true) {
    vTaskDelay(pdMS_TO_TICKS(1000));
  }
}
Operation Result
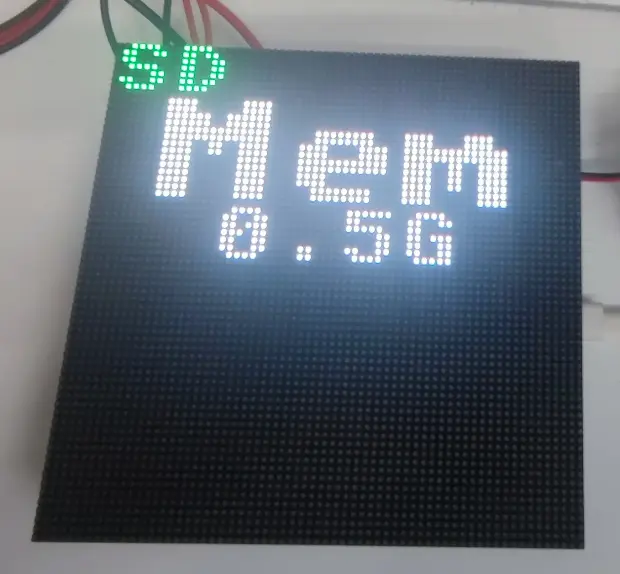
05_Matrix_SDCard
Code Analysis
sdcard_start(): Initializes the TFcard UI, starts the underlying driver, and configures periodic status refresh.sdcard_ui_init(): Creates UI components for displaying mount status, capacity, and storage information.middle_sdcard_init(): Performs low-level TF card initialization, typically including bus configuration, card identification, and file system mounting.example_ui_install_timer(1000, sdcard_data_update): Installs a 1-second periodic timer to refresh TF card status and capacity information.sdcard_data_update: Updates the TF card display content in the callback.while (true): Keeps the example task running.vTaskDelay(pdMS_TO_TICKS(1000)): Idle wait to reduce task usage.
void sdcard_start(void) {
  /* =======================
   * 1. Start Display & UI
   * ======================= */
  bool locked = bsp_display_lock(0);
  if (locked) {
    sdcard_ui_init();
    bsp_display_unlock();
  }

  /* =======================
   * 2. Init TF Card
   * ======================= */
  middle_sdcard_init();

  /* =======================
   * 3. Periodic Refresh
   * ======================= */
  locked = bsp_display_lock(0);
  if (locked) {
    example_ui_install_timer(1000, sdcard_data_update);
    bsp_display_unlock();
  }

  /* =======================
   * 4. Idle Loop
   * ======================= */
  while (true) {
    vTaskDelay(pdMS_TO_TICKS(1000));
  }
}
Operation Result
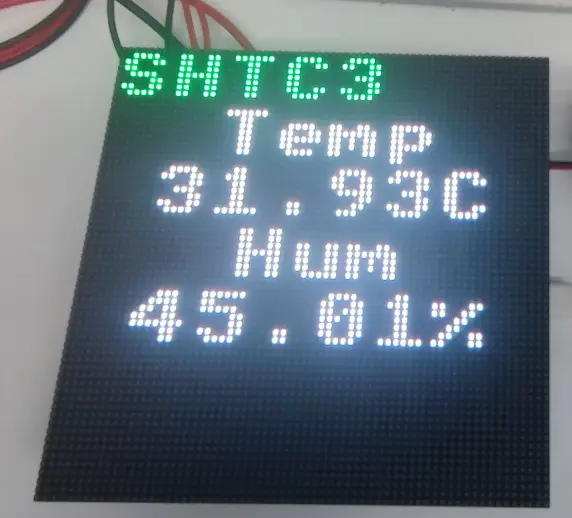
06_Matrix_SHTC3
Code Analysis
shtc3_start(): Initializes the SHTC3 UI, starts the driver, and refreshes temperature/humidity data periodically.shtc3_ui_init(): Creates UI elements for temperature, humidity, and status prompts.middle_init_shtc3(): Initializes the SHTC3 sensor driver.shtc3_state.shtc3_init_ret: Stores the initialization result for the UI layer to decide whether to show data normally.example_ui_install_timer(500, shtc3_data_update): Installs a 500 ms periodic timer to refresh sensor data.shtc3_data_update: Reads temperature and humidity information in the callback and refreshes the UI.while (true): Keeps the example task running.vTaskDelay(pdMS_TO_TICKS(1000)): Idle wait to reduce task usage.
void shtc3_start(void) {
  /* =======================
   * 1. Start Display & UI
   * ======================= */
  bool locked = bsp_display_lock(0);
  if (locked) {
    shtc3_ui_init();
    bsp_display_unlock();
  }
  /* =======================
   * 2. Init Sensor & Timer
   * ======================= */
  shtc3_state.shtc3_init_ret = middle_init_shtc3();
  locked = bsp_display_lock(0);
  if (locked) {
    example_ui_install_timer(500, shtc3_data_update);
    bsp_display_unlock();
  }

  /* =======================
   * 3. Idle Loop
   * ======================= */
  while (true) {
    vTaskDelay(pdMS_TO_TICKS(1000));
  }
}
Operation Result
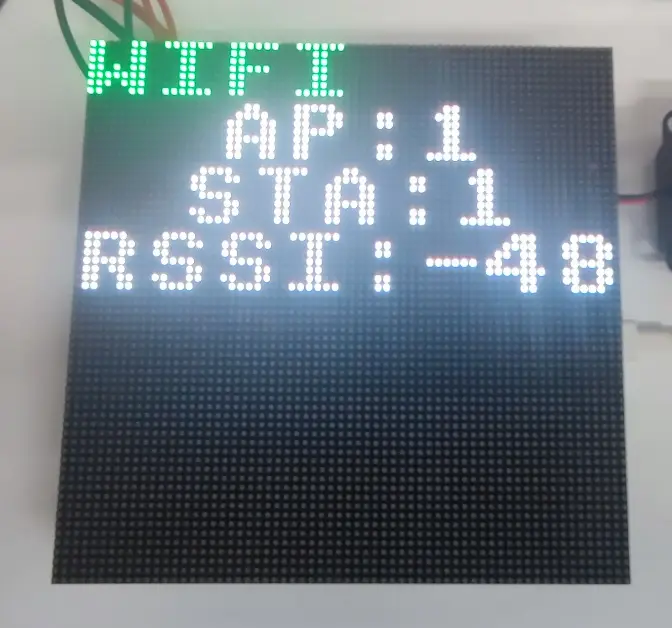
07_Matrix_WiFi
Code Analysis
wifi_start(): Initializes the Wi-Fi UI, configures STA parameters, starts the driver, and enables status refresh.wifi_ui_init(): Creates the network status display UI.middle_wifi_set_sta_config(WIFI_STA_SSID, WIFI_STA_PASS): Sets the SSID and password of the target access point.middle_wifi_init(): Starts the Wi-Fi driver and initiates the connection process.wifi_state.wifi_init_ret: Stores the Wi-Fi initialization result for the UI to display connection status.example_ui_install_timer(1000, wifi_data_update): Installs a 1-second periodic timer to refresh connection status and network information.wifi_data_update: Updates the Wi-Fi connection status, IP address, and other UI content in the callback.while (true): Keeps the example task running.
void wifi_start(void) {
  /* =======================
   * 1. Start Display & UI
   * ======================= */
  bool locked = bsp_display_lock(0);
  if (locked) {
    wifi_ui_init();
    bsp_display_unlock();
  }

  /* =======================
   * 2. Configure & Enable Wi-Fi
   * ======================= */
  middle_wifi_set_sta_config(WIFI_STA_SSID, WIFI_STA_PASS);
  wifi_state.wifi_init_ret = middle_wifi_init();

  /* =======================
   * 3. Periodic Refresh
   * ======================= */
  locked = bsp_display_lock(0);
  if (locked) {
    example_ui_install_timer(1000, wifi_data_update);
    bsp_display_unlock();
  }

  /* =======================
   * 4. Idle Loop
   * ======================= */
  while (true) {
    vTaskDelay(pdMS_TO_TICKS(1000));
  }
}
Operation Result
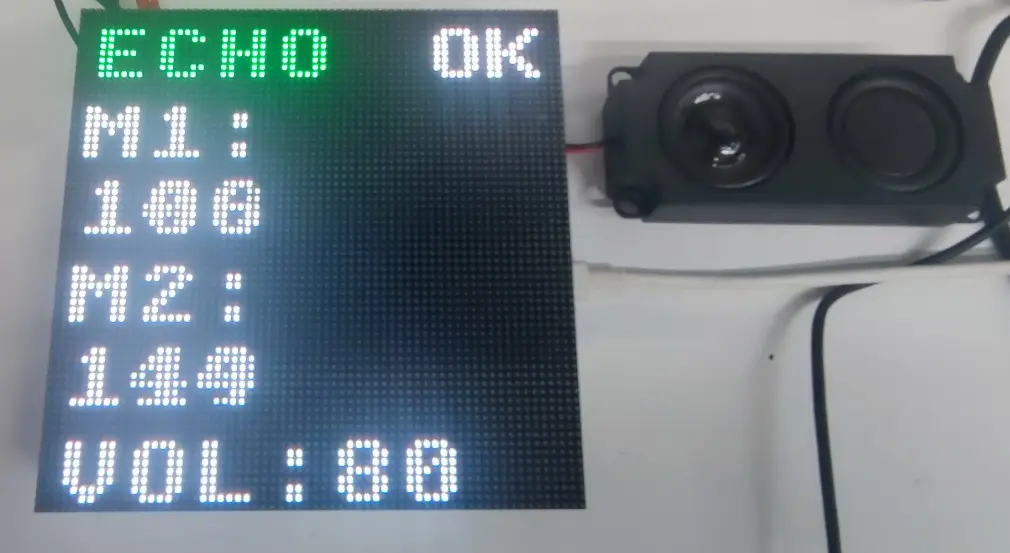
08_Matrix_Audio
Code Analysis
audio_start(): Initializes the audio UI, creates an audio task, and configures periodic status refresh.audio_ui_init(): Creates UI elements related to volume, playback status, or spectrum.audio_state.audio_out_vol = VOLUME: Sets the default audio output volume.xTaskCreate(audio_task, "aud", 4096, NULL, tskIDLE_PRIORITY + 4, NULL): Creates an independent audio task to handle audio logic in the background.example_ui_install_timer(100, audio_data_update): Installs a 100 ms periodic timer to sync the audio state with the UI.audio_data_update: Updates playback status, volume, or other audio information in the callback.while (true): Keeps the example task running.vTaskDelay(pdMS_TO_TICKS(1000)): Idle wait to reduce main task usage.
void audio_start(void) {
    /* =======================
     * 1. Start Display & UI
     * ======================= */
    bool locked = bsp_display_lock(0);
    if (locked) {
        audio_ui_init();
        bsp_display_unlock();
    }
    /* =======================
     * 2. Start Audio Task
     * ======================= */
    audio_state.audio_out_vol = VOLUME;
    xTaskCreate(audio_task, "aud", 4096, NULL, tskIDLE_PRIORITY + 4, NULL);
    /* =======================
     * 3. Periodic UI Refresh
     * ======================= */
    locked = bsp_display_lock(0);
    if (locked) {
        example_ui_install_timer(100, audio_data_update);
        bsp_display_unlock();
    }
    /* =======================
     * 4. Idle Loop
     * ======================= */
    while (true) {
        vTaskDelay(pdMS_TO_TICKS(1000));
    }
}
Operation Result