Working with ESP-IDF
This chapter introduces the ESP-IDF development environment, project build methods, and the functionality and operational behavior of the ESP-IDF example programs in the product repository for the ESP32-S3-Touch-AMOLED-2.06.
This chapter includes the following sections. Please read as needed:
Before running the examples, please ensure the following conditions are met:
- The ESP32-S3-Touch-AMOLED-2.06 development board is ready.
- The board is connected to the PC via a USB data cable.
- ESP-IDF development environment is installed.
- ESP-IDF v5.5 or later is recommended; the component manifest for
04_Immersive_blockexplicitly requires ESP-IDF ≥5.5.0. - VS Code and the ESP-IDF extension are installed, or you can use
idf.pynormally from the command line. - The ESP-IDF example programs from the product repository have been obtained.
- When compiling a project that depends on the component manager for the first time, the computer can access the ESP Component Registry.
ESP-IDF Getting Started
New to ESP32 ESP-IDF development and looking to get started quickly? We have prepared a general Getting Started Tutorial for you.
- Section 1: Environment Setup
- Section 2: Running Examples
- Section 3: Creating a Project
- Section 4: Using Components
- Section 5: Debugging
- Section 6: FreeRTOS
- Section 7: Peripherals
- Section 8: Wi-Fi Programming
- Section 9: BLE Programming
Please Note: This tutorial uses the ESP32-S3-Zero as a teaching example, and all hardware code is based on its pinout. Before you start, it is recommended that you check the pinout of your development board to ensure the pin configuration is correct.
Setting Up the Development Environment
The current examples for this product use LVGL v9.5.0, the ESP32-S3 BSP, and the newer ESP-IDF driver APIs. To ensure example compatibility, ESP-IDF v5.5 or later is recommended.
If you have switched ESP-IDF versions, run idf.py fullclean on the project, then re-set the target chip and rebuild.
The following guide uses Windows as an example, demonstrating development using VS Code + the ESP-IDF extension. macOS and Linux users should refer to the official documentation.
The screenshots in this section use ESP-IDF V5.5.2 as an example. When installing, please select the ESP-IDF version that matches your board's example.
Install the ESP-IDF Development Environment
-
Download the installation manager from the ESP-IDF Installation Manager page. This is Espressif's latest cross-platform installer. The following steps demonstrate how to use its offline installation feature.
Click the Offline Installer tab on the page, then select Windows as the operating system and the ESP-IDF version you need (the version shown in the screenshot is for reference only — choose the version that fits your actual needs).
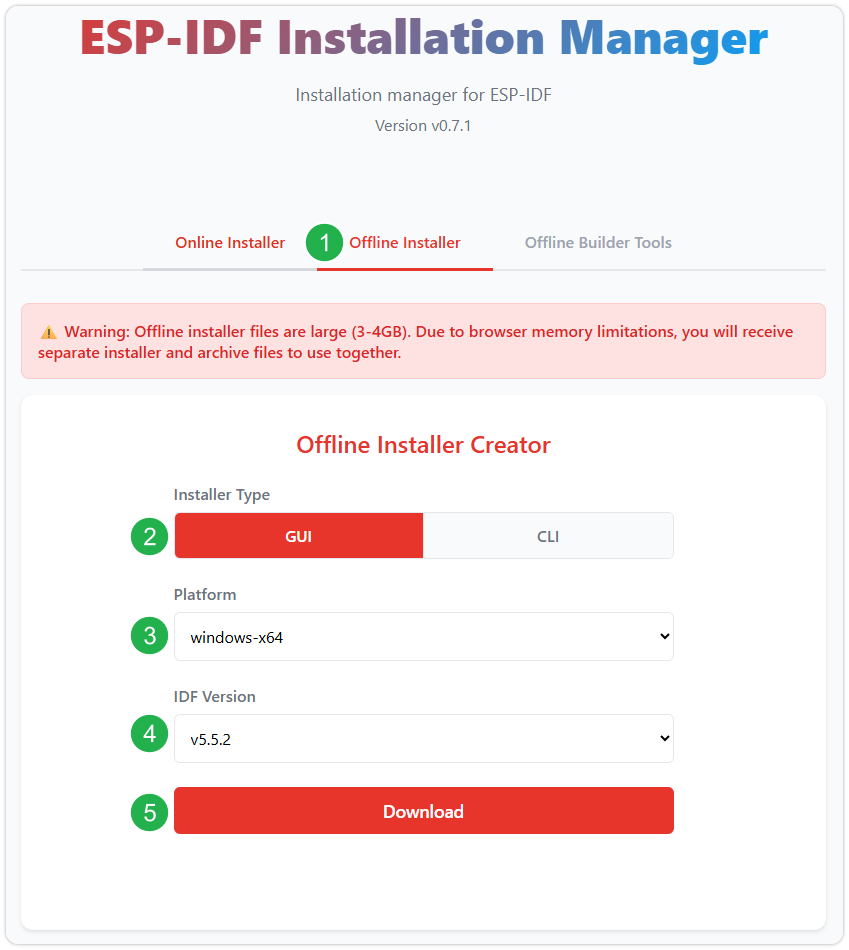
After confirming your selection, click the download button. The browser will automatically download two files: the ESP-IDF Offline Package (.zst) and the ESP-IDF Installer (.exe).
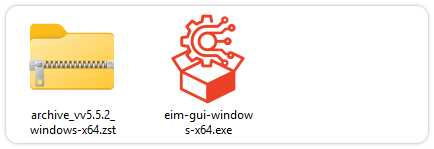
Please wait for both files to finish downloading.
-
Once the download is complete, double-click to run the ESP-IDF Installer (eim-gui-windows-x64.exe).
The installer will automatically detect if the offline package exists in the same directory. Click Install from archive.
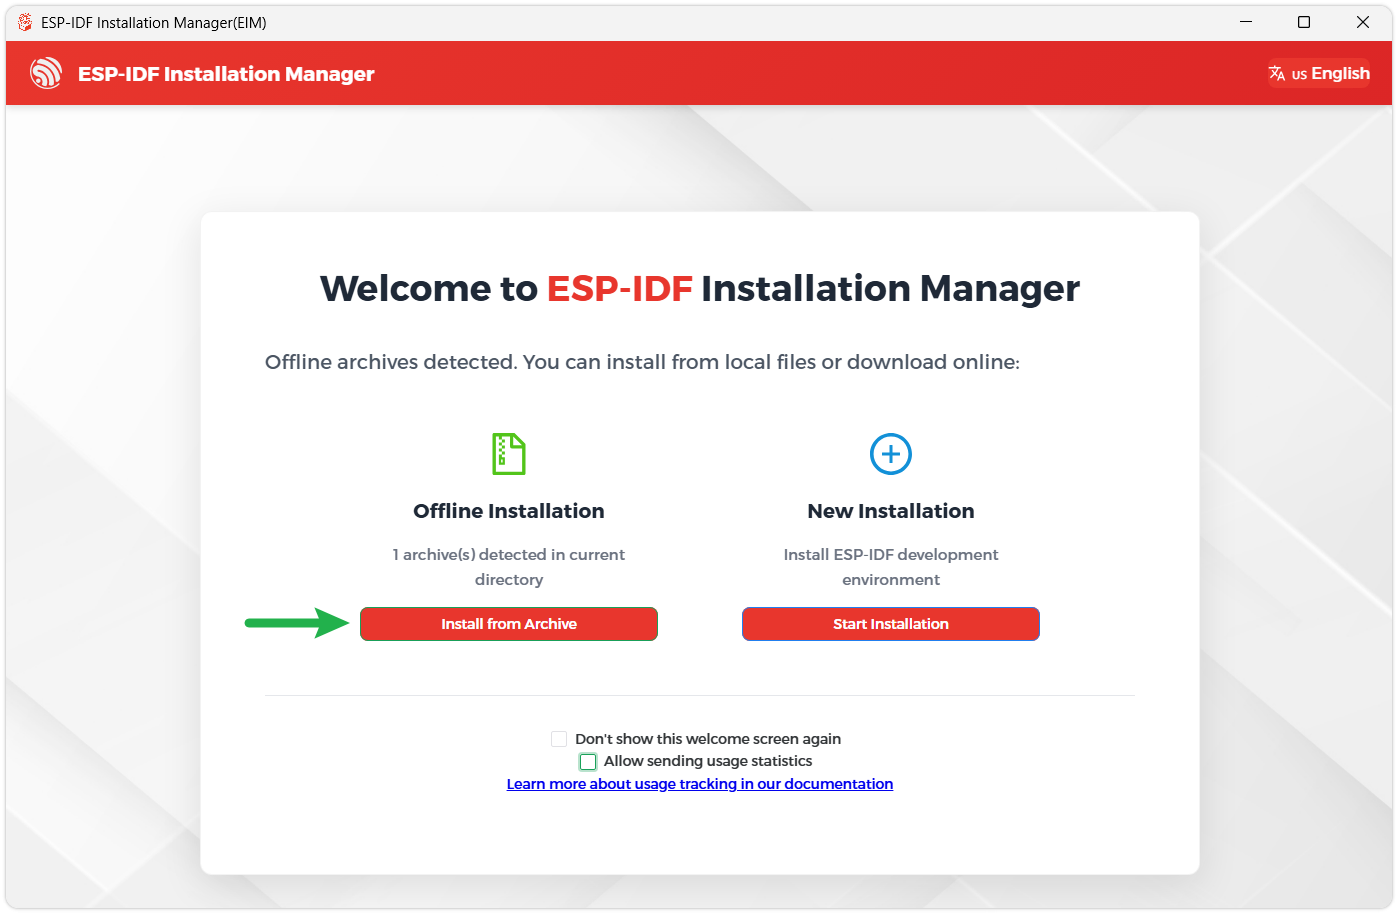
Next, select the installation path. We recommend using the default path. If you need to customize it, ensure the path does not contain Chinese characters or spaces. Click Start installation to proceed.
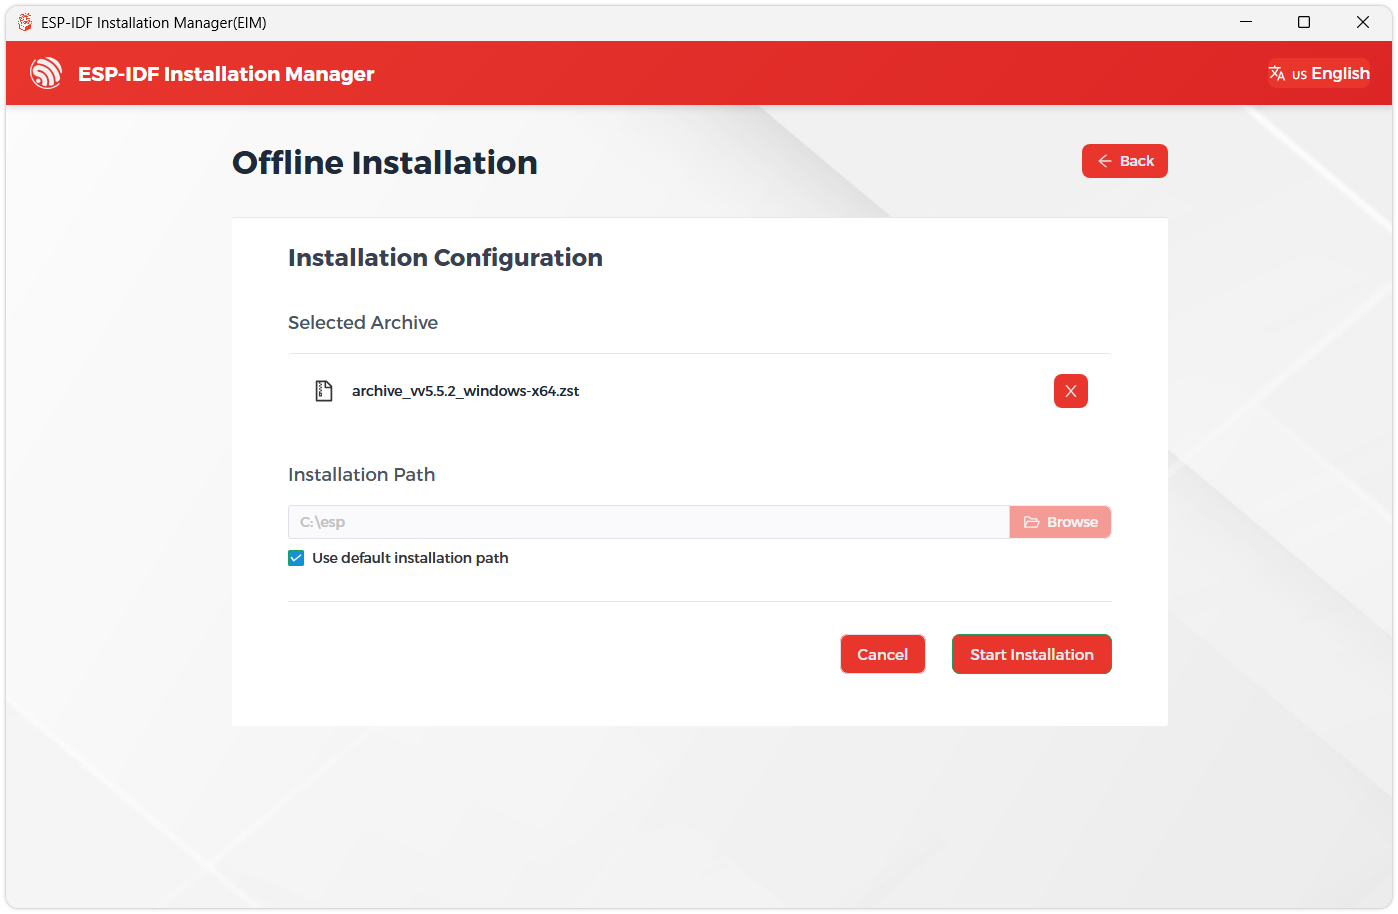
-
When you see the following screen, the ESP-IDF installation is successful.
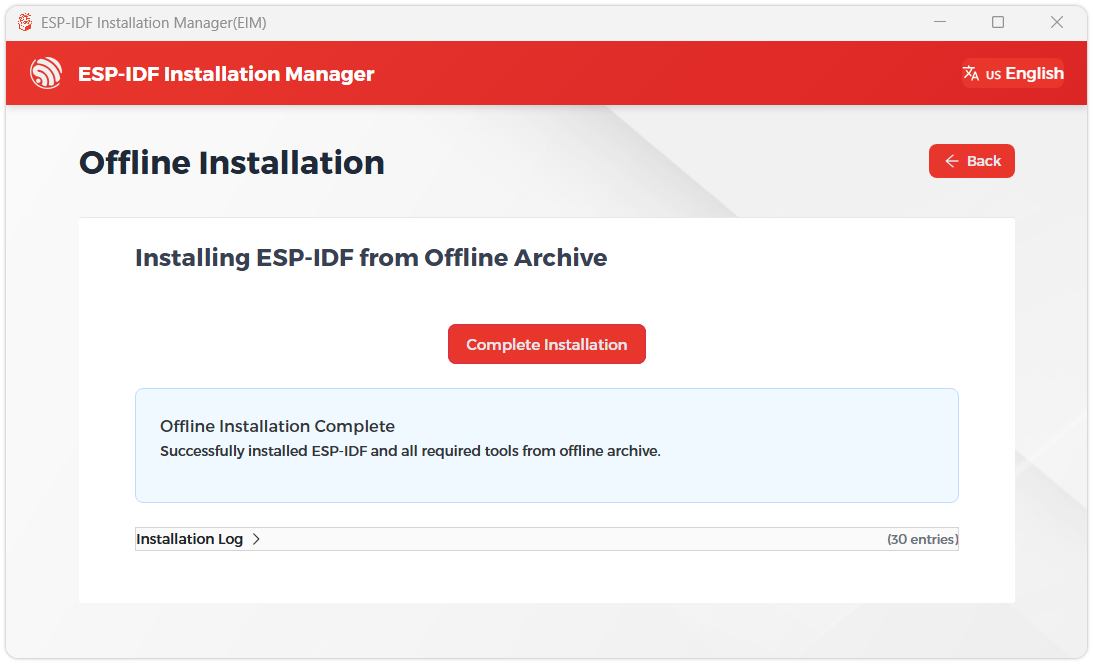
-
We recommend installing the drivers as well. Click Finish installation, then select Install driver.
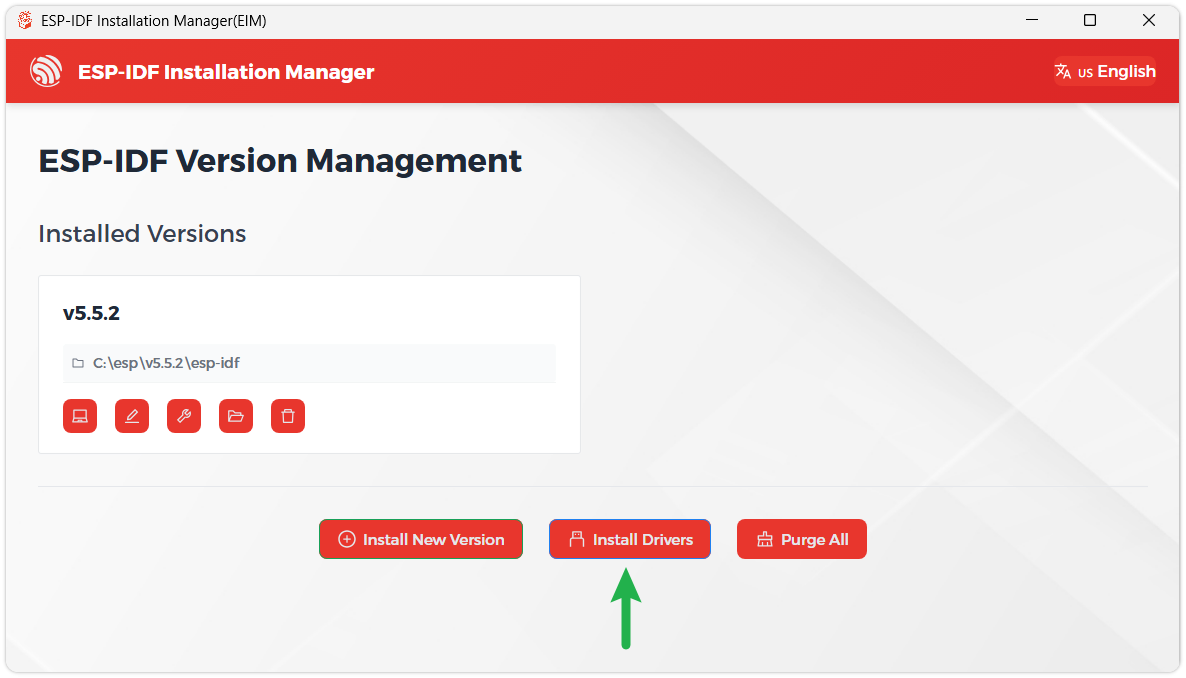
Install Visual Studio Code and the ESP-IDF Extension
-
Download and install Visual Studio Code.
-
During installation, it is recommended to check Add "Open with Code" action to Windows Explorer file context menu to facilitate opening project folders quickly.
-
In VS Code, click the Extensions icon
 in the Activity Bar on the side (or use the shortcut Ctrl + Shift + X) to open the Extensions view.
 -
Enter ESP-IDF in the search box, locate the ESP-IDF extension, and click Install.
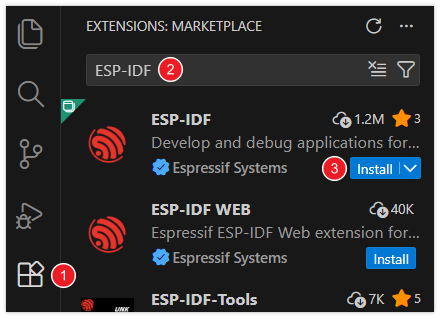
-
For ESP-IDF extension versions ≥ 2.0, the extension will automatically detect and recognize the ESP-IDF environment installed in the previous steps, requiring no manual configuration.
1. Set Target Chip
The main controller of this product is the ESP32-S3. After opening a project for the first time, set the target:
idf.py set-target esp32s3
In the VS Code ESP-IDF extension, you should select:
| Setting | Selection |
|---|---|
| Target | esp32s3 |
| Flash method | UART |
| Port | Serial port corresponding to the development board |
| ESP-IDF version | v5.5 or later |
2. Component Manager and Network
The examples declare some dependencies via idf_component.yml. On the first build, the ESP-IDF Component Manager downloads the corresponding components and generates or updates managed_components and dependencies.lock in the project.
The main components involved in the current examples include:
| Component | Role |
|---|---|
waveshare/esp32_s3_touch_amoled_2_06 | ESP32-S3-Touch-AMOLED-2.06 Board Support Package |
lvgl/lvgl v9.5.0 | Graphics library framework |
espressif/esp_codec_dev | Audio Codec support |
espressif/usb | USB component |
waveshare/qmi8658 | QMI8658 IMU driver |
espressif/esp-dsp | FFT and digital signal processing |
espressif/avi_player | AVI container parsing and playback |
espressif/esp_new_jpeg | JPEG video frame decoding |
If component downloads fail during the first build, please first check your network, proxy settings, and access to the ESP Component Registry. Do not arbitrarily delete the example's idf_component.yml, dependencies.lock, or sdkconfig.defaults.
Example
The ESP-IDF examples are located in the examples/esp-idf directory of the product repository.
| Example Program | Basic Function |
|---|---|
| 01_AXP2101 | Initialize AXP2101 via I2C and the ported XPowersLib, and handle power status |
| 02_lvgl_demo_v9 | Initialize board-level display and touch, and run the LVGL v9 Music example |
| 03_esp-brookesia | Run a phone-style UI based on ESP-Brookesia and SquareLine applications |
| 04_Immersive_block | Use QMI8658 accelerometer data to drive colored graphics that move with the device's tilt |
| 05_Spec_Analyzer | Capture audio and perform FFT, displaying a real-time spectrum on the AMOLED screen |
| 06_videoplayer | Play AVI files with audio from a TF card in a loop |
The ESP-IDF examples for this product mainly cover the following hardware resources:
| Hardware Resource | Purpose | Related Examples |
|---|---|---|
| ESP32-S3 Main Controller | Runs ESP-IDF, FreeRTOS, and graphics/audio tasks | All examples |
| 410×502 AMOLED | Display LVGL interfaces, dynamic graphics, spectrum, and video | 02 to 06 |
| FT3168 Touch | UI touch interaction | 02_lvgl_demo_v9, 03_esp-brookesia |
| AXP2101 PMU | Power management and status handling | 01_AXP2101 |
| QMI8658 IMU | Obtain acceleration data and tilt direction | 04_Immersive_block |
| ES8311 Audio Codec | Audio capture and playback | 05_Spec_Analyzer, 06_videoplayer |
| TF Card | Store AVI video files | 06_videoplayer |
If you are using the development board for the first time, it is recommended to run the examples in the following order:
01_AXP2101: Confirm PMU and I2C communication are normal.02_lvgl_demo_v9: Confirm AMOLED, touch, and basic LVGL functions are normal.04_Immersive_block: Confirm QMI8658 and dynamic display refresh are normal.05_Spec_Analyzer: Confirm audio capture, ESP-DSP, and spectrum display are normal.06_videoplayer: Confirm TF card, JPEG decoding, video, and audio playback are normal.03_esp-brookesia: Experience the complete UI system with more components and resources.
1. Directory Structure
examples/esp-idf
├── 01_AXP2101
├── 02_lvgl_demo_v9
├── 03_esp-brookesia
├── 04_Immersive_block
├── 05_Spec_Analyzer
└── 06_videoplayer
Each subdirectory is an independent ESP-IDF project. Before building, you must navigate to the specific project directory; you cannot build all examples directly from the examples/esp-idf directory.
A typical project structure is as follows:
Example Project
├── CMakeLists.txt
├── main
│   ├── CMakeLists.txt
│   ├── idf_component.yml
│   └── main.c / main.cpp
├── components
│   └── Local components
├── dependencies.lock
├── partitions.csv
└── sdkconfig.defaults
The role of each directory or file:
| Directory or File | Description |
|---|---|
main/main.c or main/main.cpp | Application entry point; prioritize reviewing these when reading examples |
components | Local components, such as XPowersLib, ESP-Brookesia, or audio extensions |
idf_component.yml | ESP-IDF Component Manager dependency declaration |
dependencies.lock | Locked versions of resolved dependencies |
sdkconfig.defaults | Example default configuration, including PSRAM, LVGL, Flash, etc. |
partitions.csv | Flash partition table; graphics resource and video examples require a larger application partition |
CMakeLists.txt | Project and component build configuration |
An example directory may contain sdkconfig, sdkconfig.defaults, and sdkconfig.old simultaneously. It is recommended to keep the repository configuration when using the examples for the first time. If issues arise after switching ESP-IDF versions, you can run idf.py fullclean, delete the automatically generated sdkconfig from the current project if necessary, and let sdkconfig.defaults regenerate it.
2. Running Examples via VS Code
-
Open VS Code.
-
Select
File ---> Open Folderand open a specific example directory, for example:examples/esp-idf/02_lvgl_demo_v9 -
In the ESP-IDF status bar, select the target chip
esp32s3. -
Select
UARTas the flash method. -
Select the serial port corresponding to the development board.
-
Click Build to build the project.
-
Click Flash to flash the firmware.
-
Click Monitor to view the runtime logs.
You can also use Build Flash Monitor to complete building, flashing, and monitoring in one step.
If no serial port appears, try:
- Replacing with a USB cable that supports data transfer.
- Unplugging and reconnecting the development board, and observing any new ports that appear.
- Holding down
BOOT, reconnecting the USB, then releasingBOOT.
3. Running Examples via Command Line
Take 02_lvgl_demo_v9 as an example:
cd examples/esp-idf/02_lvgl_demo_v9
idf.py set-target esp32s3
idf.py build
idf.py -p PORT flash monitor
Replace PORT with the actual serial port, for example:
idf.py -p COM8 flash monitor
On Linux, it might be:
idf.py -p /dev/ttyACM0 flash monitor
Exit the serial monitor:
Ctrl + ]
After switching ESP-IDF versions, target chips, or example projects, you can run:
idf.py fullclean
idf.py set-target esp32s3
idf.py build
idf.py -p PORT flash monitor
4. Example Descriptions
01_AXP2101
Function Description
This example is used to verify whether the AXP2101 power management chip can be accessed normally via I2C, and runs the ported XPowersLib power status handling logic.
Main functions:
- Initialize the I2C bus using the ESP-IDF new I2C Master API.
- Add the AXP2101 device at address
0x34to the I2C bus. - Provide register read/write interfaces for the ported XPowersLib.
- Call
pmu_init()to initialize PMU. - Create a FreeRTOS task that calls
pmu_isr_handler()once per second.
Code Entry
01_AXP2101/main/main.cpp
Local component:
01_AXP2101/components/XPowersLib
| Function | Purpose |
|---|---|
app_main() | Application entry point; completes I2C, PMU, and task initialization |
i2c_init() | Create I2C Master Bus and add the AXP2101 device |
pmu_register_read() | Read PMU registers using i2c_master_transmit_receive() |
pmu_register_write_byte() | Write PMU registers using i2c_master_transmit() |
pmu_hander_task() | Periodically execute PMU status handling |
pmu_init() | Initialize AXP2101 |
Expected Behavior
This example does not use the display. The serial log should show:
I2C initialized successfully
Subsequently, output AXP2101 initialization and power status related information.
If communication is abnormal, the following may appear:
PMU READ FAILED!
PMU WRITE FAILED!
Troubleshooting
| Symptom | Possible Cause | Suggested Action |
|---|---|---|
| PMU read or write failed | I2C pins, frequency, or device communication abnormal | Check CONFIG_PMU_I2C_SDA and CONFIG_PMU_I2C_SCL in the project configuration |
| No response at address | I2C bus initialization failed or device not powered | Confirm the AXP2101 address is 0x34, and restore the example default configuration |
| Compilation cannot find XPowersLib | Local component directory incomplete | Confirm components/XPowersLib has been fully downloaded |
| No serial output | Port or monitor selection incorrect | Check the port and re-run idf.py -p PORT monitor |
02_lvgl_demo_v9
Function Description
This example uses the Waveshare BSP to initialize the CO5300 AMOLED, FT3168 touch, and LVGL v9. The program runs the LVGL Music example by default to verify display, animation, and touch interaction.
The entry code defaults to running:
lv_demo_music();
The following are also reserved in the code:
// lv_demo_benchmark();
// lv_demo_widgets();
Code Entry
02_lvgl_demo_v9/main/main.c
Main component dependencies:
waveshare/esp32_s3_touch_amoled_2_06
lvgl/lvgl 9.5.0
espressif/esp_codec_dev ~1.5
espressif/usb ^1.4.1
| Function or Interface | Purpose |
|---|---|
bsp_display_start() | Initialize display, touch, LVGL, and BSP resources |
bsp_display_lock() | Enter LVGL critical section |
lv_demo_music() | Start LVGL Music example |
bsp_display_unlock() | Exit LVGL critical section |
Expected Behavior
The screen displays the LVGL Music example. You can interact with the interface controls and browse the example content via touch.
Switching Examples
Switch to Benchmark:
// lv_demo_music();
lv_demo_benchmark();
// lv_demo_widgets();
Switch to Widgets:
// lv_demo_music();
// lv_demo_benchmark();
lv_demo_widgets();
After modification, rebuild and flash:
idf.py -p PORT flash monitor
Troubleshooting
| Symptom | Possible Cause | Suggested Action |
|---|---|---|
| Screen stays off | BSP initialization, power, or display configuration abnormal | Run 01_AXP2101 first and check the build logs |
| Screen color abnormal or image shifted | Used BSP for other models or old component cache | Confirm dependency is esp32_s3_touch_amoled_2_06, run idf.py fullclean |
| Component download failed | Network or proxy abnormal | Check access to ESP Component Registry |
| Touch not responding | FT3168 not initialized or current interface has no obvious interaction | Switch to Widgets example and check BSP logs |
| Compilation indicates LVGL API mismatch | Mixed other LVGL versions | Keep LVGL v9.5.0 as specified in the manifest |
03_esp-brookesia
Function Description
This example is based on the ESP-Brookesia Phone framework, showcasing a phone-style UI system close to a complete product form. The project includes dark styles, a status bar, a navigation bar, a recent tasks interface, an app launcher, and a example application generated from SquareLine.
Main functions:
- Start the BSP display using a custom LVGL Port configuration.
- Turn on the AMOLED display.
- Register the BSP display lock with
LvLock. - Create and start the
Phoneobject. - Load and enable the dark Stylesheet.
- Initialize and install applications from the App Registry.
- Update the status bar clock every second.
- Periodically update memory information on the recent tasks interface.
Code Entry
03_esp-brookesia/main/main.cpp
Main local components:
03_esp-brookesia/components/brookesia_core
03_esp-brookesia/components/brookesia_app_squareline_demo
The SquareLine example includes interface resources for clock, weather, music, calls, chat, and alarm.
| Function or Object | Purpose |
|---|---|
bsp_display_start_with_config() | Start the display using specified LVGL Port parameters |
bsp_display_backlight_on() | Turn on the display |
LvLock::registerCallbacks() | Register LVGL thread-safe locks |
Phone | ESP-Brookesia Phone system object |
phone->begin() | Start the UI system |
phone->initAppFromRegistry() | Initialize applications from the registry |
phone->installAppFromRegistry() | Install registered applications |
lv_timer_create() | Create a timer for status bar time updates |
Expected Behavior
The screen displays a phone-style UI. You can enter apps, return, switch pages, or view recent tasks via touch.
The entry code uses the system's time() and localtime_r() to update the time. If the application has not set the system time or completed network time synchronization, the status bar clock may not show the current real time.
Troubleshooting
| Symptom | Possible Cause | Suggested Action |
|---|---|---|
| First compilation takes a long time | Many local components, UI resources, and C++ files | This is normal; wait for the first complete build |
| Compilation indicates the app is too large | Partition table not using the example configuration | Keep the example's partitions.csv and sdkconfig.defaults |
Start display failed | BSP display initialization failed | Run 02_lvgl_demo_v9 first to verify basic display |
Begin failed or App Registry failed | Brookesia components or application resources incomplete | Check components/brookesia_core and the example application |
| UI displays but touch not responding | Touch initialization or LVGL lock abnormal | Check serial logs and the LvLock registration flow |
04_Immersive_block
Function Description
This example uses QMI8658 to read accelerometer data and creates 15 randomly colored shapes via LVGL. When the development board is tilted, the shapes move according to the acceleration direction, while performing rounded screen boundary constraints and shape collision handling.
Main functions:
- Initialize BSP display and AMOLED.
- Initialize QMI8658.
- Set the accelerometer to ±8g, 500Hz.
- Collect 200 samples for level calibration.
- Apply bias and deadzone filtering.
- Create circle, square, triangle, and hexagon shapes.
- Update shape positions based on acceleration.
- Use the
BOOTbutton to trigger recalibration.
Code Entry
04_Immersive_block/main/main.c
Main component dependencies:
idf >=5.5.0
waveshare/qmi8658
waveshare/esp32_s3_touch_amoled_2_06
lvgl/lvgl 9.5.0
| Function | Role |
|---|---|
app_main() | Initialize display, IMU, buttons, calibration, and update task |
perform_level_calibration() | Collect 200 samples and calculate X/Y bias |
apply_calibration_and_deadzone() | Apply calibration offset and deadzone |
generate_random_shapes() | Create 15 random shapes |
shapes_update_task() | Read acceleration and update shape positions |
constrain_to_rounded_rect() | Constrain shapes within the rounded display area |
handle_shape_collisions() | Handle overlap and collisions between shapes |
init_calibration_button() | Configure GPIO0/BOOT button interrupt |
Expected Behavior
After power-on, the bottom of the screen displays:
Press BOOT to recalibrate
The program first performs level calibration, then displays multiple colored shapes. When the development board is tilted, the shapes move in the corresponding direction. Press BOOT to recalibrate.
Under normal circumstances, the serial port will show logs similar to:
Starting level calibration...
Calibration complete...
Device is now level. Shapes should be stationary.
Usage Notes
- During startup and recalibration, the development board should be placed stably on a level surface.
- The calibration process collects about 200 samples; if the data fluctuates too much, the program will recalibrate.
- If significant drift persists even when level, press
BOOTagain.
Troubleshooting
| Symptom | Possible Cause | Suggested Action |
|---|---|---|
| Shapes continuously drift | Board not level or shaking during calibration | Place the board level and press BOOT to recalibrate |
| Calibration repeatedly retries | Desktop vibration or IMU data unstable | Keep the device stationary and check QMI8658 communication |
| QMI8658 initialization failed | I2C or BSP abnormal | Check component dependencies and serial logs |
Pressing BOOT has no effect | GPIO0 interrupt not registered or occupied by other functions | Restore the example default GPIO configuration |
| Compilation indicates IDF version does not meet requirements | ESP-IDF lower than v5.5 | Switch to ESP-IDF v5.5 or later |
05_Spec_Analyzer
Function Description
This example captures stereo audio via the ES8311/I2S input, performs a 1024-point FFT using ESP-DSP, and draws 64 colored spectrum bars on the AMOLED screen.
Main functions:
- Initialize BSP display and audio Codec.
- Read stereo 16-bit audio at a 16kHz sample rate.
- Mix left and right channels into mono floating-point data.
- Apply a Hann window to the sampled data.
- Perform FFT and bit reversal.
- Map the frequency domain magnitudes to 64 spectrum bars.
- Draw the spectrum and peak effects using an LVGL Canvas.
Code Entry
05_Spec_Analyzer/main/main.c
Local audio extension:
05_Spec_Analyzer/components/bsp_extra
Main component dependencies:
lvgl/lvgl 9.5.0
espressif/esp-dsp
espressif/usb ^1.4.1
Key parameters:
| Parameter | Default | Description |
|---|---|---|
N_SAMPLES | 1024 | FFT sample points |
SAMPLE_RATE | 16000 | Audio sample rate |
CHANNELS | 2 | Input channels |
STRIPE_COUNT | 64 | Number of spectrum bars |
CANVAS_WIDTH | 410 | Spectrum canvas width |
CANVAS_HEIGHT | 200 | Spectrum canvas height |
DISPLAY_REFRESH_MS | 200 | Spectrum data update period |
| Function | Role |
|---|---|
app_main() | Initialize display, Canvas, and FFT task |
audio_fft_task() | Initialize Codec, capture audio, and perform FFT |
lv_example_canvas_10() | Create 410×200 LVGL Canvas |
timer_cb() | Draw colored spectrum bars based on spectrum data |
bsp_extra_i2s_read() | Read audio samples |
Expected Behavior
The screen displays a colored spectrum in the center. As ambient sound changes, the height and peaks of the spectrum bars vary with sound intensity and frequency distribution.
The serial port startup log should show:
Starting Audio Spectrum Analyzer
FFT and window initialized
Troubleshooting
| Symptom | Possible Cause | Suggested Action |
|---|---|---|
| Spectrum does not change at all | Codec initialization failed or no audio input | Check if Audio codec init failed appears |
| Spectrum stays near the bottom for a long time | Ambient sound too low or microphone path abnormal | Speak close to the onboard microphone for testing |
| Indicates I2S read error | I2S/Codec configuration or audio task abnormal | Check components/bsp_extra and serial logs |
| ESP-DSP not found | Component download incomplete | Check the network and re-run idf.py build |
| Canvas creation failed or reboots | PSRAM/memory configuration incorrect | Use the example's sdkconfig.defaults |
06_videoplayer
Function Description
This example searches for AVI files in the /avi directory of the TF card, uses avi_player to parse video and audio data, uses esp_new_jpeg to decode MJPEG video frames, and plays PCM audio via ES8311.
Main functions:
- Initialize the ES8311 audio Codec and set the volume to 80.
- Initialize BSP display and LVGL.
- Continuously attempt to mount the TF card.
- Scan all
.avifiles in the/sdcard/avidirectory. - Create two 320×200 RGB565 Canvas buffers.
- Decode MJPEG video frames and alternately refresh the buffers.
- Dynamically set the I2S clock based on AVI audio parameters.
- Play audio via
bsp_extra_i2s_write(). - Play all AVI files sequentially and loop.
Code Entry
06_videoplayer/main/main.c
Local audio extension:
06_videoplayer/components/bsp_extra
Main component dependencies:
lvgl/lvgl 9.5.0
espressif/avi_player
espressif/esp_new_jpeg
waveshare/esp32_s3_touch_amoled_2_06
| Function | Role |
|---|---|
app_main() | Initialize audio, display, TF card, and playback task |
get_avi_file_list() | Enumerate AVI files in the /sdcard/avi directory |
init_canvas() | Create two 320×200 RGB565 video buffers |
init_jpeg_decoder() | Initialize the JPEG decoder |
video_cb() | Decode MJPEG frames and update LVGL Canvas |
audio_cb() | Write AVI audio data to I2S |
audio_set_clock_callback() | Set sample rate, bit width, and channels based on media parameters |
avi_play_task() | Play AVI files sequentially and loop |
Preparing the TF Card
-
Format the TF card as a common FAT32 file system.
-
Create an
avifolder in the root directory of the TF card. -
Place AVI files inside:
/avi├── video1.avi└── video2.avi -
Power off, insert the TF card, and start the example.
The example's video canvas is 320×200. It is recommended to convert videos to MJPEG + PCM:
ffmpeg -i input.mp4 -vf scale=320:200 -c:v mjpeg -r 30 -q:v 2 -c:a pcm_s16le -ar 44100 -ac 2 output.avi
Place the generated output.avi into the /avi directory of the TF card.
Expected Behavior
After startup, the screen first displays the TF card mount status:
Mounting SD card...
Attempt: 1
After successful mount and AVI file discovery, the status text disappears, and the video is displayed in 320×200 size in the center of the screen while audio plays. Multiple AVI files will play sequentially, and after the list ends, it will loop from the beginning.
Serial logs will look similar to:
Found 2 AVI files in directory /sdcard/avi
Playing: /sdcard/avi/video1.avi (1/2)
AVI playback finished
Usage Notes
- The example only scans the
/avidirectory, not the TF card root directory or subdirectories. - File extensions are case-insensitive, but must be
.avi. - Video frame decoding output must not exceed the 320×200 RGB565 buffer.
- The code will keep retrying to mount the TF card; if no card is inserted, it will continuously display increasing Attempt counts.
- If the
/avidirectory does not exist or contains no AVI files, the screen will display an error and stop playing.
Troubleshooting
| Symptom | Possible Cause | Suggested Action |
|---|---|---|
Continually displays Mounting SD card | TF card not inserted properly, incompatible format, or hardware connection abnormal | Power off, reinsert the card, and use FAT32 preferably |
Displays No AVI files found in /sdcard/avi | Directory name or file format incorrect | Confirm files are in the avi folder within the TF card root directory |
| JPEG header or decode failed | AVI video encoding is not supported MJPEG | Re-encode using the recommended FFmpeg command |
Output buffer too small | Video resolution exceeds 320×200 | Scale the video to 320×200 |
| Video plays but no sound | AVI has no PCM audio track or Codec/I2S initialization abnormal | Re-encode with PCM S16LE audio and check serial logs |
| Video playback is choppy | Frame rate, bitrate, TF card speed, or decoding load too high | Lower the frame rate, JPEG quality, or video size |
| Indicates memory allocation failed | PSRAM or project configuration mismatch | Use the example's sdkconfig.defaults |
Common Issues Summary
| Issue | Suggested Action |
|---|---|
| Build indicates ESP-IDF version does not meet requirements | Use ESP-IDF v5.5 or later |
| LVGL v9.5.0 APIs not found | Delete incorrect local LVGL overrides and let the component manager download according to the manifest |
| Component downloads fail on first build | Check network, proxy, and ESP Component Registry |
| Compilation or linking still uses old configurations | Run idf.py fullclean and rebuild |
| Graphics examples reboot on startup | Keep sdkconfig.defaults, partition table, and PSRAM configuration |
| Image offset, touch coordinates, or peripherals abnormal | Confirm using the waveshare/esp32_s3_touch_amoled_2_06 BSP; do not mix components from 2.16 or other size products |
| Device not found when flashing | Replace USB cable, confirm port, and hold BOOT before reconnecting if necessary |
| Monitor has no logs | Check port usage and re-run idf.py -p PORT monitor |