ESP32-S3-Touch-AMOLED-2.06 Using Factory Firmware
To help users quickly understand the various functions of the product, the factory firmware is pre-flashed. This allows users to learn how to use each interface. In addition to the ESP32-S3-Touch-AMOLED-2.06 main unit and the included components, the following items are required to run the firmware:
Required Components
- ESP32-S3-Touch-AMOLED-2.06 ×1
- TF card ×1 (not required, needed only for TF card examples)
Development Board Battery Installation Guide
When disassembling, pay special attention to the cable area. The connection in this part is fragile. Pulling, twisting, or applying excessive force can easily cause breakage and affect device operation. Before disassembly, understand the importance of cable protection. During disassembly, move slowly and gently. When separating the enclosure from the motherboard, observe the location and routing of the cable connections. Support the motherboard or cable to keep it in a natural, tension-free state to avoid forced dismantling.
Precautions
⚠️ USB Download Precautions (Important)
If the port is not recognized, please enter Boot mode:
- Press and hold the BOOT button.
- Connect the USB cable to the computer
- Release the BOOT button.
After the download is complete, power cycle the board to run the program.
Firmware Download
- The example firmware is located in the
esp32-s3-touch-amoled-2.06-main\firmwaredirectory of the example package. - Flash address:
0x00
Firmware Flashing
- Firmware Flashing
- Firmware Erasing
The following steps apply to the firmware provided on this page.
-
Download and extract Espressif's official Flash Download Tool (Download)
-
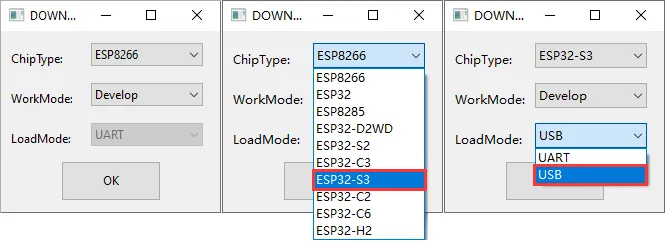
Run Flash Download Tool and select the options that match the development board's MCU and download interface. The screenshot below uses ESP32-S3 and USB as an example; use the options required by the product's hardware design.
-
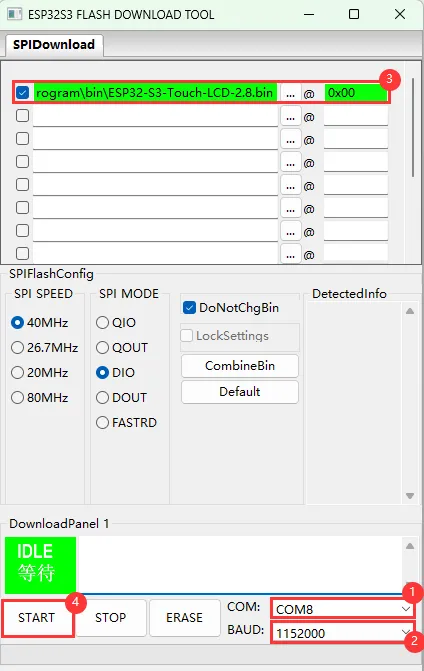
Parameter settings
- Select the COM port for the development board
- Set BAUD to the maximum value, 1152000
- Click the "..." button in the row, select the bin file provided by Waveshare, manually enter the flash address given at the top of this page in the field to its right, and select the leftmost checkbox in the row
- Click START to begin flashing
-
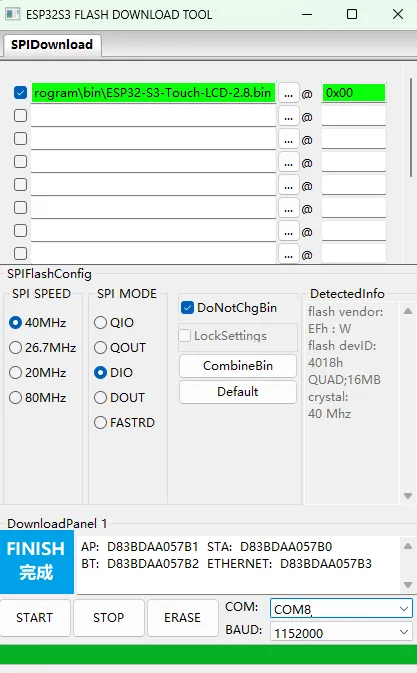
Wait for flashing to complete (this may take some time; please be patient)
-
Press the reset button and verify the result
If the tool remains at "Waiting for power-on sync", hold down BOOT and power cycle the device to enter download mode.
Click ERASE to erase the entire flash. If erasing fails or the device does not respond, hold down BOOT and power cycle the device to enter download mode, then try again.
-
Download and extract Espressif's official Flash Download Tool (Download)
-
Run Flash Download Tool and select the options that match the development board's MCU and download interface. The screenshot below uses ESP32-S3 and USB as an example; use the options required by the product's hardware design.
-
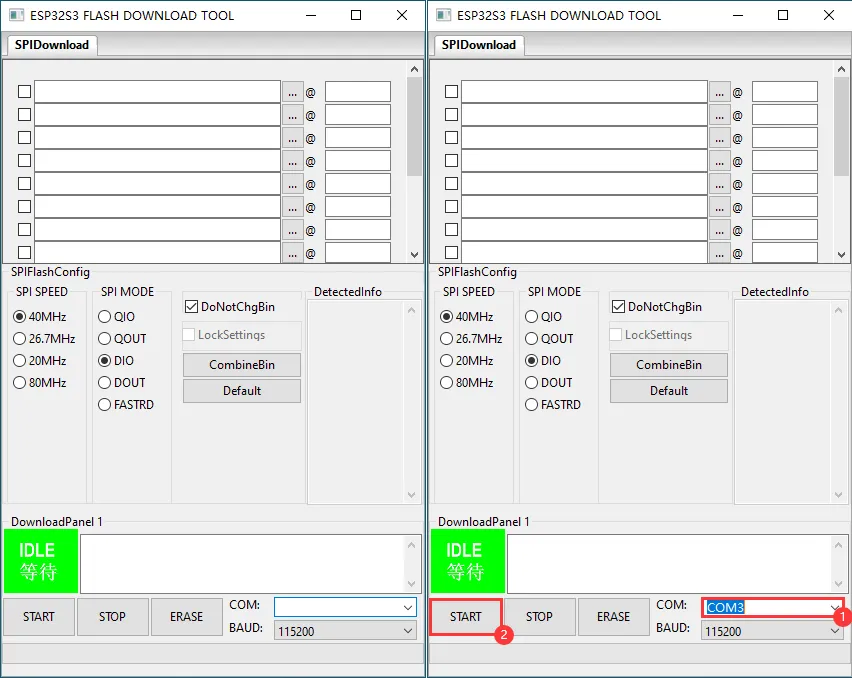
Select the COM port for the device, do not select any bin file, and click START
-
When the operation above is complete, click ERASE to erase the flash
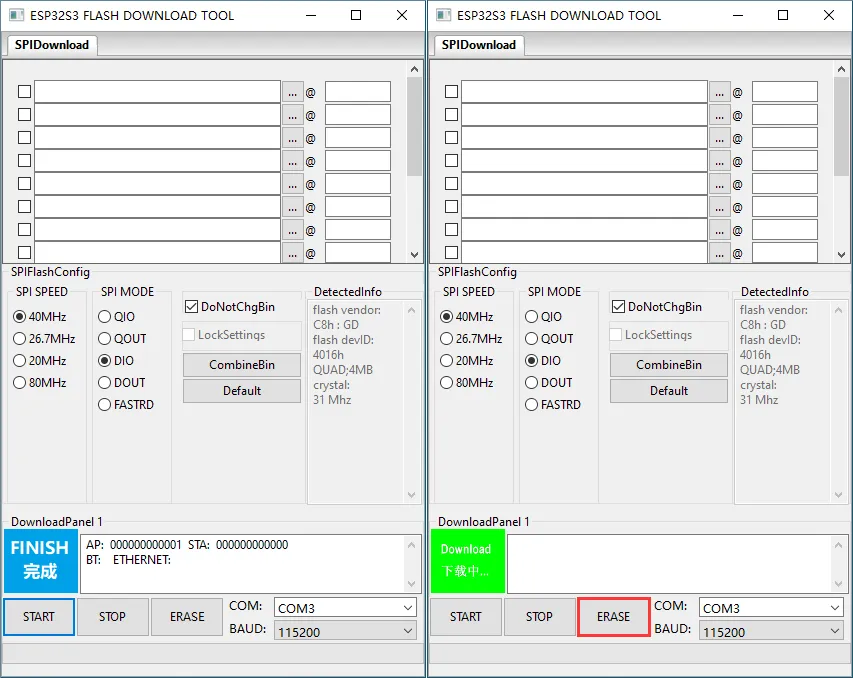
-
Wait for erasing to complete
Example Overview
-
The firmware uses the Brookesia component and showcases various applications in an APP-style interface, including Settings, Drawing Pad, Music Player, Video Player, Audio Analyzer, SquareLine, XiaoZhi AI, Gravity Ball, and other apps.
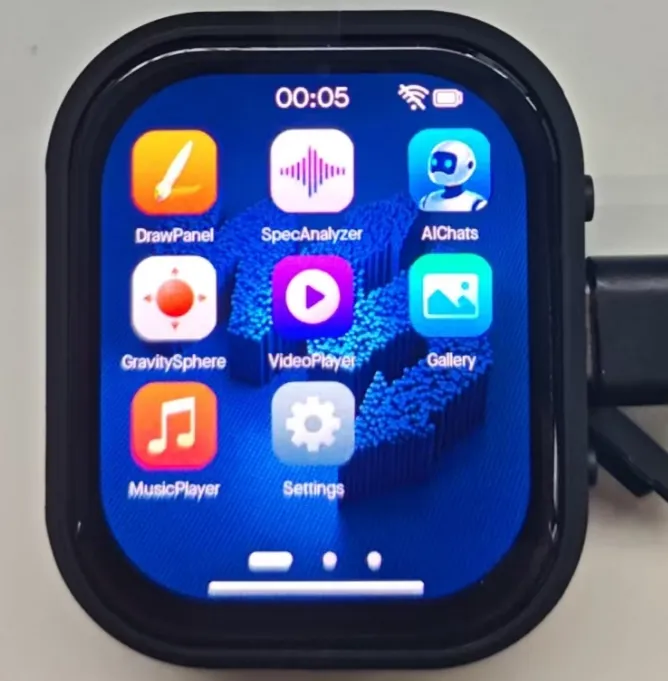
App Example Introduction
- To exit an app, swipe up from the bottom of the screen.
- Swipe up from the bottom and pause in the middle of the screen to view recently running apps; swipe up again to close and terminate the APP process.
DrawPanel APP
-
This example demonstrates a touch-screen drawing board for simple sketches.

SpecAnalyzer APP
-
This example shows a real-time audio spectrum visualizer, presenting audio frequency distribution intuitively.

AIChats APP
-
Click the APP to enter the Xiaozhi AI application. It is the same version adapted for the Xiaozhi official website, with identical operation methods. To return to the esp-brookesia UI, press PWR multiple times.

GravitySphere APP
-
This example demonstrates the Gravity Ball APP based on the six-axis attitude sensor. Open GravitySphere and place the device completely flat and stationary on the table. Once the loading bar on the screen disappears and the ball appears, the ball will move in real-time according to the device's tilt and rotational posture.

VideoPlayer APP
-
This example demonstrates an AVI video player. Place AVI-format video files in the
avifolder on the TF card.
Gallery APP
-
This example demonstrates an image viewer. It can display images, and you can swipe left or right to switch between different images.

MusicPlayer APP
-
Simulates the interface of a music player.

Settings APP
-
Features Wi-Fi scanning and network configuration functions.
-
Allows adjustment of display brightness and volume
-
Displays the battery ADC voltage
