ESP32-S3-Touch-LCD-1.69
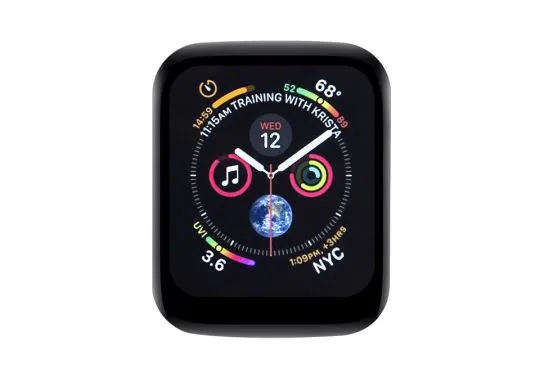
The ESP32-S3-Touch-LCD-1.69 is a low-cost, high-performance microcontroller development board designed by Waveshare. It features a compact form factor and integrates a 1.69inch capacitive LCD screen, a Li‑battery charging chip, a 6-axis IMU (3-axis accelerometer and 3-axis gyroscope), an RTC, and other peripherals, making it convenient for rapid product prototyping and embedded applications.
| SKU | Product |
|---|---|
| 27350 | ESP32-S3-Touch-LCD-1.69 |
Features
- Equipped with the high-performance ESP32-S3R8 featuring an Xtensa® 32-bit LX7 dual-core processor with a clock frequency up to 240 MHz
- Supports 2.4 GHz Wi-Fi (802.11 b/g/n) and Bluetooth® 5 (LE) with an integrated onboard antenna
- Built-in 512KB SRAM and 384KB ROM, with stacked 8MB PSRAM and external 16MB Flash storage
- Onboard 1.69inch capacitive LCD screen with 240×280 resolution and 262K colors, capable of displaying colorful images clearly
Onboard Resources
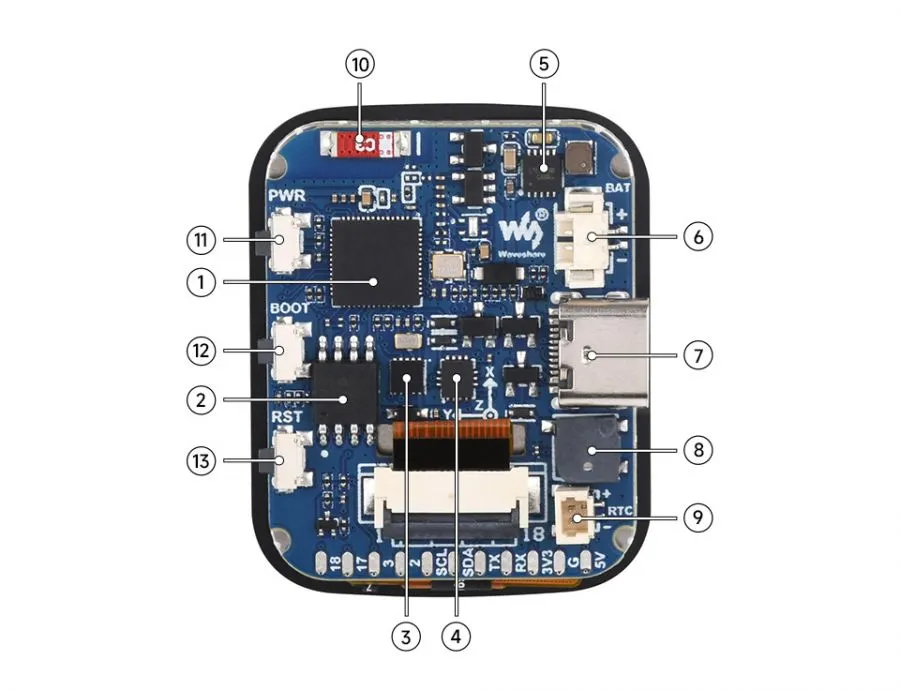
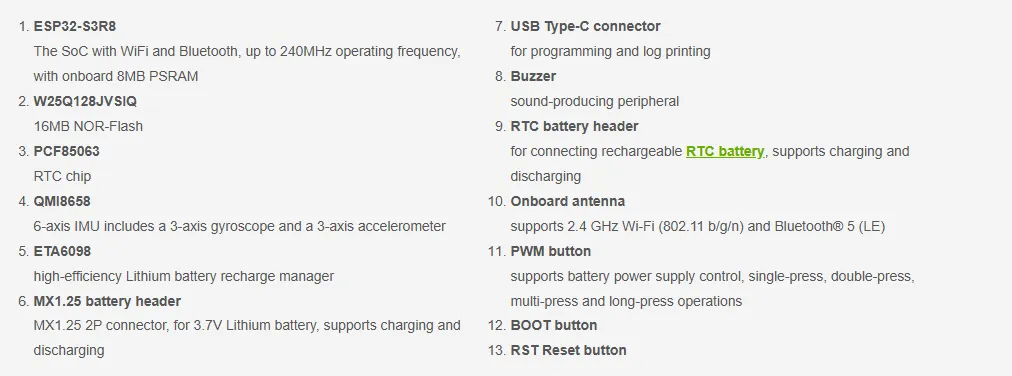
- Onboard PCF85063 RTC clock chip and RTC battery connector for timing and counting functions (see ③, ⑨ in the figure)
- Onboard QMI8658C six‑axis inertial measurement unit (IMU) integrating a 3‑axis gyroscope and a 3‑axis accelerometer (see ④ in the figure)
- Onboard ETA6098 high‑efficiency Li‑battery charging chip and M1.25 Li‑battery connector, supporting battery charging/discharging for long‑term use (see ⑤, ⑥ in the figure)
- Onboard TYPE‑C connector connected to the ESP32‑S3 USB for program uploading and log printing (see ⑦ in the figure)
- Onboard buzzer for audible feedback (see ⑧ in the figure)
- Onboard chip antenna (see ⑩ in the figure)
- Onboard customizable function button that can be configured as a power button, supporting single‑click, double‑click, and long‑press detection (see ⑪ in the figure)
- Onboard BOOT and RST function buttons for resetting and entering download mode (see ⑫, ⑬ in the figure)
LCD and Its Controller
- The LCD uses the built‑in ST7789V2 controller, which is a 240 × RGB × 320 pixel LCD controller. The LCD itself has a resolution of 240(H) × RGB × 280(V), so the internal RAM of the LCD is not fully used.
- The LCD supports 12‑bit, 16‑bit, and 18‑bit per pixel input color formats, i.e., RGB444, RGB565, and RGB666. The examples use the RGB565 color format, which is the most common RGB format.
- The LCD uses a 4‑wire SPI interface, which saves GPIO pins and also provides high communication speed.
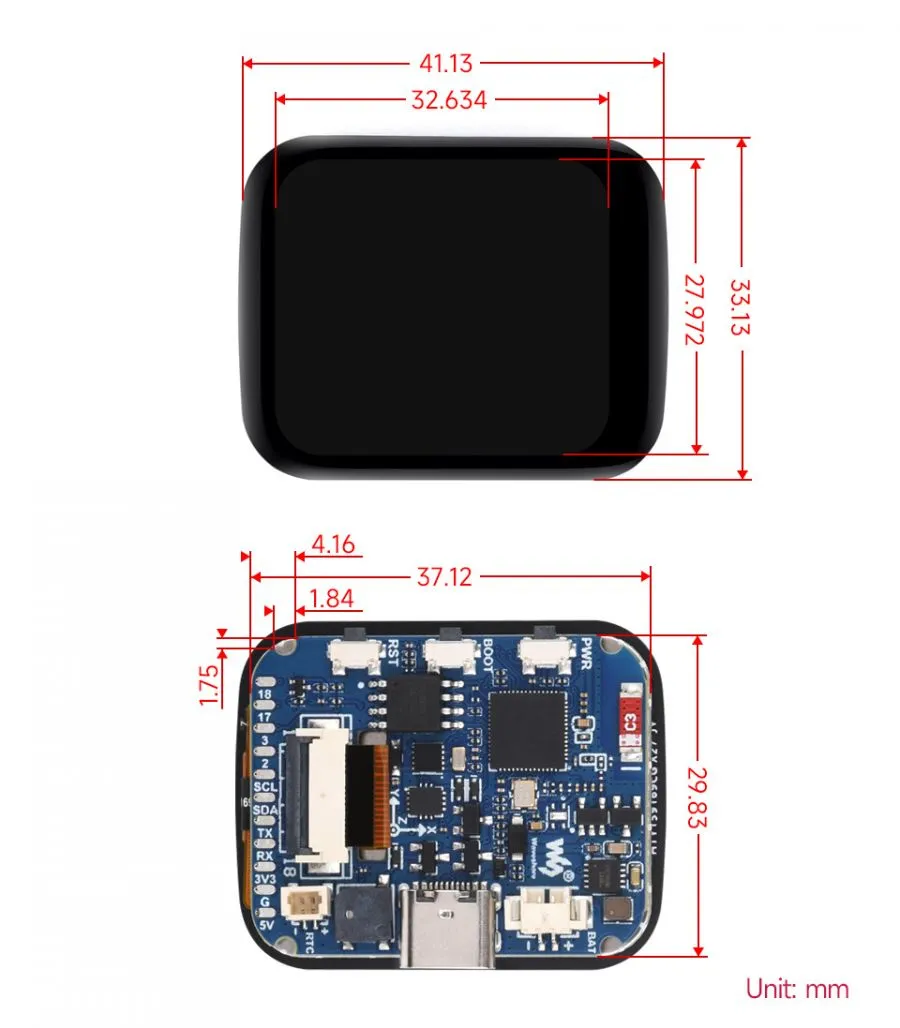
- The module resolution is 240(H) × RGB × 280(V), but because the four corners are rounded (see dimensions for details), some parts of an input image may not be displayed.
SPI Communication Protocol:
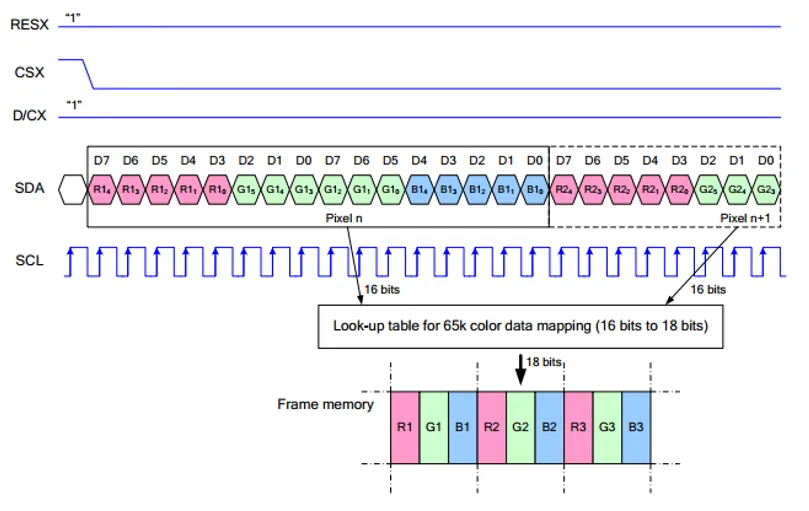
Note: The SPI interface here is specifically designed for screen display, therefore the data line from slave to master (MISO) is omitted.
-
RESX is the Reset pin; it is pulled low during module power-up and is normally set to 1.
-
CSX is the slave chip select pin; the chip is enabled only when CS is low
-
D/CX is the data/command control pin of the chip. When DC = 0, commands are written; when DC = 1, data is written.
-
SDA is the data transmission pin, specifically for RGB data.
-
SCL is the SPI communication clock pin.
For SPI communication, data transmission follows a specific timing sequence, which are determined by the combination of clock phase (CPHA) and clock polarity (CPOL):
-
The level of CPHA determines whether data is captured on the first or second clock transition edge of the serial synchronous clock. When CPHA = 0, data is captured on the first transition edge;
-
The level of CPOL determines the idle level of the serial synchronous clock. CPOL = 0 means the idle state is low level.
As can be seen from the diagram, data transmission begins at the first falling edge of SCL. One clock cycle transmits 1 bit of data, using SPI0 mode, transmitted bit by bit with the Most Significant Bit (MSB) first and the Least Significant Bit (LSB) last.
Touch and Its Controller
This touch screen uses tempered glass + film material, offering high strength, hardness, and good light transmittance. It is equipped with the CST816T self‑capacitance touch controller, which supports the standard I2C communication protocol with a configurable rate from 10 kHz to 400 kHz.
I2C Communication Protocol:
-
The chip's 7‑bit device address is
0x15, so the write address is0x2Aand the read address is0x2B. -
Waveform description
-
Write a single byte (write
0x01to register0x1F)
-
Write multiple bytes consecutively (write
0x20,0x01to registers0x1E,0x1Frespectively)
-
Read a single byte (read one byte from register
0x21)
-
Read multiple bytes consecutively (read 3 bytes from registers
0x21,0x22,0x23)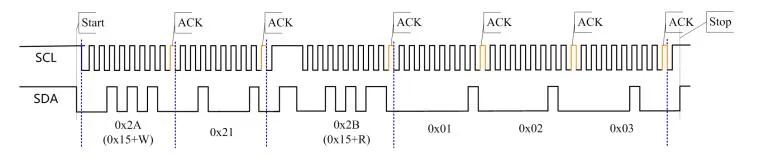
-
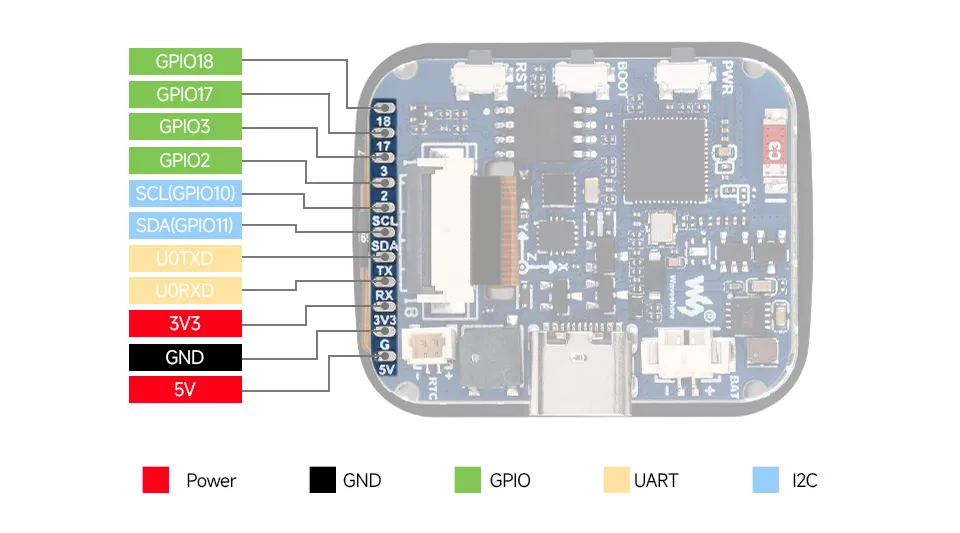
Pinout Definition
When using the GPIO pins reserved on the ESP32-S3-Touch-LCD-1.69 board, pay attention to the wire colors and corresponding functions to avoid burnout of the development board due to wiring habits
Dimensions
Development Methods
The ESP32-S3-Touch-LCD-1.69 supports two development frameworks: Arduino IDE and ESP-IDF, providing flexibility for developers to choose the tool that best fits their project requirements and personal preference.
Both development methods have their own advantages. Developers can choose based on their needs and skill levels. Arduino is simple to learn and quick to start, suitable for beginners and non-professionals. ESP-IDF provides more advanced development tools and stronger control capabilities, suitable for developers with professional backgrounds or higher performance requirements, and is more appropriate for complex project development.
-
Arduino IDE is a convenient, flexible, and easy-to-use open-source electronics prototyping platform. It requires minimal foundational knowledge, allowing for rapid development after a short learning period. Arduino has a huge global user community, providing a vast amount of open-source code, project examples, and tutorials, as well as a rich library ecosystem that encapsulates complex functions, enabling developers to implement various features rapidly. You can refer to the Working with Arduino to complete the initial setup, and the tutorial also provides related examples for reference.
-
ESP-IDF, short for Espressif IoT Development Framework, is a professional development framework launched by Espressif Systems for its ESP series of chips. It is based on C language development and includes compilers, debuggers, flashing tools, etc. It supports development via command line or integrated development environments (such as Visual Studio Code with the Espressif IDF plugin), which provides features like code navigation, project management, and debugging. We recommend using VS Code for development. For the specific configuration process, please refer to the Working with ESP-IDF. The tutorial also provides relevant examples for reference.