ESP-IDF
This chapter contains the following sections. Please read as needed:
ESP-IDF Getting Started
New to ESP32 ESP-IDF development and looking to get started quickly? We have prepared a general Getting Started Tutorial for you.
- Section 1: Environment Setup
- Section 2: Running Examples
- Section 3: Creating a Project
- Section 4: Using Components
- Section 5: Debugging
- Section 6: FreeRTOS
- Section 7: Peripherals
- Section 8: Wi-Fi Programming
- Section 9: BLE Programming
Please Note: This tutorial uses the ESP32-S3-Zero as a teaching example, and all hardware code is based on its pinout. Before you start, it is recommended that you check the pinout of your development board to ensure the pin configuration is correct.
Setting Up the Development Environment
For the ESP32-S3-Touch-LCD-3.5 development board, ESP-IDF V5.5.0 or above is required.
The following guide uses Windows as an example, demonstrating development using VS Code + the ESP-IDF extension. macOS and Linux users should refer to the official documentation.
The screenshots in this section use ESP-IDF V5.5.2 as an example. When installing, please select the ESP-IDF version that matches your board's example.
Install the ESP-IDF Development Environment
-
Download the installation manager from the ESP-IDF Installation Manager page. This is Espressif's latest cross-platform installer. The following steps demonstrate how to use its offline installation feature.
Click the Offline Installer tab on the page, then select Windows as the operating system and the ESP-IDF version you need (the version shown in the screenshot is for reference only — choose the version that fits your actual needs).
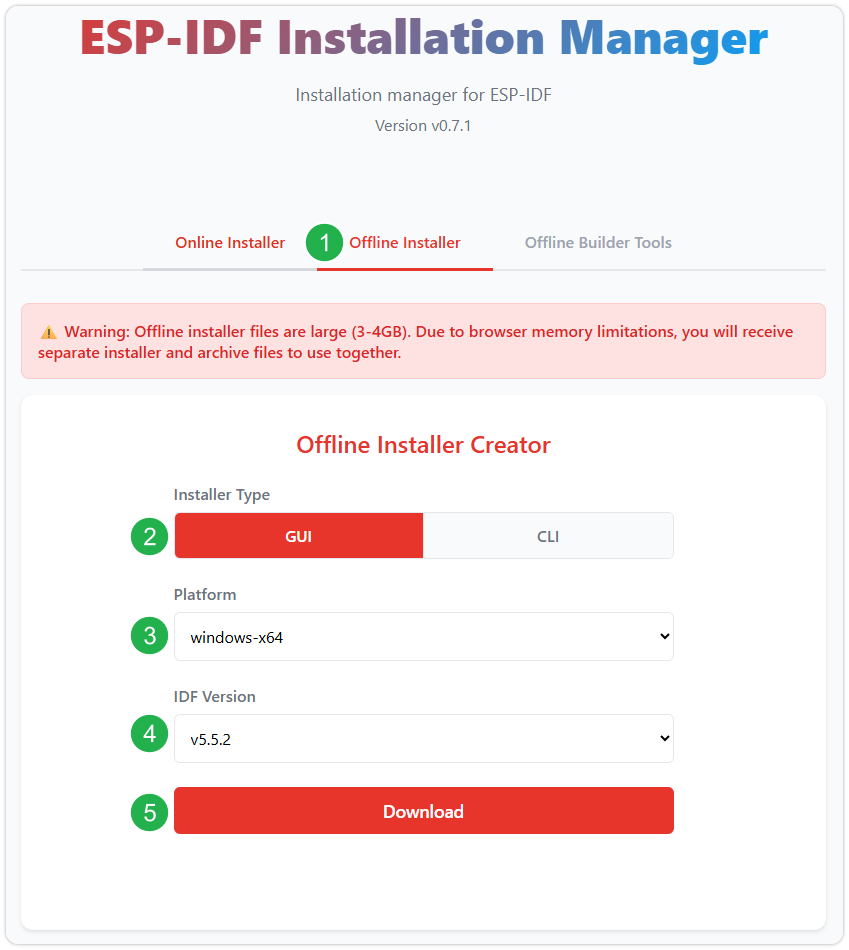
After confirming your selection, click the download button. The browser will automatically download two files: the ESP-IDF Offline Package (.zst) and the ESP-IDF Installer (.exe).
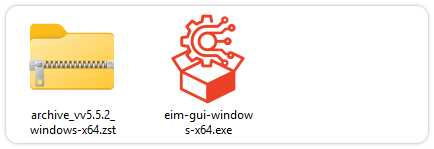
Please wait for both files to finish downloading.
-
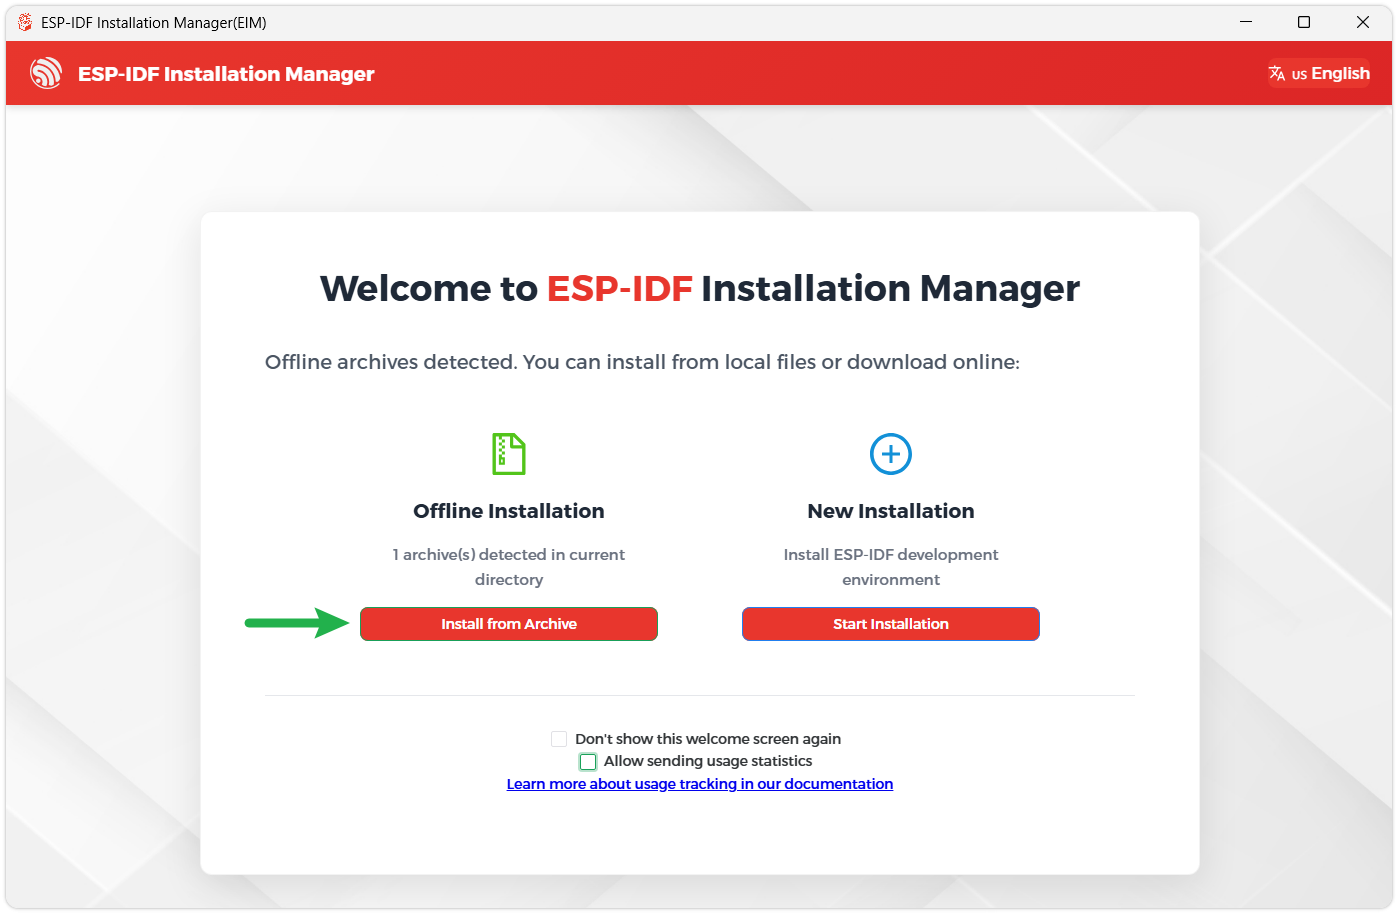
Once the download is complete, double-click to run the ESP-IDF Installer (eim-gui-windows-x64.exe).
The installer will automatically detect if the offline package exists in the same directory. Click Install from archive.
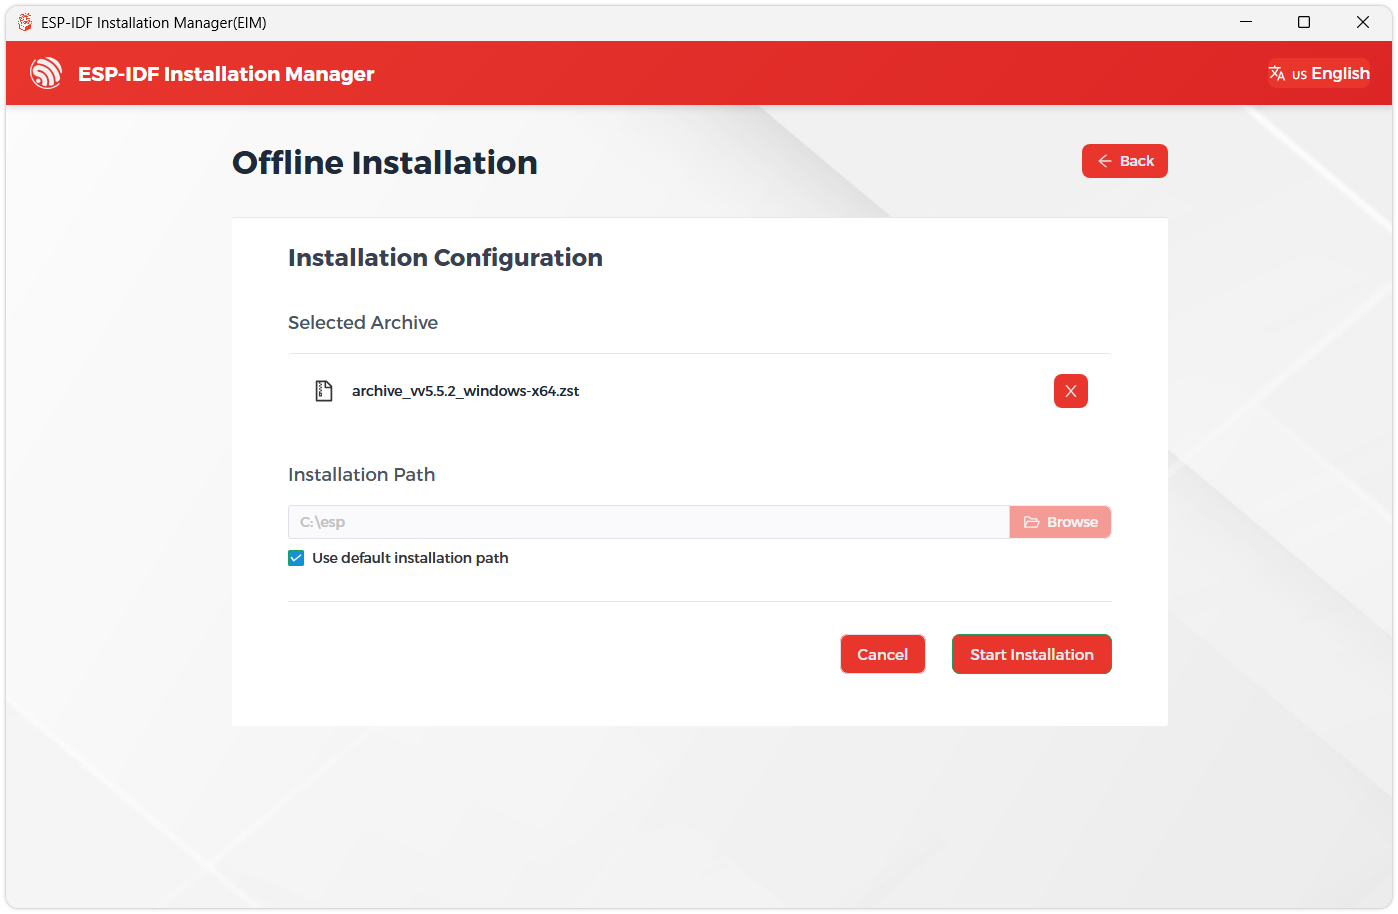
Next, select the installation path. We recommend using the default path. If you need to customize it, ensure the path does not contain Chinese characters or spaces. Click Start installation to proceed.
-
When you see the following screen, the ESP-IDF installation is successful.
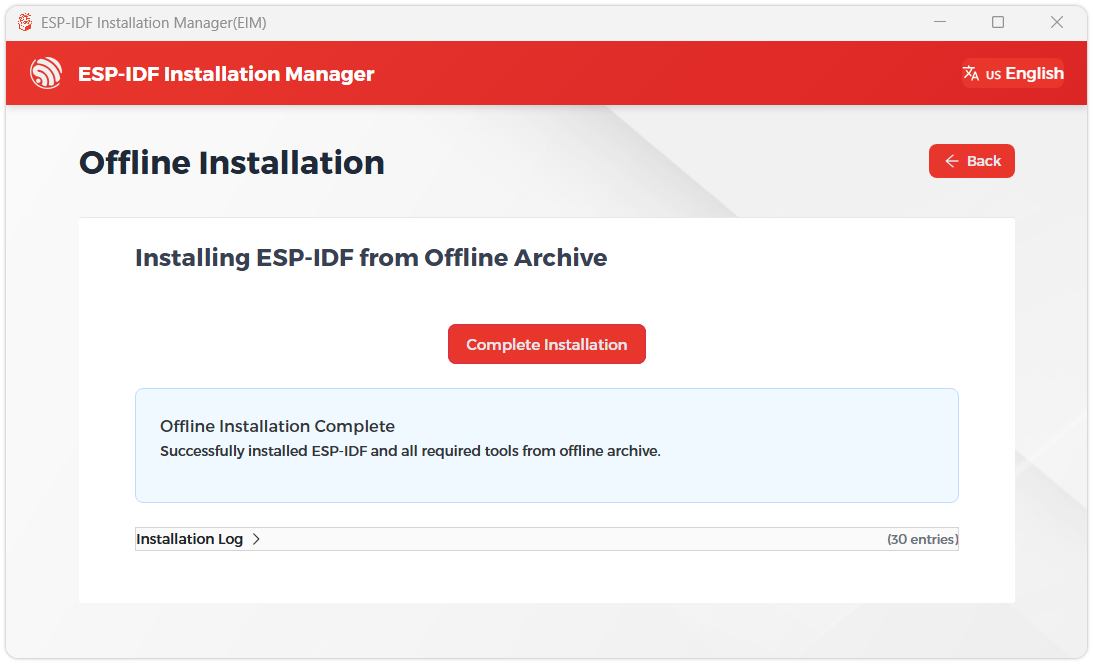
-
We recommend installing the drivers as well. Click Finish installation, then select Install driver.
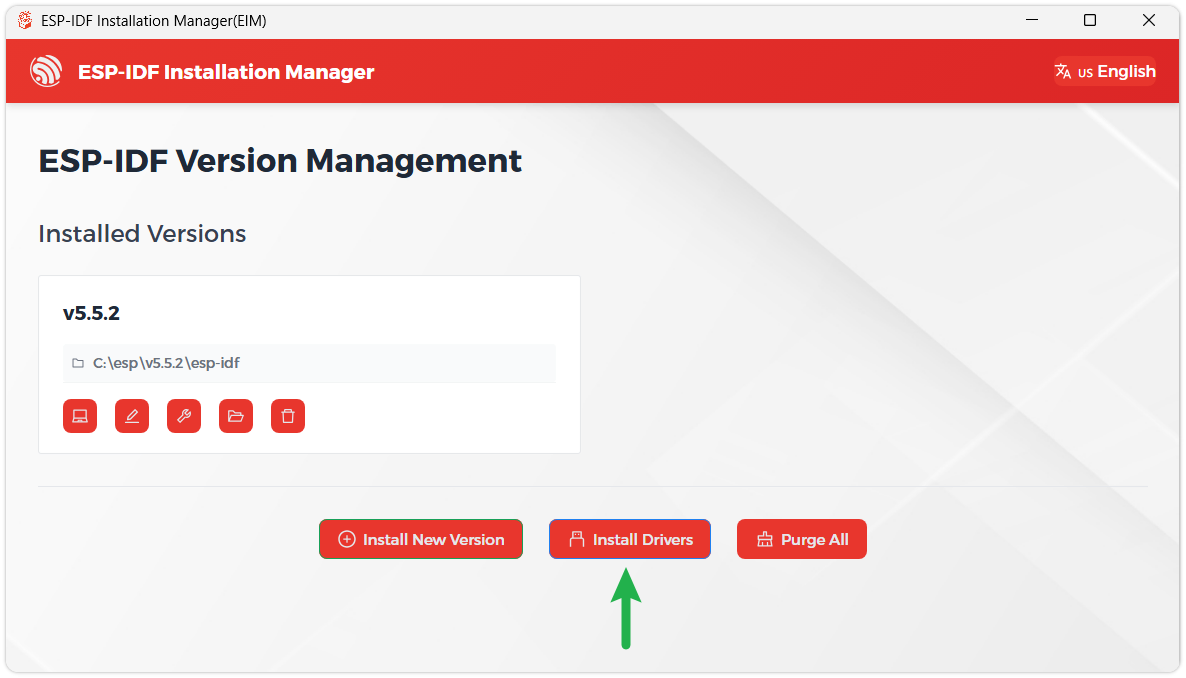
Install Visual Studio Code and the ESP-IDF Extension
-
Download and install Visual Studio Code.
-
During installation, it is recommended to check Add "Open with Code" action to Windows Explorer file context menu to facilitate opening project folders quickly.
-
In VS Code, click the Extensions icon
 in the Activity Bar on the side (or use the shortcut Ctrl + Shift + X) to open the Extensions view.
 -
Enter ESP-IDF in the search box, locate the ESP-IDF extension, and click Install.
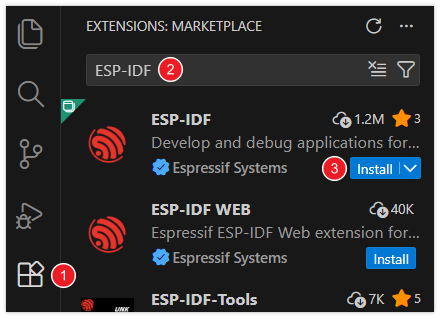
-
For ESP-IDF extension versions ≥ 2.0, the extension will automatically detect and recognize the ESP-IDF environment installed in the previous steps, requiring no manual configuration.
Example
The ESP-IDF examples are located in the ESP-IDF directory of the example package.
| Example | Basic Program Description | Dependency Library |
|---|---|---|
| 01_factory | Comprehensive test program | - |
| 02_lvgl_example | Run the official LVGL Demo UI | - |
| 03_lvgl_system | Display system parameters using LVGL, test ES8311, control screen brightness | - |
| 04_lvgl_qmi8658 | Display QMI8658 data using LVGL | - |
| 05_lvgl_axp2101 | Display various data from the AXP2101 power management chip using LVGL | - |
| 06_lvgl_camera | Display camera images using LVGL | - |
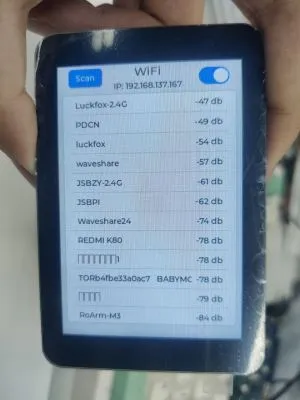
| 07_lvgl_wifi | Display scanned Wi-Fi SSIDs and signal strengths using LVGL | - |
| 08_lvgl_image | Display images from a TF card using LVGL | - |
01_factory
Example Description
- This is a comprehensive example for the ESP32-S3-Touch-LCD-3.5, and is also the factory-default flashed example.
Hardware Connection
- Connect the board to the computer.
Code Analysis
-
Initialize
i2c_bus_init();io_expander_init();esp_3inch5_display_port_init(&io_handle, &panel_handle, LCD_BUFFER_SIZE);esp_3inch5_touch_port_init(&touch_handle, i2c_bus_handle, EXAMPLE_LCD_H_RES, EXAMPLE_LCD_V_RES, EXAMPLE_DISPLAY_ROTATION);esp_axp2101_port_init(i2c_bus_handle);vTaskDelay(pdMS_TO_TICKS(100));esp_es8311_port_init(i2c_bus_handle);esp_qmi8658_port_init(i2c_bus_handle);esp_pcf85063_port_init(i2c_bus_handle);esp_sdcard_port_init();esp_camera_port_init(I2C_PORT_NUM);esp_wifi_port_init("WSTEST", "waveshare0755");esp_3inch5_brightness_port_init();esp_3inch5_brightness_port_set(80);lv_port_init();
Operation Result
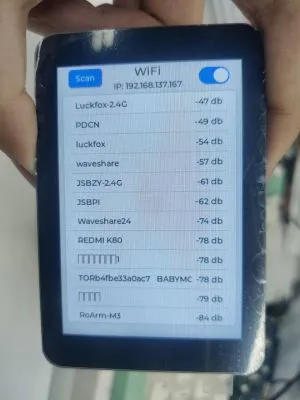
- Touch test: swipe your finger across the screen to display the trace; short-press the BOOT button to exit the touch test.

- Swipe left/right to switch between screens.
 |  |
|---|
 |  |
|---|
 |  |
|---|
02_lvgl_example
Example Description
- This example runs an LVGL example on the ESP32-S3-Touch-LCD-3.5.
Hardware Connection
- Connect the board to the computer.
Operation Result
- Touch operation is supported.

03_lvgl_system
Example Description
- This example demonstrates displaying system information using LVGL on the ESP32-S3-Touch-LCD-3.5, as well as testing the ES8311 and controlling screen brightness.
Hardware Connection
- Connect the board to the computer.
Code Analysis
-
Get the size of Flash, PSRAM, TF card, and the system operating frequency.
esp_flash_get_size(NULL, &flash_size);lv_label_set_text_fmt(label_flash, "%d MB", (int)(flash_size / 1024 / 1024));psram_size = (uint32_t)esp_psram_get_size();lv_label_set_text_fmt(label_psram, "%d MB", (int)(psram_size / 1024 / 1024));cpu_freq = esp_clk_cpu_freq();lv_label_set_text_fmt(label_chip_freq, "%d MHz", (int)(cpu_freq / 1000 / 1000));sdcard_size = esp_sdcard_port_get_size();lv_label_set_text_fmt(label_sd, "%d MB", (int)(sdcard_size / 1024 / 1024));
Operation Result
- Touch operation is supported.
04_lvgl_qmi8658
Example Description
- This example demonstrates displaying QMI8658 data using LVGL on the ESP32-S3-Touch-LCD-3.5.
Hardware Connection
- Connect the board to the computer.
Operation Result
- Touch operation is supported.
05_lvgl_axp2101
Example Description
- This example demonstrates displaying AXP2101 data using LVGL on the ESP32-S3-Touch-LCD-3.5.
Hardware Connection
- Connect the board to the computer.
Operation Result
- Touch operation is supported.
06_lvgl_camera
Example Description
- This example demonstrates displaying camera images using LVGL on the ESP32-S3-Touch-LCD-3.5.
Hardware Connection
- Connect the board to the computer.
Code Analysis
-
Obtain camera images and update LVGL.
void camera_task(void *arg){camera_fb_t *pic;lv_img_dsc_t img_dsc;img_dsc.header.always_zero = 0;img_dsc.header.w = 320;img_dsc.header.h = 480;img_dsc.data_size = 320 * 480 * 2;img_dsc.header.cf = LV_IMG_CF_TRUE_COLOR;img_dsc.data = NULL;while (1){pic = esp_camera_fb_get();if (NULL != pic){// printf("pic->len = %d\n", pic->len);img_dsc.data = pic->buf;if (lvgl_port_lock(0)){lv_img_set_src(cam_ing, &img_dsc);lvgl_port_unlock();}}esp_camera_fb_return(pic);vTaskDelay(pdMS_TO_TICKS(1));}}
Operation Result
- Touch operation is supported.
07_lvgl_wifi
Example Description
- This example demonstrates Wi-Fi scanning on the ESP32-S3-Touch-LCD-3.5 and displaying the scanned SSIDs and signal strengths using LVGL.
Hardware Connection
- Connect the board to the computer.
Code Analysis
-
Scan for Wi-Fi and update LVGL.
static void lvgl_wifi_task(void *arg){char str[50] = {0};char str_wifi_ip[32] = {0};lv_obj_t *label;wifi_ap_record_t ap_info[LIST_BTN_LEN_MAX];while (1){if (xSemaphoreTake(wifi_scanf_semaphore, pdMS_TO_TICKS(1000)) == pdTRUE){printf("wifi_scanf!!\r\n");memset(ap_info, 0, sizeof(ap_info));if (esp_wifi_port_scan(ap_info, &list_item_count, LIST_BTN_LEN_MAX)){lv_obj_del(list_btns[0]);if (lvgl_port_lock(0)){for (int i = 0; i < list_item_count && i < LIST_BTN_LEN_MAX; i++){list_btns[i] = lv_list_add_btn(list, NULL, (char *)ap_info[i].ssid);label = lv_label_create(list_btns[i]);lv_label_set_text_fmt(label, "%d db", ap_info[i].rssi);}lvgl_port_unlock();}}}esp_wifi_port_get_ip(str_wifi_ip);sprintf(str, "IP: %s", str_wifi_ip);if (lvgl_port_lock(0)){lv_label_set_text(lable_wifi_ip, str);lvgl_port_unlock();}}}
Operation Result
- Touch operation is supported.
08_lvgl_image
Example Description
- This example demonstrates the ESP32-S3-Touch-LCD-3.5 using LVGL to display images from a TF card, supporting image formats such as jpg, bmp, png, and bin.
Hardware Connection
- Insert the TF card into the computer.
- Create a new folder named
imagesin the root directory of the TF card. - Copy all the files from the
datafolder of this project to theimagesfolder on the TF card - Insert the TF card into the ESP32-S3-Touch-LCD-3.5.
- Connect the board to the computer.
Code Analysis
-
Read all images in the
S:imagesdirectory and print the file names.read_image_files("S:images");print_image_filenames(); -
Initialize the UI and add left/right swipe gestures to switch images.
img = lv_img_create(lv_scr_act());lv_obj_set_size(img, 320, 480);lv_obj_align(img, LV_ALIGN_CENTER, 0, 0);snprintf(str_buf, sizeof(str_buf), "S:images/%s", image_filenames[0]);printf("img_set_src: %s\r\n", str_buf);lv_img_set_src(img, str_buf);lv_obj_clear_flag(img, LV_OBJ_FLAG_SCROLLABLE);lv_obj_add_flag(img, LV_OBJ_FLAG_GESTURE_BUBBLE);lv_obj_add_event_cb(lv_scr_act(), img_gesture_event_cb, LV_EVENT_GESTURE, NULL);
Operation Result
- Touch operation is supported.
