4G/5G
This section introduces how to use the M.2 B KEY interface functions on the Raspberry Pi, laying the foundation for subsequent project development.
danger
- The test uses the SIM7600. If using other modules, refer to the corresponding 4G/5G module's Wiki.
- The board itself does not support 4G/5G; the module must be connected via the M.2 B KEY interface. The M.2 B KEY interface provides only a USB2.0 channel and does not support PCIe devices.
warning
- To turn off the 4G/5G module, use GPIO6 (BCM pin 6). Output high to disable the module, output low to enable it.
- Enabling or disabling the module takes some time (approximately 30 seconds).
Troubleshooting
No New ttyUSB Device Detected
- Execute the following commands in the terminal to load the USB device descriptors:
sudo modprobe optionsudo sh -c 'echo "1e0e 9011" > /sys/bus/usb-serial/drivers/option1/new_id'sudo sh -c 'echo "1e0e 9018" > /sys/bus/usb-serial/drivers/option1/new_id'sudo sh -c 'echo "1e0e 901E" > /sys/bus/usb-serial/drivers/option1/new_id'
Setting Up AT Command Configuration Environment
-
Install the text-based serial communication tool minicom:
sudo apt-get install minicom -
Connect to the 4G/5G module port (use ttyUSB2, which appears when the module is connected; adjust the port according to your actual situation):
sudo minicom -D /dev/ttyUSB2 -
The following AT commands are common to both 4G and 5G modules:
Command Description Return Value AT Test command OK ATE ATE1 enables echo
ATE0 disables echoOK AT+CGMI Query module manufacturer OK AT+CGMM Query module model OK AT+CGSN Query product serial number OK AT+CSUB Query module version and chip OK AT+CGMR Query firmware version serial number OK AT+IPREX Set module hardware serial port baud rate +IPREX: OK AT+CRESET Reset module OK AT+CSQ Query network signal quality; returns signal value +CSQ: 17,99 OK AT+CPIN? Query SIM card status; returns READY if the SIM card is recognized properly +CPIN: READY AT+COPS? Query current operator; returns operator information when connected to the network +COPS: OK AT+CREG? Query network registration status +CREG: OK AT+CPSI? Query UE system information AT+CNMP Network mode selection command:
2: Automatic
13: GSM only
38: LTE only
48: Any modes but LTE
... ....OK - For more AT commands, refer to: SIM7600 AT Command Reference
- For more documentation, refer to: SIM7600 Reference
ifconfig Fails to Find the Device
- Click here to set up the AT command configuration environment
- Compare the newly added ttyUSB interfaces (if the new interfaces are ttyUSB0~ttyUSB4). If no new ttyUSB device appears, click here to configure.
- Use the newly added ttyUSB interface for configuration changes (here we use the newly added ttyUSB2):
sudo minicom -D /dev/ttyUSB2
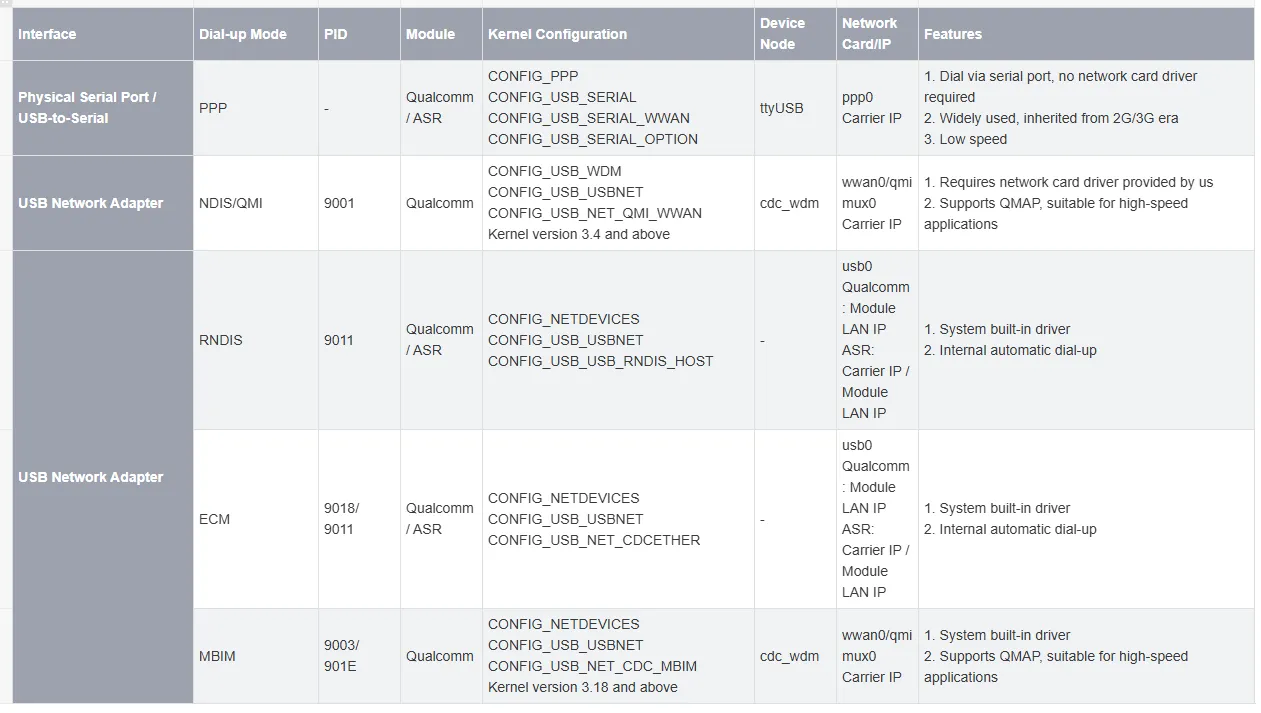
- Enter the following command and press Enter. The module will automatically restart to apply the settings (adjust according to your module's requirements; different modules support different dial-up methods; the example below uses Qualcomm's RNDIS dial-up).
- This command only needs to be set once. On the next power-up, the module will default to this mode (1E0E: Vendor ID, 9011: depends on the actual module):
AT+CUSBCFG=USBID,1E0E,9011
- Rescan the devices:
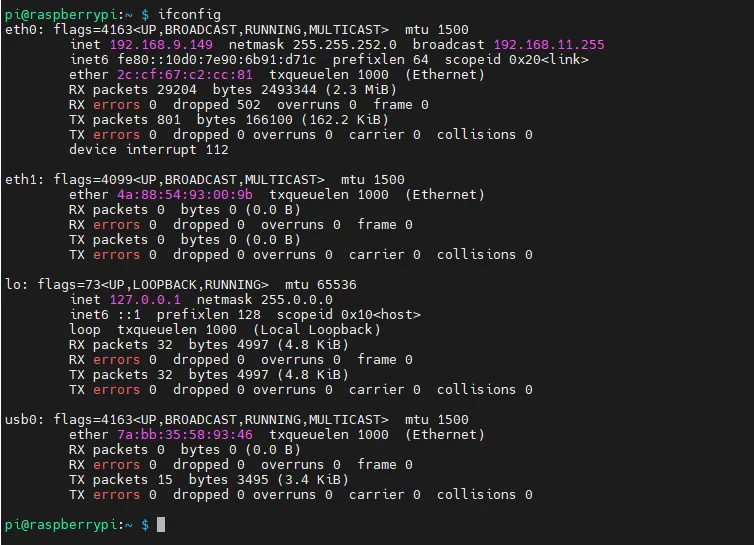
ifconfig
4G/5G Usage
- Connect the 4G/5G module and the SIM card to the device, then power on.
- Use ifconfig to scan for usb0 (USB network adapter – the exact device name may vary; it is not necessarily usb0). If ifconfig does not find the device, click here to troubleshoot.
ifconfig
- If the SIM card is properly connected, the NET LED blinks normally but no IP address is obtained, verify that the SIM card is working.
- If the SIM card is working but still no IP address is obtained, execute the following commands in the terminal to renew the IP address:
sudo dhclient -v usb0sudo apt-get install udhcpcsudo udhcpc -i usb0sudo route add -net 0.0.0.0 usb0
- Test whether the wireless network card can ping Baidu successfully; be sure to connect the antenna.
ping -I usb0 www.baidu.com # Here the port added by the 4G/5G module is usb0; adjust the command according to your actual situation
- If you are using an IoT SIM card that successfully registers on the network but dial-up fails and ping does not work, try one of the following AT commands to select the optimal frequency band (click here to set up the AT command configuration environment):
AT+CNBP=0x0002000000400183,0x000001E000000000,0x0000000000000021AT+CNBP=0x0002000000400180,0x480000000000000000000000000000000000000000000042000001E200000095,0x0000000000000021