Working with Raspberry Pi
1. Hardware Connection
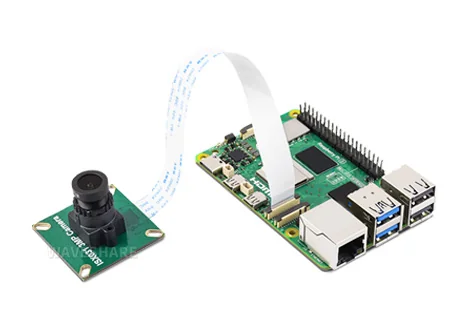
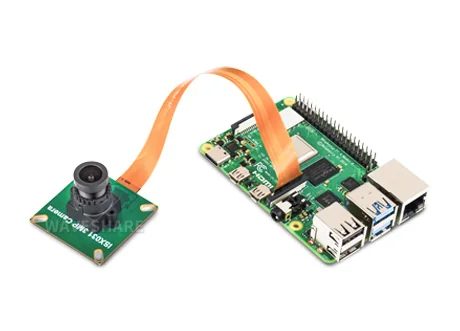
The images above are for demonstration purposes only. This product does not include the Raspberry Pi board or the yellow FPC ribbon cable shown.
2. Software Environment Configuration
2.1 Flash Official Raspberry Pi OS Image
- First, flash the latest official Raspberry Pi OS image to a TF card.
- After flashing, start the Raspberry Pi and complete the basic initial configuration.
2.2 Install GStreamer Tools
sudo apt update
sudo apt install gstreamer1.0-tools
2.3 Copy the Driver Installation Package
Copy the driver compressed package ISX031-3MP-Camera.zip to the Raspberry Pi.
Unzip and navigate to the directory:
unzip ISX031-3MP-Camera.zip
cd ISX031-3MP-Camera
2.4 Install the Driver
Grant execute permissions to the installation script and run it:
chmod +x install.sh
./install.sh
2.5 Select Raspberry Pi 5 Camera Interface
CAM1(Default): Connect the camera toCAM1; no configuration changes are needed.CAM0: Connect the camera toCAM0, then open/boot/firmware/config.txt:
sudo nano /boot/firmware/config.txt
Change the following line:
dtoverlay=isx031
to:
dtoverlay=isx031,cam0
2.6 Reboot the Raspberry Pi
After the installation and interface configuration are complete, reboot the Raspberry Pi:
sudo reboot
3. Preview Test
3.1 Find the Media Device Corresponding to ISX031
Run the following command to find the media device corresponding to ISX031:
for dev in /dev/media*; do media-ctl -d "$dev" -p 2>/dev/null | grep -qi isx031 && echo "$dev"; done
In the topology configuration commands below, fill in the media device number found above after -d. For example, if the output is /dev/media0, use -d 0.
3.2 Raspberry Pi 5
3.2.1 Resolution: 1920 × 1536
Configure the link:
media-ctl -d 0 -V ''\''isx031 11-001a'\'':0 [fmt:UYVY8_1X16/1920x1536 field:none colorspace:smpte170m]'
media-ctl -d 0 -V ''\''csi2'\'':0 [fmt:UYVY8_1X16/1920x1536 field:none colorspace:smpte170m]'
media-ctl -d 0 -l ''\''csi2'\'':4 -> '\''rp1-cfe-csi2_ch0'\'':0 [1]'
Preview (run on the Raspberry Pi):
gst-launch-1.0 v4l2src device=/dev/video0 ! video/x-raw,format=UYVY,width=1920,height=1536,framerate=30/1 ! videoconvert ! fpsdisplaysink video-sink=xvimagesink sync=false
3.2.2 Resolution: 1920 × 1080
Configure the link:
media-ctl -d 0 -V ''\''isx031 11-001a'\'':0 [fmt:UYVY8_1X16/1920x1080 field:none colorspace:smpte170m]'
media-ctl -d 0 -V ''\''csi2'\'':0 [fmt:UYVY8_1X16/1920x1080 field:none colorspace:smpte170m]'
media-ctl -d 0 -l ''\''csi2'\'':4 -> '\''rp1-cfe-csi2_ch0'\'':0 [1]'
Preview (run on the Raspberry Pi):
gst-launch-1.0 v4l2src device=/dev/video0 ! video/x-raw,format=UYVY,width=1920,height=1080,framerate=30/1 ! videoconvert ! fpsdisplaysink video-sink=xvimagesink sync=false
3.3 Raspberry Pi 4
3.3.1 Resolution: 1920 × 1536
Configure the link:
media-ctl -d 0 -V ''\''isx031 10-001a'\'':0 [fmt:UYVY8_1X16/1920x1536 field:none colorspace:smpte170m]'
Preview (run on the Raspberry Pi):
gst-launch-1.0 v4l2src device=/dev/video0 ! video/x-raw,format=UYVY,width=1920,height=1536,framerate=30/1 ! videoconvert ! fpsdisplaysink video-sink=xvimagesink sync=false
3.3.2 Resolution: 1920 × 1080
Configure the link:
media-ctl -d 0 -V ''\''isx031 10-001a'\'':0 [fmt:UYVY8_1X16/1920x1080 field:none colorspace:smpte170m]'
Preview (run on the Raspberry Pi):
gst-launch-1.0 v4l2src device=/dev/video0 ! video/x-raw,format=UYVY,width=1920,height=1080,framerate=30/1 ! videoconvert ! fpsdisplaysink video-sink=xvimagesink sync=false
4. Important Notes
- Please ensure the camera ribbon cable is connected correctly (pay attention to the metal contact orientation and make sure the latch is locked securely).