RGB-Matrix-Px-96x48 Working with STM32
Working with STM32F103RBT6
Hardware Connection
Preparation
- RGB-Matrix-P2.5-96x48 (included in this product)
- 2 × 8PIN 2.54mm pitch cable (included in this product)
- STM32F103RB (must be purchased separately)
Hardware Connection
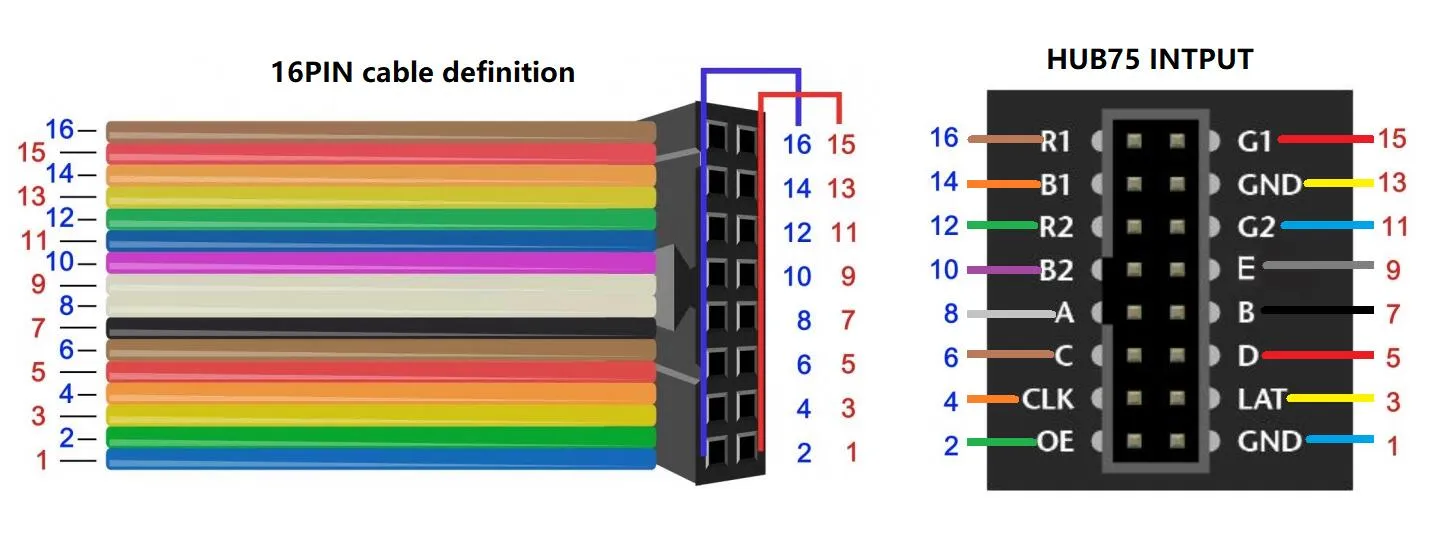
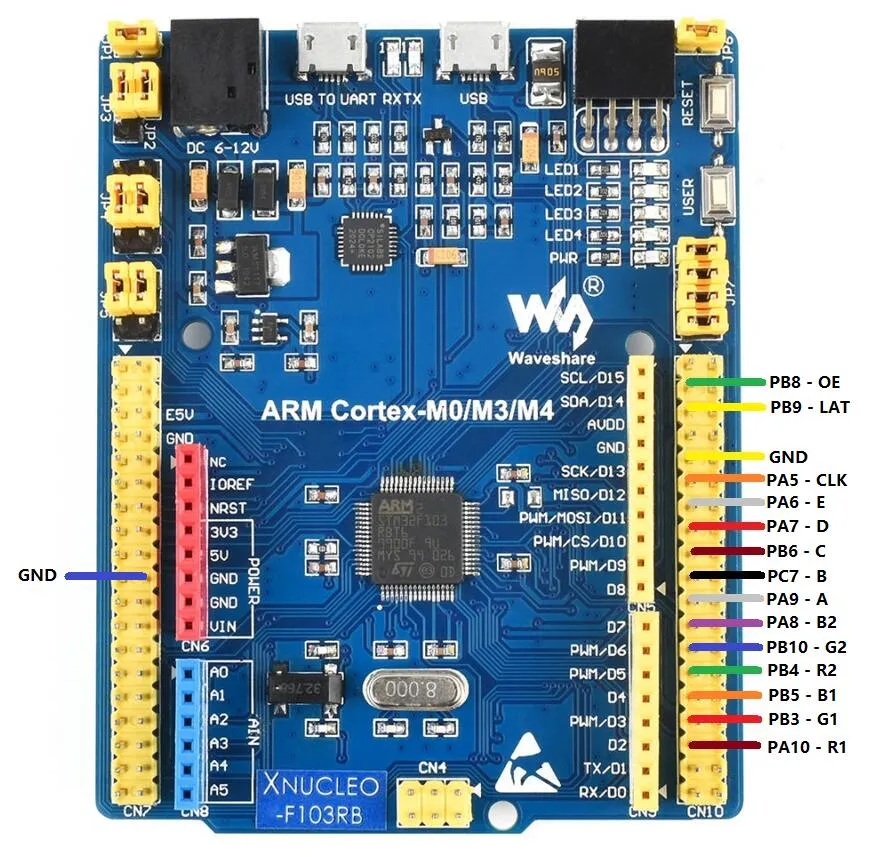
tip
- The example is developed based on the HAL library. Download the program, locate the STM32 program file directory, and open
HUB75.uvprojxin theSTM32\STM32F103RBT6\MDK-ARMdirectory to view the program. - Compile and download, then connect the screen to start the display (make sure to connect an external 5V 4A power supply; otherwise, the drive current will be drawn from the STM32 GPIO, which may damage the I/O pins).
3. STM32 Project Settings
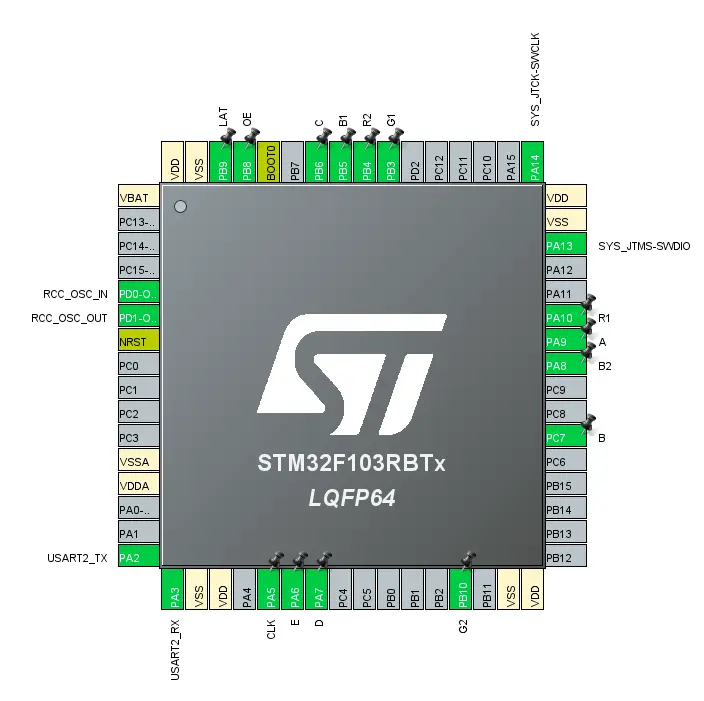
V2 Version Settings
If using the V2 version, add the following definitions in Driver_RGBMatrix.h:
/* hub75 interface definition */
#define HUB75_PANEL_PROFILE_64X32_1_16 (1u)
#define HUB75_PANEL_PROFILE_64X64_1_32 (2u)
#define HUB75_PANEL_PROFILE_80X40_1_20 (3u)
#define HUB75_PANEL_PROFILE_96X48_1_24 (4u)
#define HUB75_PANEL_PROFILE_96X48_1_24_SM5368 (5u)

#define HUB75_PANEL_OPTION_NONE (0u)
#define HUB75_PANEL_OPTION_SM5368  (1u << 0)

#ifndef HUB75_PANEL_PROFILE
#define HUB75_PANEL_PROFILE HUB75_PANEL_PROFILE_96X48_1_24_SM5368
#endif
V1 Version Settings
If you are using the V1 version, configure as follows:
/* hub75 interface definition */
#define HUB75_PANEL_PROFILE_64X32_1_16 (1u)
#define HUB75_PANEL_PROFILE_64X64_1_32 (2u)
#define HUB75_PANEL_PROFILE_80X40_1_20 (3u)
#define HUB75_PANEL_PROFILE_96X48_1_24 (4u)
#define HUB75_PANEL_PROFILE_96X48_1_24_SM5368 (5u)

#define HUB75_PANEL_OPTION_NONE (0u)
#define HUB75_PANEL_OPTION_SM5368  (1u << 0)

#ifndef HUB75_PANEL_PROFILE
#define HUB75_PANEL_PROFILE HUB75_PANEL_PROFILE_96X48_1_24
#endif
Code Description
main.c
int main(void)
{
  /* USER CODE BEGIN 1 */

  /* USER CODE END 1 */

  /* MCU Configuration--------------------------------------------------------*/

  /* Reset of all peripherals, Initializes the Flash interface and the Systick. */
  HAL_Init();

  /* USER CODE BEGIN Init */

  /* USER CODE END Init */

  /* Configure the system clock */
  SystemClock_Config();

  /* USER CODE BEGIN SysInit */

  /* USER CODE END SysInit */

  /* Initialize all configured peripherals */
  MX_GPIO_Init();
  MX_USART2_UART_Init();
  MX_TIM1_Init();
  /* USER CODE BEGIN 2 */

  DWT_Init();
  HUB75_Init();
  HUB75_SetBrightness(255); // the parameter is 0-255, the higher the number, the brighter the screen is
  HUB75_SetRefreshRate(1); // the parameter is 1-4, the higher the number, the lower the refresh rate is
  App_DrawGuiScreen();

  /* USER CODE END 2 */

  /* Infinite loop */
  /* USER CODE BEGIN WHILE */
  UWORD page = 0U;
  while (true)
  {
    App_WaitMsWithRefresh(1000U);
    page = (UWORD)((page + 1U) % 3U);
    App_DrawPage(page);
    /* USER CODE END WHILE */

    /* USER CODE BEGIN 3 */
  }
  /* USER CODE END 3 */
}
Code Walkthrough
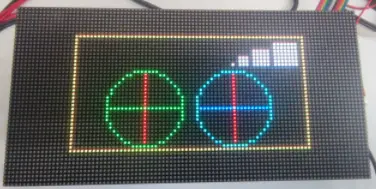
App_DrawPage():- Draws different display content based on the page number.
- Page 1 displays basic graphics such as points, lines, circles, and borders;
- Page 2 displays the text "Hello" and "world";
- Page 3 displays "Page3" and a number.
- After drawing, the buffer content is loaded to the HUB75 screen.
HUB75_LoadRGB565Frame(gui_framebuffer, HUB75_PANEL_WIDTH, HUB75_PANEL_HEIGHT):- Transfers the RGB565 image data from the current frame buffer to the HUB75 display driver, preparing it for display on the LED matrix screen.
App_WaitMsWithRefresh():- Continuously calls
HUB75_Display()while waiting for the specified time, ensuring the screen refreshes during the delay to avoid flicker or blanking.
- Continuously calls
HUB75_SetBrightness(255):- Sets the screen brightness to the maximum value, making the display content clearer and brighter.
HUB75_SetRefreshRate(1):- Sets the HUB75 screen refresh parameter to control display stability and refresh speed.
while (true):- Main program loop, switches pages every 1 second, causing the three interface contents to cycle in order.
Expected Behavior
 | 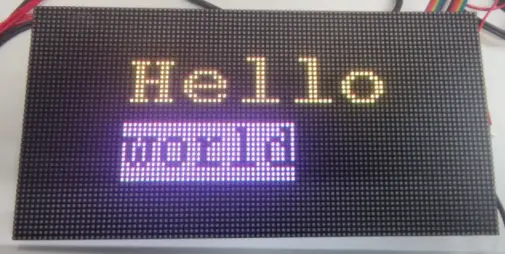 | 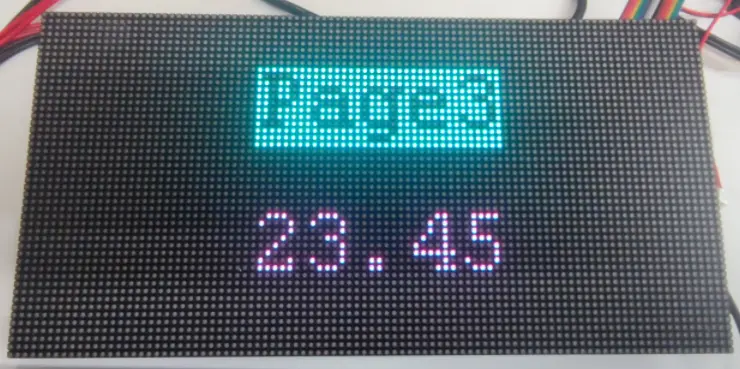 |
|---|