Working with MicroPython
This chapter contains the following sections. Please read as needed:
MicroPython Getting Started Tutorial
New to Pico MicroPython development and want to get started quickly? We have prepared a general introductory tutorial for you. This tutorial is designed to help developers quickly become familiar with Thonny IDE and start developing. It covers environment setup, project creation, component usage, and peripheral programming, helping you take the first step in MicroPython programming.
- Section 1 Basic Introduction
- Section 2 GPIO
- Section 3 PWM
- Section 4 ADC
- Section 5 UART
- Section 6 I2C
- Section 7 SPI
- Section 8 PIO
Setting Up the Development Environment
Please refer to the Install and Configure Thonny IDE Tutorial to download and install the Thonny IDE.
Example
The MicroPython examples are located in the examples/MicroPython directory of the example package.
| Example | Basic Program Description | Dependency Library |
|---|---|---|
| 01_MQTT | MQTT example | - |
01_MQTT
Example Description
- This example demonstrates how the RP2350-POE-ETH uses the W6300 Ethernet to connect to a public MQTT broker (
broker.emqx.io:1883by default) under MicroPython, and implements:- Subscribe topic:
Sub/ed229f15 - Publish topic:
Pub/ed229f15 - Publish a device status JSON once on power-up, and then every 10 seconds thereafter (including CPU frequency, temperature, VSYS voltage, USB/POE insertion status, uptime, etc.)
- Subscribe topic:
- Open-source usage notes (strongly recommended to modify on first use to avoid conflicts among multiple people/devices):
- MQTT Brokers typically require that the
Client IDbe globally unique at any given time: if two devices use the sameMQTT_CLIENT_IDto log in, the later one will kick off the earlier one, resulting in frequent disconnections. - If topics use fixed values, data from multiple devices will be mixed together and can easily be accidentally subscribed to or controlled by others.
- It is recommended to modify at least:
MQTT_CLIENT_ID,MQTT_SUB_TOPIC, andMQTT_PUB_TOPIC. If you set up your own broker or enable authentication, also modifyMQTT_USERNAMEandMQTT_PASSWORD.
- MQTT Brokers typically require that the
In the source code for this example, the relevant configuration is located in:
main.py: Topic definitions + reading MQTT parameters fromconfig.py
# Constants for MQTT Topics
MQTT_SUB_TOPIC = 'Sub/ed229f15'
MQTT_PUB_TOPIC = 'Pub/ed229f15'

# MQTT Parameters
MQTT_SERVER = config.mqtt_server
MQTT_PORT = config.mqtt_port
MQTT_USERNAME = config.mqtt_username
MQTT_PASSWORD = config.mqtt_password
MQTT_CLIENT_ID = config.mqtt_client_id
MQTT_KEEPALIVE = config.mqtt_keepalive
config.py: MQTT broker and account information
mqtt_server = b'broker.emqx.io'
mqtt_port = 1883
mqtt_client_id = b'ed229f15'
mqtt_keepalive = 60
mqtt_username = b'w6300_test'
mqtt_password = b'0123456789'
Hardware Connection
- Connect the development board to your computer via USB (for power, flashing, and serial log viewing).
- Plug an Ethernet cable into the RJ45 port and ensure the network can reach the public internet (able to access
broker.emqx.io:1883). - Optional: Use a PoE Ethernet cable to power the board (the program will reflect the
poe_insertedstatus in the reported JSON).
Code Analysis
- Entry file:
main.py- Ethernet initialization
ethernet_init()network.WIZNET6K()initializes the Ethernet interfacenic.ifconfig('dhcp')enables DHCP to obtain an IP address and waits fornic.isconnected()
- MQTT connection
mqtt_connect()- Uses
from umqtt.simple import MQTTClient - After successful connection, sets the callback
client.set_callback(mqtt_recv_callback)and subscribes toMQTT_SUB_TOPIC
- Uses
- Publish and subscribe topics (defined by default as constants at the top of
main.py):
- Ethernet initialization
MQTT_SUB_TOPIC = 'Sub/ed229f15'
MQTT_PUB_TOPIC = 'Pub/ed229f15'
- Reporting (once at startup + every 10 seconds)
PUBLISH_INTERVAL = 10- The published JSON consists of three parts:
device/system/message(note:get_network_info()is implemented in the current code but not yet included in the payload; you can extend it as needed):
{
  "device": { "chip": "RP2350A", "client_id": "ed229f15" },
  "system": {
    "cpu_mhz": 150,
    "ram_kb": 520,
    "temp_c": 36.2,
    "vsys_voltage_v": 5.021,
    "vsys_adc_raw": 2048,
    "usb_inserted": true,
    "poe_inserted": false,
    "uptime": "0:00:01:23"
  },
  "message": "Hello, waveshare!"
}
- Subscription message callback
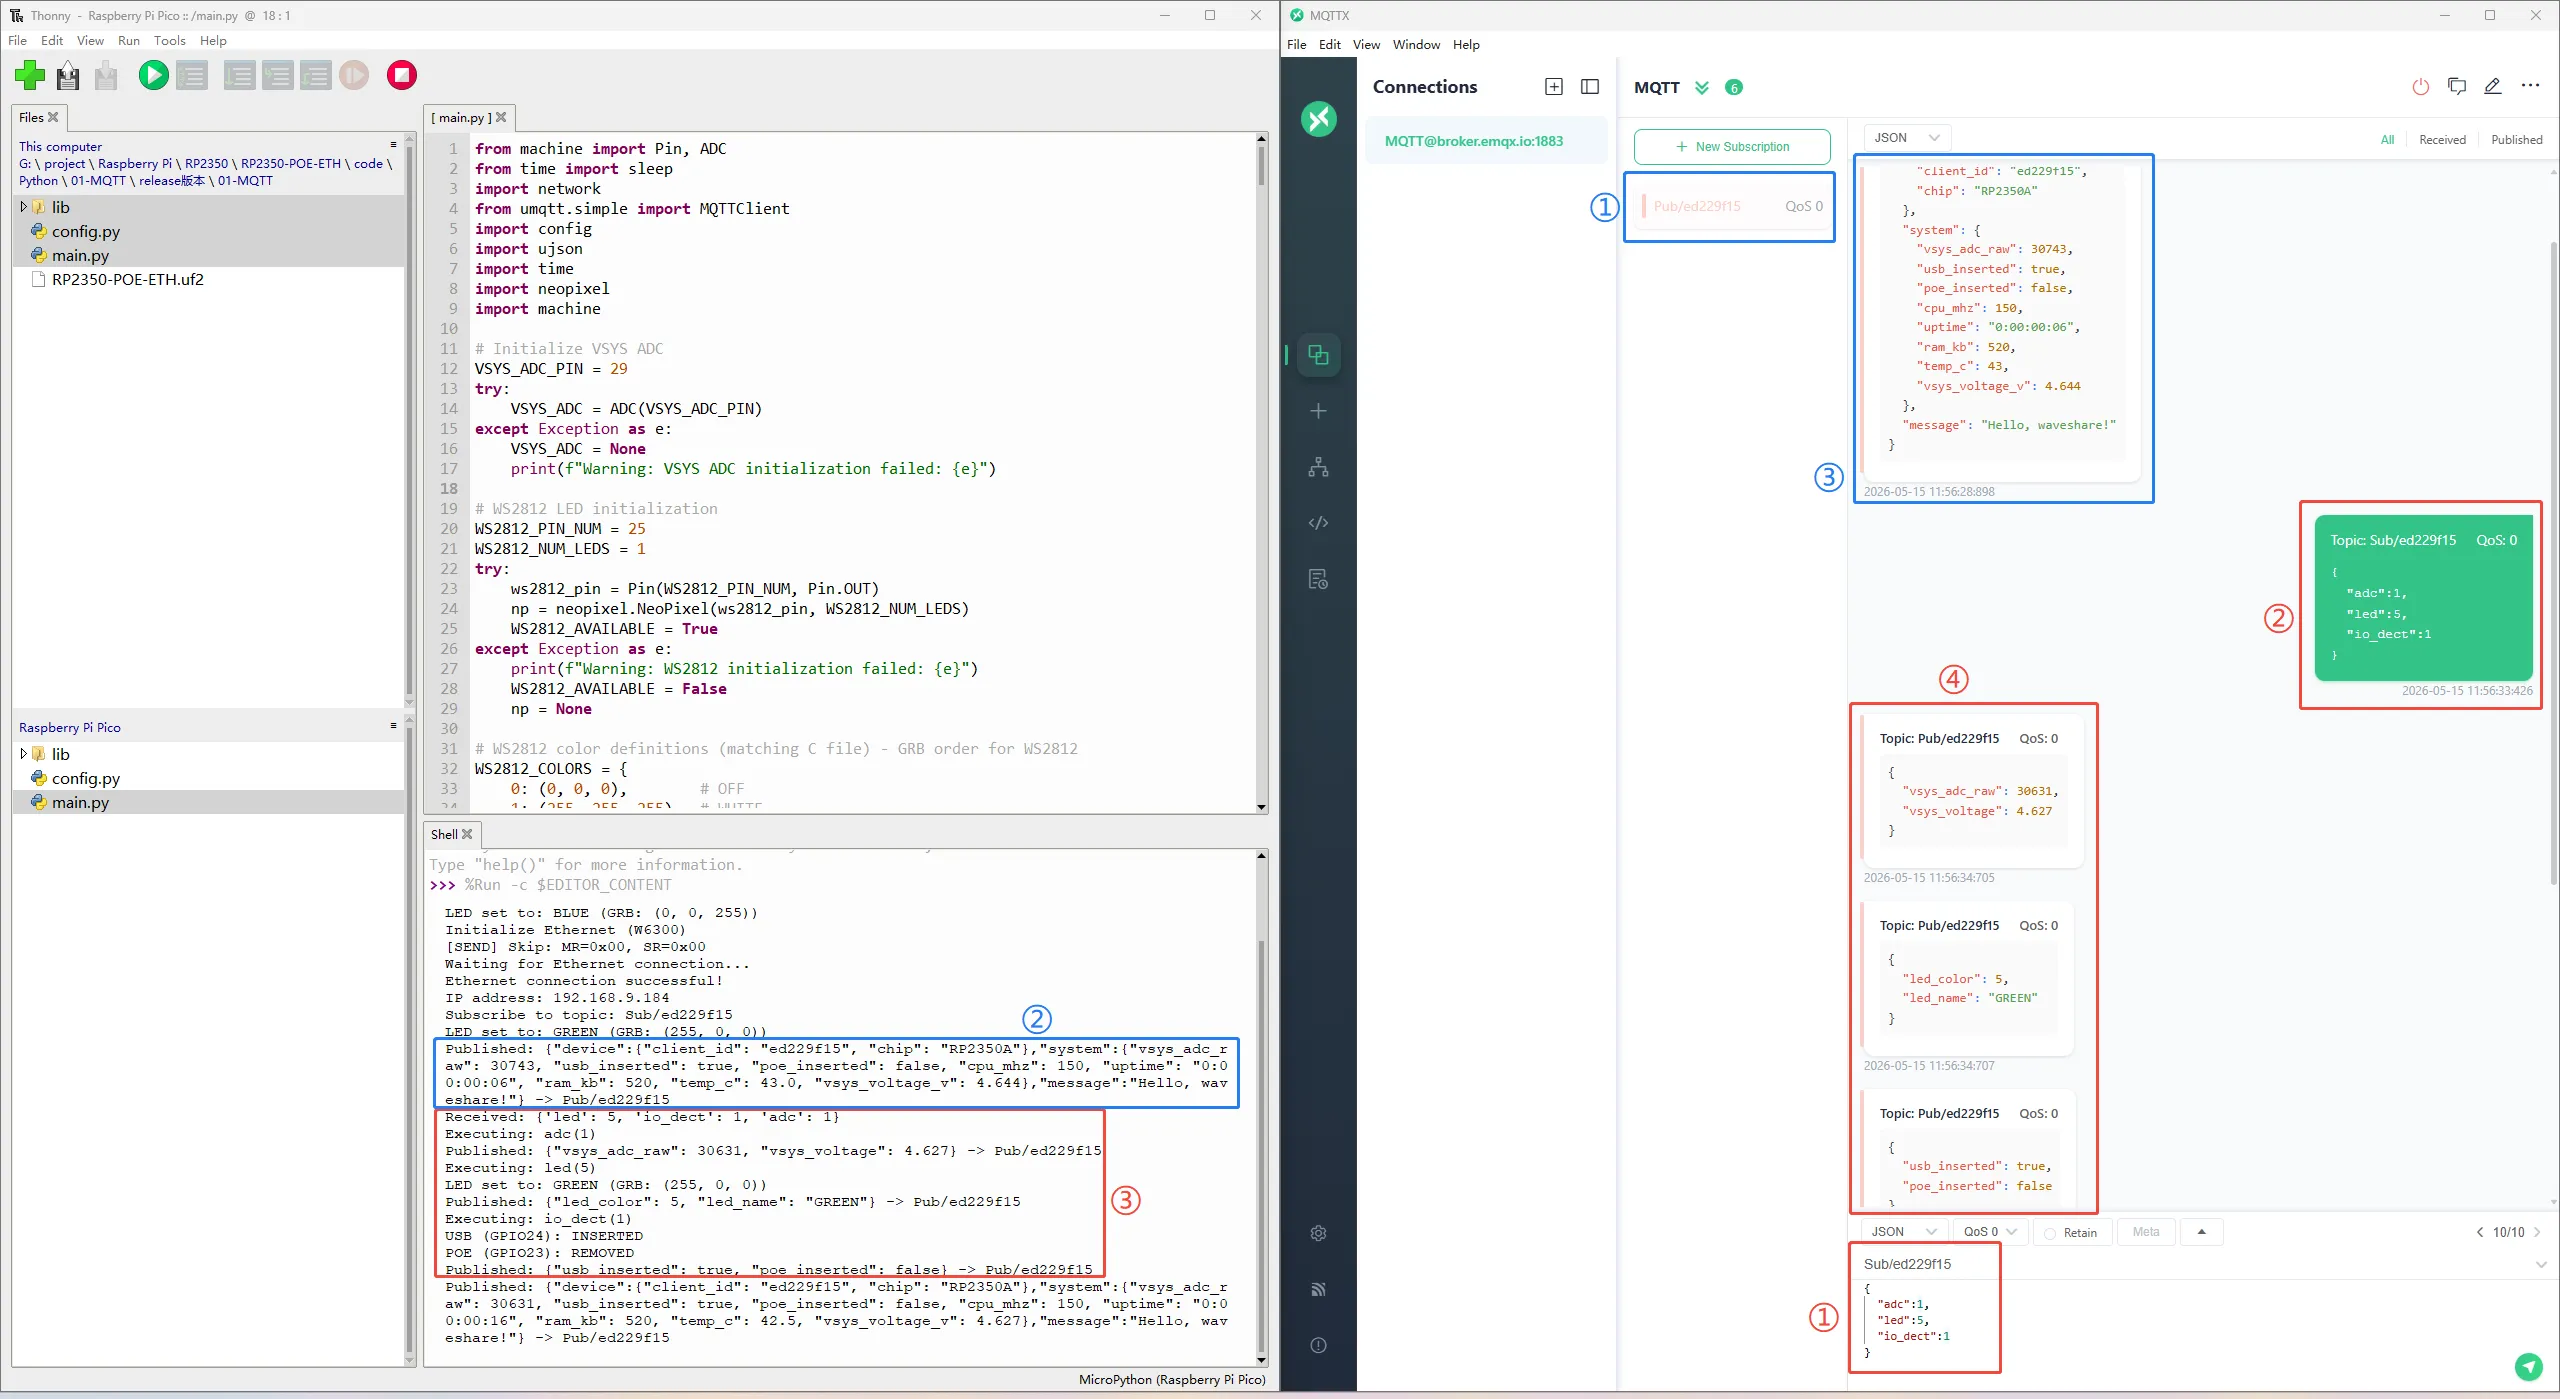
mqtt_recv_callback(topic, message)- Upon receiving a message on the subscribed topic, it attempts to parse the payload as JSON and executes commands according to the fields (supports multiple fields in a single payload):
{"adc": 1}: reads VSYS voltage (GPIO29 ADC) and replies toPub/...{"led": 2}: sets WS2812 color (GPIO25, values0-8){"io_dect": 1}: reads USB/POE insertion status (GPIO24/23) and replies toPub/...
- Reply examples:
- Upon receiving a message on the subscribed topic, it attempts to parse the payload as JSON and executes commands according to the fields (supports multiple fields in a single payload):
{"vsys_voltage":5.021,"vsys_adc_raw":2048}
{"led_color":2,"led_name":"RED"}
{"usb_inserted":true,"poe_inserted":false}
- MQTT library
lib/umqtt/simple.py: basic MQTT protocol implementation (connect/publish/subscribe/wait_msg/check_msg)robust.py: adds automatic reconnection logic on top ofsimple.py(this example currently usesumqtt.simple; you can switch torobustfor more resilience if needed)
Operation Result
Before running, please complete the Hardware Connections and follow the steps below for programming and deployment:
- Flash the MicroPython Firmware (UF2)
- After entering BOOT mode, drag-and-drop/copy the
RP2350-POE-ETH.uf2file from thefirmware/MicroPythondirectory onto the development board's USB drive to complete programming.
- After entering BOOT mode, drag-and-drop/copy the
- Upload the example code to the board's file system and run main.py in Thonny
- Files in the
examples/MicroPython/01_MQTTdirectory:main.py(MicroPython auto-start entry on power-up)config.pylib/umqtt/simple.pylib/umqtt/robust.py
- Note: The
lib/directory structure must be preserved; the final layout on the board should resemble:
- Files in the
/
  main.py
  config.py
  lib/
    umqtt/
      simple.py
      robust.py
- After programming and uploading the files, reset the board. The serial port will print logs similar to the following (may vary slightly depending on the network environment):
Initialize Ethernet (W6300)
Waiting for Ethernet connection...
Ethernet connection successful!
IP address: 192.168.1.100
Subscribe to topic: Sub/ed229f15
Published: {...} -> Pub/ed229f15
...
-
Verify with any MQTT client (MQTTX recommended)
- MQTTX client settings:
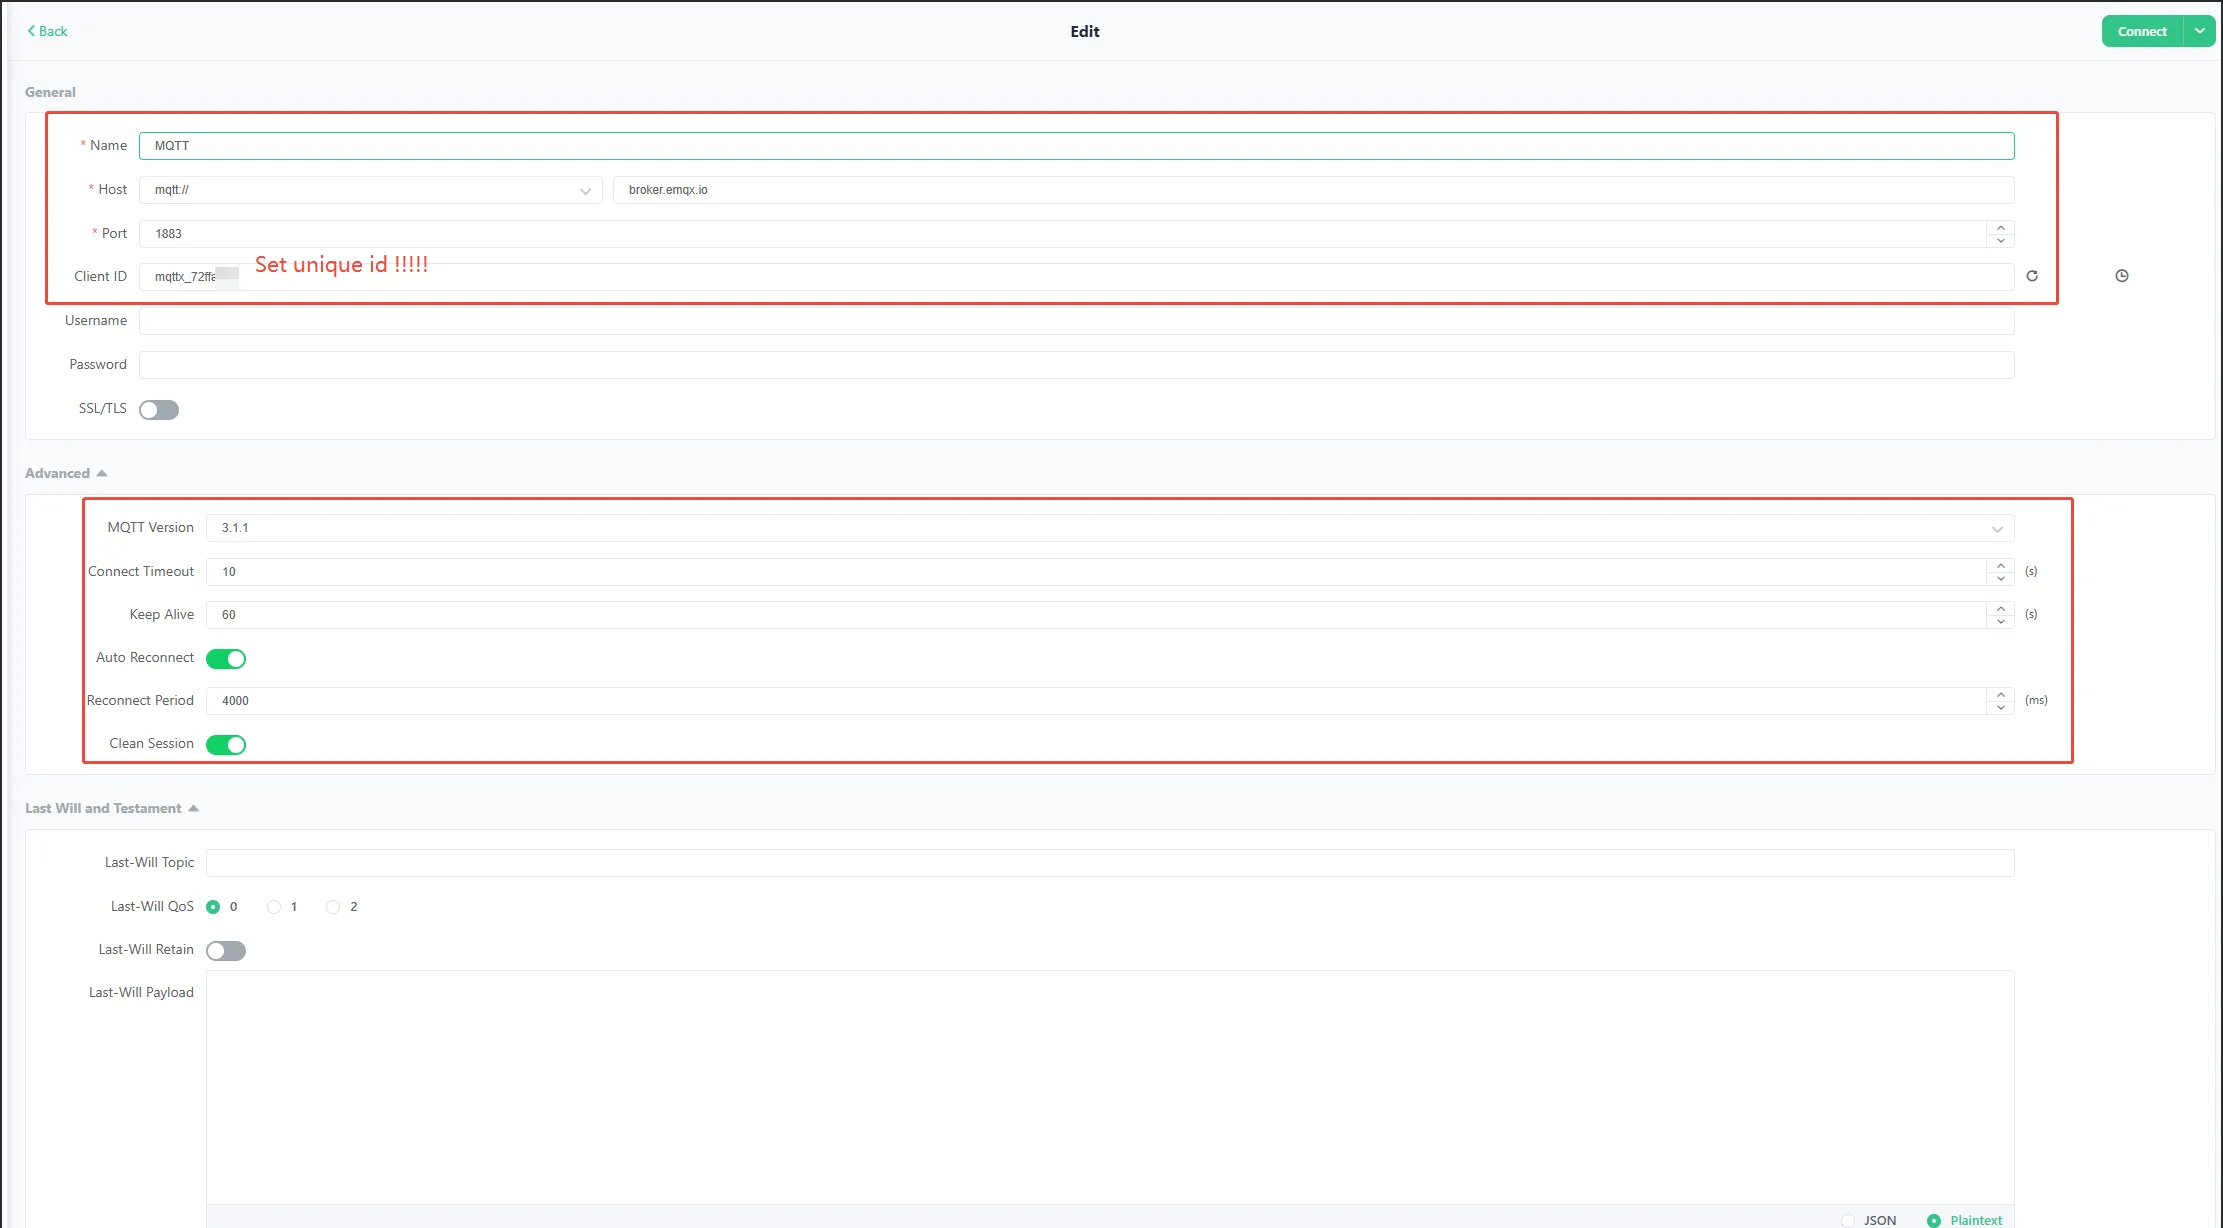
RP2350-POE-ETHconnection parameters:- Host:
broker.emqx.io - Port:
1883 - Username:
w6300_test - Password:
0123456789 - Client ID:
ed229f15
- Host:
- Subscribe to topic:
Pub/ed229f15to receive the JSON reported by the board every 10 seconds. - Publish control commands (payload as a JSON string) to the topic
Sub/ed229f15, for example:
{"led":2}
{"adc":1,"io_dect":1}