Working with Arduino
This chapter includes the following sections. Please read as needed:
Setting Up the Development Environment
Please refer to the Install and Configure Arduino IDE Tutorial to download and install the Arduino IDE.
Example
The Arduino examples are located in the examples/Arduino directory of the example package.
| Example | Basic Program Description | Dependency Library |
|---|---|---|
| 01_GUI | LCD GUI display program | - |
| 02_LVGL | LCD LVGL display program | LVGL V8.2 |
01_GUI
Example Description
- Uses SPI to communicate with the LCD and implements functions like displaying text and images via GUI.
Hardware Connection
- Connect the board to the computer using a USB cable.
Code Analysis
Underlying Hardware Interface
We have encapsulated the hardware operations at a low level. Due to differences in hardware platforms, the internal implementations vary. If you need to understand the internal implementation, you can check the corresponding directory. Many definitions can be seen in DEV_Config.c(.h) under the directory: c\lib\Config.
-
Module initialization and exit handling
void DEV_Module_Init(void);void DEV_Module_Exit(void);tipThis handles GPIO operations before using the LCD and after finishing use.
-
GPIO read/write
void DEV_Digital_Write(uint_16 Pin, uint_8 Value);uint_8 DEV_Digital_Read(uint_16 Pin); -
SPI write data
void DEV_SPI_WriteByte(uint_8 Value);
Upper Layer Applications
For the screen, what if you need to paint, display Chinese and English characters, display pictures, etc., these are all done by the upper layer applications. Many users have asked about graphical processing. We provide some basic functionalities in the GUI, located in the directory: c\lib\GUI\GUI_Paint.c(.h)

The character fonts that the GUI depends on are located in the directory: c\lib\Fonts

-
Create Image Attribute: Create a new image attribute, which includes the name, width, height, rotation angle, and color of the image cache.
void Paint_NewImage(uint16_t *image, uint16_t Width, uint16_t Height, uint16_t Rotate, uint16_t Color)Parameters:image: The name of the image cache, which is essentially a pointer to the starting address of the image cache;Width: The width of the image cache;Height: The height of image cache;Rotate: The rotation angle of the image;Color: The initial color of the image; -
Select Image Cache: Selects an image cache. The purpose of this selection is to allow you to create multiple image attributes. Since multiple image caches can exist, you can select each image you have created.
void Paint_SelectImage(uint8_t *image)Parameters:image: The name of the image cache, which is essentially a pointer to the starting address of the image cache; -
Image Rotation: Set the rotation angle for the selected image. It is best to use this after
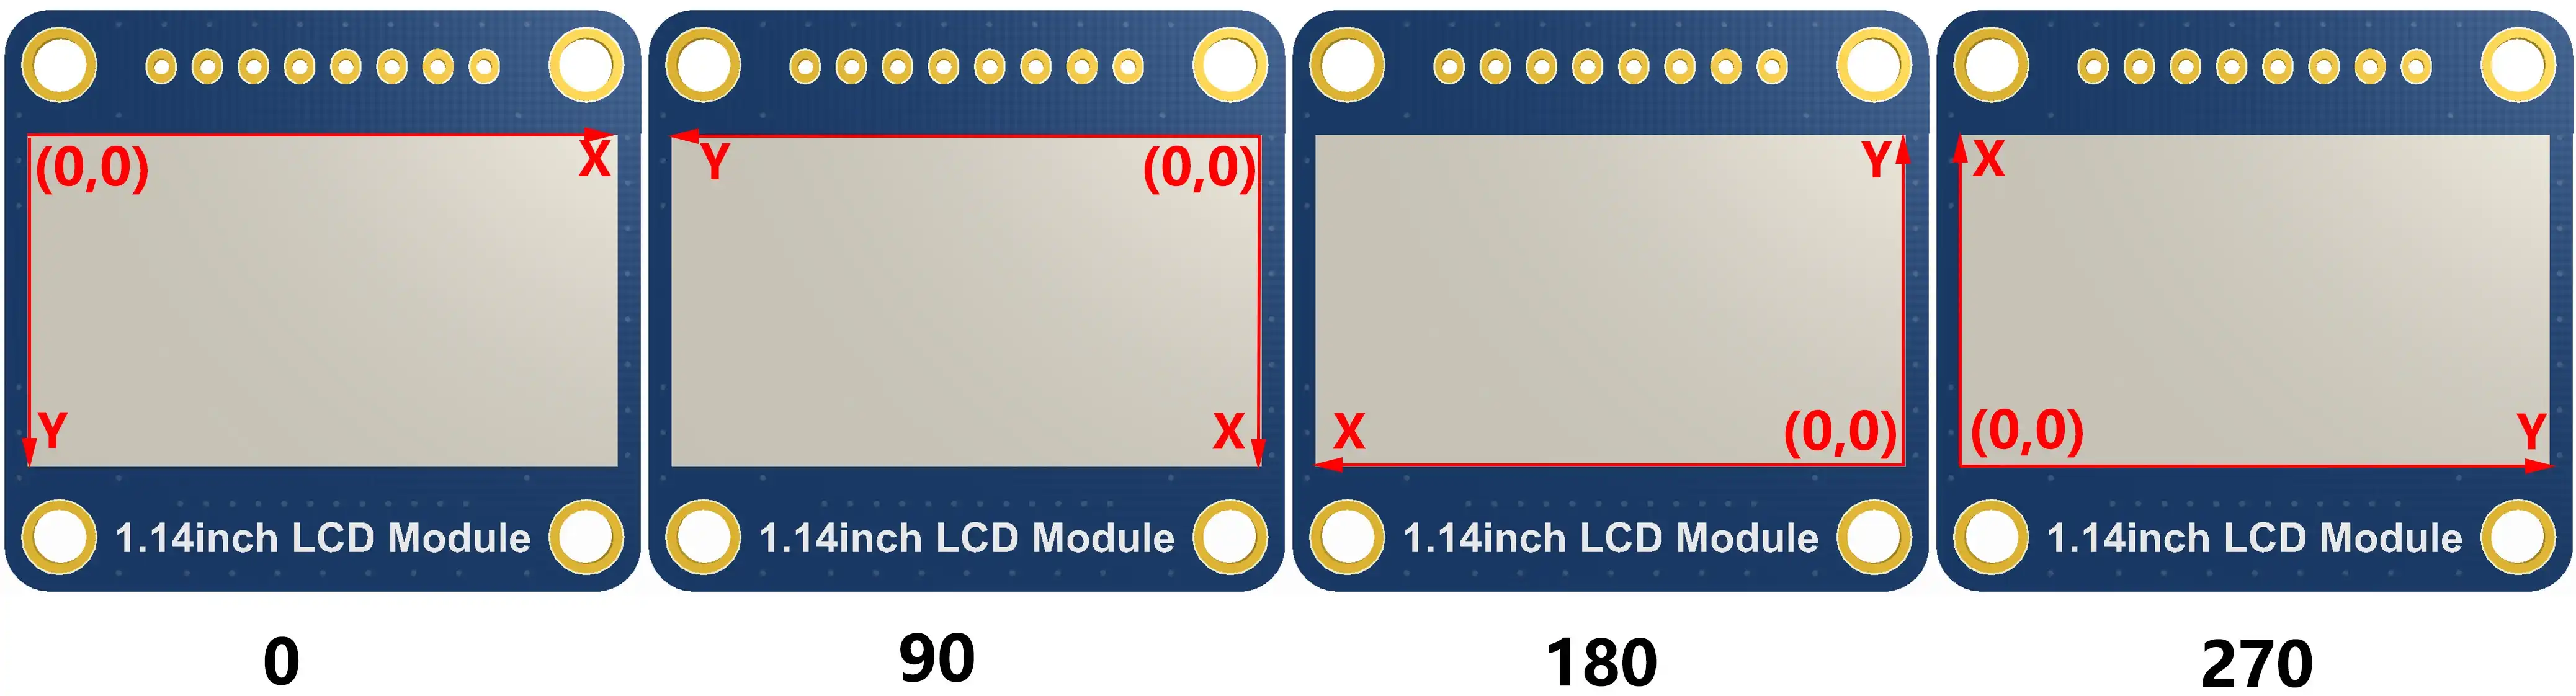
Paint_SelectImage(). You can choose rotation angles of 0, 90, 180, or 270 degrees.void Paint_SetRotate(uint16_t Rotate)Parameters:Rotate: The image rotation angle. You can choose ROTATE_0, ROTATE_90, ROTATE_180, ROTATE_270 corresponding to 0, 90, 180, 270 degrees respectively.tipThe starting pixel for coordinates differs under different rotation angles. Taking 1.14 as an example, the four images correspond to 0°, 90°, 180°, and 270° in order. This is for reference only.
-
Image Mirroring: Set mirroring for the selected image. You can choose no mirroring, horizontal mirroring, vertical mirroring, or mirroring about the image center.
void Paint_SetMirroring(uint8_t mirror)Parameters:mirror: The mirroring method for the image. You can choose MIRROR_NONE, MIRROR_HORIZONTAL, MIRROR_VERTICAL, MIRROR_ORIGIN corresponding to no mirroring, horizontal mirroring, vertical mirroring, and mirroring about the image center respectively. -
Set Pixel Display Position and Color in Cache: This is one of the core GUI functions, handling the display position and color of a pixel within the cache.
void Paint_SetPixel(uint16_t Xpoint, uint16_t Ypoint, uint16_t Color)Parameters:Xpoint: The X-coordinate of the point within the image cache;Ypoint: The Y-coordinate of the point within the image cache;Color: The display color of the point; -
Fill Image Cache with Color: Fills the image cache with a specific color, typically used to clear the screen to white.
void Paint_Clear(uint16_t Color)Parameters:Color: The filled color -
Fill Partial Window in Image Cache with Color: Fill a specific window area within the image cache with a color, often used to clear a window to white, such as when updating time displays to clear the previous second.
void Paint_ClearWindows(uint16_t Xstart, uint16_t Ystart, uint16_t Xend, uint16_t Yend, uint16_t Color)Parameters:Xstart: The X starting coordinate of the window;Ystart: The Y starting coordinate of the window;Xend: The X ending coordinate of the window;Yend: The Y ending coordinate of the window;Color: The filled color -
Draw Dot: Draw a dot at (Xpoint, Ypoint) in the image cache. You can choose the color, the size, and the style of the dot.
void Paint_DrawPoint(uint16_t Xpoint, uint16_t Ypoint, uint16_t Color, DOT_PIXEL Dot_Pixel, DOT_STYLE Dot_Style)Parameters:Xpoint: The X-coordinate of the dot;Ypoint: The Y-coordinate of the dot;Color: The filled colorDot_Pixel: The size of the dot, with 8 default sizes provided:typedef enum {DOT_PIXEL_1X1 = 1, // 1 x 1DOT_PIXEL_2X2 , // 2 X 2DOT_PIXEL_3X3 , // 3 X 3DOT_PIXEL_4X4 , // 4 X 4DOT_PIXEL_5X5 , // 5 X 5DOT_PIXEL_6X6 , // 6 X 6DOT_PIXEL_7X7 , // 7 X 7DOT_PIXEL_8X8 , // 8 X 8} DOT_PIXEL;Dot_Style: The style of the dot, defining the method to expand the size of the dot is that, whether to expand from the dot as the center or from the dot as the lower left corner to the upper right.typedef enum {DOT_FILL_AROUND = 1,DOT_FILL_RIGHTUP,} DOT_STYLE; -
Draw Line: Draw a line from (Xstart, Ystart) to (Xend, Yend) in the image cache. You can select the color, line width, and line style.
void Paint_DrawLine(uint16_t Xstart, uint16_t Ystart, uint16_t Xend, uint16_t Yend, uint16_t Color, LINE_STYLE Line_Style , LINE_STYLE Line_Style)Parameters:Xstart: The X starting coordinate of the line;Ystart: The Y starting coordinate of the line;Xend: The X ending coordinate of the line;Yend: The Y ending coordinate of the line;Color: The filled colorLine_width: The width of the line, with 8 default widths provided:typedef enum {DOT_PIXEL_1X1 = 1, // 1 x 1DOT_PIXEL_2X2 , // 2 X 2DOT_PIXEL_3X3 , // 3 X 3DOT_PIXEL_4X4 , // 4 X 4DOT_PIXEL_5X5 , // 5 X 5DOT_PIXEL_6X6 , // 6 X 6DOT_PIXEL_7X7 , // 7 X 7DOT_PIXEL_8X8 , // 8 X 8} DOT_PIXEL;Line_Style: The line style, choosing between solid line connection or dotted line connectiontypedef enum {LINE_STYLE_SOLID = 0,LINE_STYLE_DOTTED,} LINE_STYLE; -
Draw Rectangle: Draw a rectangle from (Xstart, Ystart) to (Xend, Yend) in the image cache. You can select the color, line width, and whether to fill the interior of the rectangle.
void Paint_DrawRectangle(uint16_t Xstart, uint16_t Ystart, uint16_t Xend, uint16_t Yend, uint16_t Color, DOT_PIXEL Line_width, DRAW_FILL Draw_Fill)Parameters:Xstart: The X starting coordinate of the rectangle;Ystart: The Y starting coordinate of the rectangle;Xend: The X ending coordinate of the rectangle;Yend: The Y ending coordinate of the rectangle;Color: The filled colorLine_width: The width of the rectangle's four sides, with 8 default widths provided:typedef enum {DOT_PIXEL_1X1 = 1, // 1 x 1DOT_PIXEL_2X2 , // 2 X 2DOT_PIXEL_3X3 , // 3 X 3DOT_PIXEL_4X4 , // 4 X 4DOT_PIXEL_5X5 , // 5 X 5DOT_PIXEL_6X6 , // 6 X 6DOT_PIXEL_7X7 , // 7 X 7DOT_PIXEL_8X8 , // 8 X 8} DOT_PIXEL;Draw_Fill: Fill option, determining whether to fill the interior of the rectangle:typedef enum {DRAW_FILL_EMPTY = 0,DRAW_FILL_FULL,} DRAW_FILL; -
Draw Circle: Draw a circle with center at (X_Center, Y_Center) and a radius of Radius in the image cache, and you can choose the color. You can select the color, line width, and whether to fill the interior of the circle.
void Paint_DrawCircle(uint16_t X_Center, uint16_t Y_Center, uint16_t Radius, uint16_t Color, DOT_PIXEL Line_width, DRAW_FILL Draw_Fill)Parameters:X_Center: The X-coordinate of the circle's center;Y_Center: The Y-coordinate of the circle's center;Radius: The radius of the circle;Color: The filled colorLine_width: The width of the circle's arc, with 8 default widths provided:typedef enum {DOT_PIXEL_1X1 = 1, // 1 x 1DOT_PIXEL_2X2 , // 2 X 2DOT_PIXEL_3X3 , // 3 X 3DOT_PIXEL_4X4 , // 4 X 4DOT_PIXEL_5X5 , // 5 X 5DOT_PIXEL_6X6 , // 6 X 6DOT_PIXEL_7X7 , // 7 X 7DOT_PIXEL_8X8 , // 8 X 8} DOT_PIXEL;Draw_Fill: Fill option, determining whether to fill the interior of the circle:typedef enum {DRAW_FILL_EMPTY = 0,DRAW_FILL_FULL,} DRAW_FILL; -
Draw Ascii Character: Draw an Ascii character in the image cache with (Xstart, Ystart) as the top-left vertex. You can select the Ascii visible character font, foreground color, and background color.
void Paint_DrawChar(uint16_t Xstart, uint16_t Ystart, const uint8_t Ascii_Char, sFONT* Font, uint16_t Color_Foreground, uint16_t Color_Background)Parameters:Xstart: The X-coordinate of the number's top-left vertex;Ystart: The Y-coordinate of the number's top-left vertex;Ascii_Char: The Ascii character;Font: The Ascii visible character font. The following fonts are provided in the Fonts folder:font8: 5*8 fontfont12: 7*12 fontfont16: 11*16 fontfont20: 14*20 fontfont24: 17*24 fontColor_Foreground: The font color;Color_Background: The background color; -
Draw English String: Draw a string of English characters in the image cache with (Xstart, Ystart) as the top-left vertex. You can select the Ascii visible character font, foreground color, and background color.
void Paint_DrawString_EN(uint16_t Xstart, uint16_t Ystart, const uint8_t * pString, sFONT* Font, uint16_t Color_Foreground, uint16_t Color_Background)Parameters:Xstart: The X-coordinate of the number's top-left vertex;Ystart: The Y-coordinate of the number's top-left vertex;pString: The string, which is a pointer;Font: The Ascii visible character font. The following fonts are provided in the Fonts folder:font8: 5*8 fontfont12: 7*12 fontfont16: 11*16 fontfont20: 14*20 fontfont24: 17*24 fontColor_Foreground: The font color;Color_Background: The background color; -
Draw Chinese String: Draw a string of Chinese characters in the image cache with (Xstart, Ystart) as the top-left vertex. You can select the GB2312 encoded character font, foreground color, and background color.
void Paint_DrawString_CN(uint16_t Xstart, uint16_t Ystart, const uint8_t * pString, cFONT* font, uint16_t Color_Foreground, uint16_t Color_Background)Parameters:Xstart: The X-coordinate of the number's top-left vertex;Ystart: The Y-coordinate of the number's top-left vertex;pString: The string, which is a pointer;Font: The GB2312 encoded character font. The following fonts are provided in the Fonts folder:font12CN: Ascii character 11*21 font, Chinese 16*21 fontfont24CN: Ascii character 24*41 font, Chinese 32*41 fontColor_Foreground: The font color;Color_Background: The background color; -
Draw Number: Draw a number string in the image cache with (Xstart, Ystart) as the top-left vertex. You can select the Ascii visible character font, foreground color, background color, and decimal places.
void Paint_DrawNum(uint16_t Xpoint, uint16_t Ypoint, uint32_t Nummber, sFONT* Font, uint16_t Digit,uint16_t Color_Foreground, uint16_t Color_Background);Parameters:Xstart: The X-coordinate of the number's top-left vertex;Ystart: The Y-coordinate of the number's top-left vertex;Number: The displayed number, here is stored in a 32-bit long int type, which can be displayed up to 2147483647.Font: The Ascii visible character font. The following fonts are provided in the Fonts folder:font8: 5*8 fontfont12: 7*12 fontfont16: 11*16 fontfont20: 14*20 fontfont24: 17*24 fontDigit: The number of decimal places to displayColor_Foreground: The font color;Color_Background: The background color; -
Display Time: Display a time period in the image cache with (Xstart, Ystart) as the top-left vertex. You can select the Ascii visible character font, foreground color, and background color.
void Paint_DrawTime(uint16_t Xstart, uint16_t Ystart, PAINT_TIME *pTime, sFONT* Font, uint16_t Color_Background, uint16_t Color_Foreground)Parameters:Xstart: The X-coordinate of the number's top-left vertex;Ystart: The Y-coordinate of the number's top-left vertex;pTime: The time to display, using a predefined time structure; simply pass the hour, minute, and second digits to the parameters;Font: The Ascii visible character font. The following fonts are provided in the Fonts folder:font8: 5*8 fontfont12: 7*12 fontfont16: 11*16 fontfont20: 14*20 fontfont24: 17*24 fontColor_Foreground: The font color;Color_Background: The background color;
Operation Result
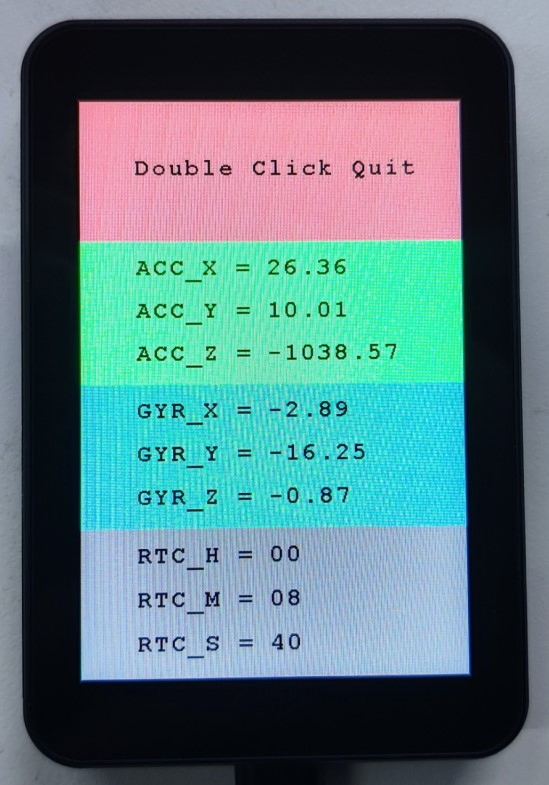
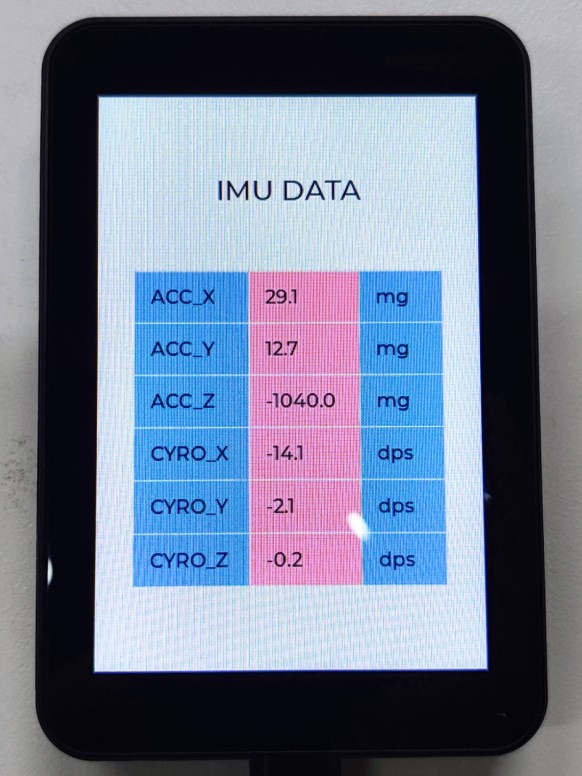
02_LVGL
Environment Configuration
-
Install the LVGL Library
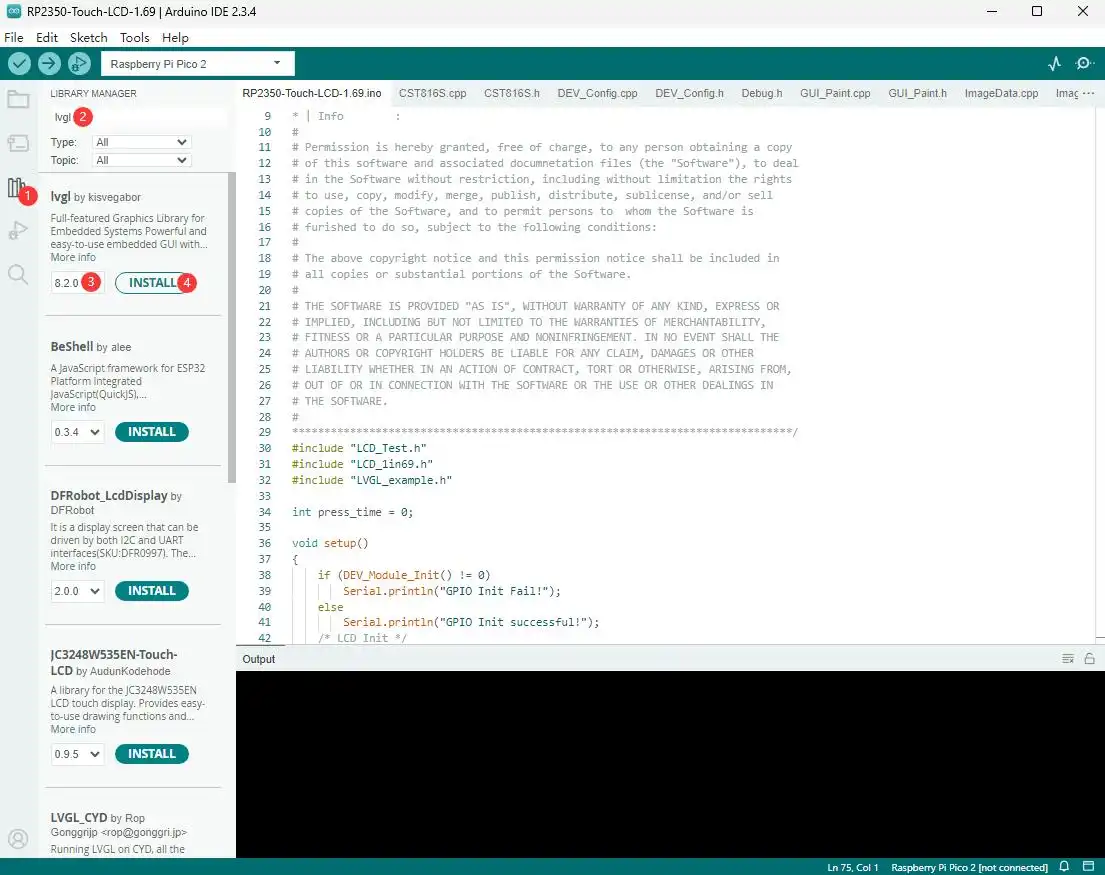
- Click on the third icon in the left sidebar or click on "Tools">"Manage Library..." in the menu bar
- Enter "lvgl" in the search box and find the "lvgl" library.
- Select version 8.2.0.
- Click the "INSTALL" button to install it.
- Click on the third icon in the left sidebar or click on "Tools">"Manage Library..." in the menu bar
-
Add Configuration File
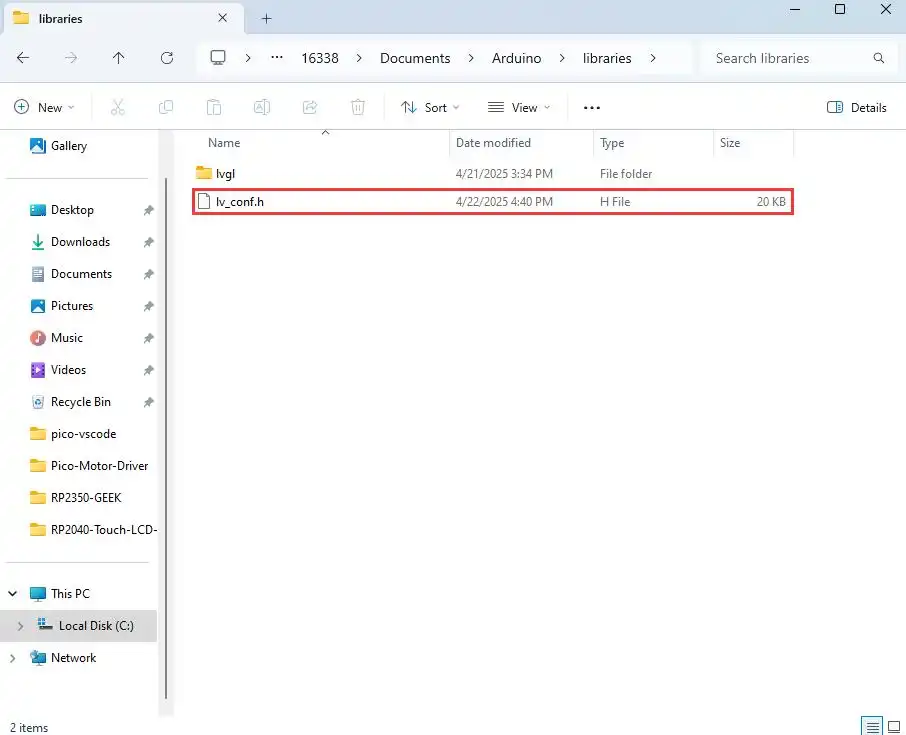
- LVGL has its own configuration file named
lv_conf.h. - Go to the directory of the installed Arduino libraries. Here you can see the directory of the lvgl library we installed.
- Download the program package and copy
Arduino\lv_conf.hfrom the package to your local Arduino library directory. - The final
lv_conf.hlayout should look like this:
arduino|-libraries|-lvgl|-other_lib_1|-other_lib_2|-lv_conf.h - LVGL has its own configuration file named
Example Description
- Uses SPI to communicate with the LCD and implements functions like displaying text and images via LVGL.
Hardware Connection
- Connect the board to the computer using a USB cable.
Code Analysis
Source Code Structure
-
The LVGL library source code is located at
C:\Users\<username>\Documents\Arduino\libraries\lvgl. The version used is 8.2.0. For secondary development, please refer to the development documentation for the corresponding version. -
LVGL library configurations are located in
C:\Users\<username>\Documents\Arduino\libraries\lv_conf.h. You can adjust settings such as the display refresh rate and system memory usage.
-
The LVGL application code is located in the
LVGL_example.cppfile within the project folder.
LVGL Initialization
Before using the LVGL graphics library, you need to initialize LVGL.
-
LVGL Library Initialization Function
Code location:
LVGL_example.cppFunction: Mainly used to initialize the hardware and structure variables required by LVGL.
LVGL_Init(); -
LVGL Core Initialization
Code location:
LVGL_example.cpp/*2.Init LVGL core*/lv_init();
LVGL Run
The LVGL library periodically calls the heartbeat interface function lv_tick_inc to notify LVGL of the elapsed time, allowing LVGL to update its internal time state and handle time-related tasks such as animations, timers, and more. In the main function loop, the lv_task_handler function must also be called so that LVGL can process events and tasks in a timely manner, ensuring the responsiveness and refresh of the user interface.
-
LVGL heartbeat interface
Code location:
LVGL_example.cppImplementation: Ensure the priority of
lv_task_handleris lower than that oflv_tick_inc. In this example,lv_tick_incis called in the timer callback function.//Timer callback function is called every 5msadd_repeating_timer_ms(5, repeating_lvgl_timer_callback, NULL, &lvgl_timer);static bool repeating_lvgl_timer_callback(struct repeating_timer *t){lv_tick_inc(5);return true;} -
LVGL task handler
Code location:
XXX.inoImplementation: To handle LVGL tasks,
lv_timer_handler()needs to be called periodically. In this example, it's called in the main function loop.void loop(){lv_timer_handler();DEV_Delay_ms(5);}
LVGL Display
To enable LVGL display, a display driver must be initialized and its various properties configured, such as color format, draw buffer, rendering mode, and display callback function. At each LV_DISP_DEF_REFR_PERIOD (set in lv_conf.h), LVGL detects if something has happened on the UI that needs to be redrawn. For example, a button is pressed, a chart is changed, an animation occurs, etc. When redrawing is needed, LVGL calls the display callback function to complete the drawing of the image in the refresh area.
-
LVGL Display Refresh Rate Setting
Code location:
C:\Users\<username>\Documents\Arduino\libraries\lv_conf.hSetting: You can also set the refresh period time for the display buffer in
lv_conf.h. Modify this definition to change the screen refresh time.#define LV_DISP_DEF_REFR_PERIOD 10 // Unit: ms, here is 10ms -
LVGL Display Color Setting
Code location:
C:\Users\<username>\Documents\Arduino\libraries\lv_conf.hPurpose: Since the pixel color storage method constructed by the
lv_color_tstructure by default is inconsistent with the data format required for transmission in this example, direct transmission would cause color differences in the displayed image.#define LV_COLOR_16_SWAP 1 -
LVGL display-related variable definitions
Code location:
LVGL_example.cppFunction: Defines the display driver
disp_drvand the draw bufferdisp_buf. In this example, the draw bufferbuf0is set to the entire screen display area, which effectively improves the screen refresh rate while reducing aliasing during large-area screen refreshes.static lv_disp_drv_t disp_drv;static lv_disp_draw_buf_t disp_buf;static lv_color_t *buf0; -
LVGL display device registration
Code location:
LVGL_example.cppFunction: According to design requirements, complete the core structure variables of the LVGL library, initialize the display driver
disp_drv, and set the draw buffers. The draw buffers are simple arrays used by LVGL to render screen content. Once rendering is ready, the content of the draw buffer is sent to the display using thedisp_drv_flush_cbfunction set in the display driver./*3.Init LVGL display*/buf0 = (lv_color_t *)malloc(DISP_HOR_RES * DISP_VER_RES);lv_disp_draw_buf_init(&disp_buf, buf0, NULL, DISP_HOR_RES * DISP_VER_RES);lv_disp_drv_init(&disp_drv);disp_drv.flush_cb = disp_flush_cb;disp_drv.draw_buf = &disp_buf;disp_drv.hor_res = DISP_HOR_RES;disp_drv.ver_res = DISP_VER_RES;lv_disp_t *disp= lv_disp_drv_register(&disp_drv); -
LVGL display callback function
Code location:
LVGL_example.cppFunction: mainly completes the drawing of the image in the refresh area.
void disp_flush( lv_disp_drv_t *disp_drv, const lv_area_t *area, lv_color_t *color_p )Parameters:lv_disp_drv_t *disp_drv: Displays driver structure pointers, which contain information about the display and function pointers. This parameter is often used to notify you that the refresh is completeconst lv_area_t *area : Region structure pointer, containing the position information of the area to be refreshed. In this example, you can use it for creating TFT display window.lv_color_t *color_p : Color structure pointer, indicating the color data to be displayed in the refresh area. In this example, it reads the address as DMA input to transmit data to the SPI bus and completes the image drawing -
LVGL display callback function implementation
Code location:
LVGL_example.cppImplementation: to minimize processor utilization, DMA is used for color data transfer.
color_pis set as the read address, and the SPI bus output data register is the write address.static void disp_flush_cb(lv_disp_drv_t * disp, const lv_area_t * area, lv_color_t * color_p){LCD_3IN5_SetWindows(area->x1, area->y1, area->x2+1 , area->y2+1); // Set the LVGL interface display positionDEV_Digital_Write(LCD_DC_PIN, 1);DEV_Digital_Write(LCD_CS_PIN, 0);dma_channel_configure(dma_tx,&c,&spi_get_hw(SPI_PORT)->dr,color_p, // read address((area->x2 + 1 - area->x1) * (area->y2 + 1 - area->y1))*2,true);// Start DMA transfer} -
LVGL Refresh Completion Notification Implementation
Code location:
LVGL_example.cppFunction: After each image refresh is complete, the LVGL core needs to be notified so that LVGL can prepare to render the next refresh image.
Implementation: This example notifies LVGL image refresh completion in the DMA transfer complete interrupt service function.
static void dma_handler(void){if (dma_channel_get_irq0_status(dma_tx)){dma_channel_acknowledge_irq0(dma_tx);DEV_Digital_Write(LCD_CS_PIN, 1);lv_disp_flush_ready(&disp_drv); // Indicate you are ready with the flushing}}
LVGL Input
In LVGL, users can register input devices such as touchpads, mice, keyboards, or encoders, etc. Users can control the user interface through these input devices to achieve better interaction.
-
Frequency of calling the input device callback in LVGL
Code location:
C:\Users\<username>\Documents\Arduino\libraries\lv_conf.hSetting: LVGL calls the input device callback function every 30ms by default to update events triggered by the input device. This can be set in
lv_conf.h.#define LV_INDEV_DEF_READ_PERIOD 30 // Unit: ms, here is 30ms -
LVGL input device registration
Code location:
LVGL_example.cppSetting: Register the touch screen device
indev_tsand initialize it./*4.Init touch screen as input device*/lv_indev_drv_init(&indev_ts); // Device initializationindev_ts.type = LV_INDEV_TYPE_POINTER; // Register as touch screen deviceindev_ts.read_cb = ts_read_cb; // Set callback functionlv_indev_t * ts_indev = lv_indev_drv_register(&indev_ts); // Register device//Enable IRQDEV_KEY_Config(Touch_INT_PIN);DEV_IRQ_SET(Touch_INT_PIN, GPIO_IRQ_EDGE_RISE, &touch_callback);DEV_KEY_Config(SYS_OUT);DEV_IRQ_SET(SYS_OUT, GPIO_IRQ_EDGE_FALL, &touch_callback); -
LVGL input device callback function
Code location:
LVGL_example.cppFunction: mainly used to update input events.
static void ts_read_cb(lv_indev_drv_t * drv, lv_indev_data_t*data);Parameters:lv_indev_drv_t *indev_drv: Pointer to the input device driver structure in LVGL. In this case, the structure is a touch screen input device driverlv_indev_data_t *data : Pointer to the input device data structure in LVGL. In this case, the structure is used to store the status and data of the input device, including the current touch state (pressed or released) and the coordinates of the touch points -
Touch screen input device callback implementation
Code location:
LVGL_example.cppImplementation: mainly updates the touch state and touch point coordinates via touch interrupt.
static void touch_callback(uint gpio, uint32_t events){if (gpio == TOUCH_INT_PIN){CST9217_Read_Data(); // Get coordinate datats_x = CST9217.data[0].x;ts_y = CST9217.data[0].y;ts_act = LV_INDEV_STATE_PRESSED;}else if(gpio == SYS_OUT){watchdog_reboot(0,0,0);}}static void ts_read_cb(lv_indev_drv_t * drv, lv_indev_data_t*data){data->point.x = ts_x;data->point.y = ts_y;data->state = ts_act;ts_act = LV_INDEV_STATE_RELEASED;}
LVGL Widget Layout
In LVGL, we can create various user interfaces. The basic components of the interface are objects, also called widgets, such as buttons, labels, images, lists, charts, or text areas. In a interface, we can create multiple widgets simultaneously and set their positions, sizes, parent objects, styles, and event handlers and other basic properties.
-
LVGL Widget Initialization
Code location:
LVGL_example.cppFunction: Mainly used for styling and laying out widgets.
void Widgets_Init(void); -
Create LVGL tile
Code location:
LVGL_example.cppFunction: A Tile view is a container object whose elements (called tiles) can be arranged in a grid. Users can navigate between tiles by swiping. Call
lv_tileview_add_tile(tileview, row_id, col_id, dir)to create a new tile at rowrow_idand columncol_id. Thedircan beLV_DIR_LEFT/RIGHT/TOP/BOTTOM/HOR/VER/ALLor a numeric value, allowing navigation to adjacent tiles in the specified direction via swiping.//Create a tile at (0,0), supporting sliding down to (0, 1tile1 = lv_tileview_add_tile(tv, 0, 0, LV_DIR_BOTTOM); -
Create LVGL widget
Code location:
LVGL_example.cppFunction: create a widget. Different widgets require different function interfaces. You can choose a parent object when creating.
//Create a widget where tab1 is the parent object of the key, which can be replaced with a widget such as list, title, etc. that can have child objectssw = lv_switch_create(tab1); -
Alignment and positioning of LVGL widgets
Code location:
LVGL_example.cppFunction: allows a widget to be offset-positioned relative to a reference point. The reference point for alignment offset is the center of the widget.
Alignment standard: LVGL supports both internal and external alignment. By default, the upper-left corner is the origin, the leftward as the positive horizontal direction, and the downward as the positive vertical direction.
//Position the btn widget at the center point, offset 45 pixels to the leftlv_obj_align(sw, LV_ALIGN_CENTER, -45, 0);
-
Changing font size in LVGL widgets
Code location:
C:\Users\<username>\Documents\Arduino\libraries\lv_conf.h,LVGL_example.cppFunction: In practice, a screen may need multiple font sizes. You can enable multiple font sizes in
lv_conf.hand set the default font size. To set the font size, you need to style the widget so that it renders according to the set style. Using thelv_obj_add_stylefunction, different parts of the widget can be rendered in different states.#define LV_FONT_MONTSERRAT_16 1 // Enable 16pt font#define LV_FONT_MONTSERRAT_18 1 // Enable font 18#define LV_FONT_DEFAULT &lv_font_montserrat_18 // Set the default font size as 18static lv_style_t style_label;lv_style_init(&style_label); // Initialize stylelv_style_set_text_font(&style_label, &lv_font_montserrat_16); // Set font size to 16ptlv_obj_add_style(label,&style_label,0); // Set label theme style -
LVGL widget event handling
Code location:
LVGL_example.cppFunction: In LVGL, you can add event callback functions to widgets so that when events such as clicking, scrolling, or redrawing occur, the event triggers and the callback function is executed. In the program, call the
lv_obj_add_event_cb(obj, event_cb, filter, user_data)function to add the event handlerevent_cbfor the eventfilterto the widgetobj. When the widgetobjtriggers thefilterevent, the system automatically calls theevent_cbfunction. The last parameter is a pointer to any custom data available in the event.//Add an event handler sw_event_cb for the LV_EVENT_VALUE_CHANGED event to the sw widgetlv_obj_add_event_cb(sw, sw_event_cb,LV_EVENT_VALUE_CHANGED,NULL);
Operation Result