JSON Command Transmission Methods
When controlling the robotic arm, we use a specific control command — the JSON command — to tell the robotic arm what action to perform. Whether it is the underlying communication of the web control interface or programmatically controlling the robotic arm, the essence is sending JSON commands to the robotic arm.
This section introduces the three currently supported JSON command transmission methods, allowing you to choose the appropriate access method based on your actual needs.
JSON (JavaScript Object Notation) is a lightweight data format with high readability, making it easy to transmit and parse between different systems. The robotic arm receives JSON-format commands to perform various actions.
Basic format of a JSON command: key: value.
- Keys must be strings, enclosed in double quotes;
- Values can be multiple types: strings, numbers, objects, arrays, booleans, or null. Among these, strings must be enclosed in double quotes, while others do not need quotes;
- Multiple
key: valuepairs are separated by commas.
Below is an example of a JSON command to control the robotic arm to move to a certain coordinate position:
{"T":1041,"x":200,"y":0,"z":150,"t":3.14}
Here "T" is the command type number; each command has a fixed number, and the remaining fields are the parameters corresponding to the command.
By sending different JSON commands, you can achieve more functions beyond the buttons on the web interface. For the specific meaning and parameter description of each command, please refer to [JSON Command Function Details].
Every character in the JSON command is important. Missing commas, brackets, or quotes will cause the command to be parsed incorrectly by the robotic arm. It is recommended to directly copy the command template for the corresponding function and then modify the parameter values to avoid formatting errors from manual input.
The following three methods are currently supported for sending JSON commands to the robotic arm:
| Method | Connection Type | Applicable Scenarios | Limitations |
|---|---|---|---|
| Send via Web Interface | Wireless (Wi-Fi) | Quick command verification, basic debugging | Long feedback content may not be fully displayed |
| HTTP Request Communication | Wireless (Wi-Fi) | Programmatic control, integration with other systems | Relies on Wi-Fi; unstable signal can affect communication |
| Serial Communication | Wired (USB / GPIO) | Host computer integration, offline deployment | Requires physical wiring |
1. Send via Web Interface
This is the fastest transmission method, requiring no additional configuration. You can operate it directly from the already opened web control interface, suitable for quickly verifying the effect of a command or temporary debugging.
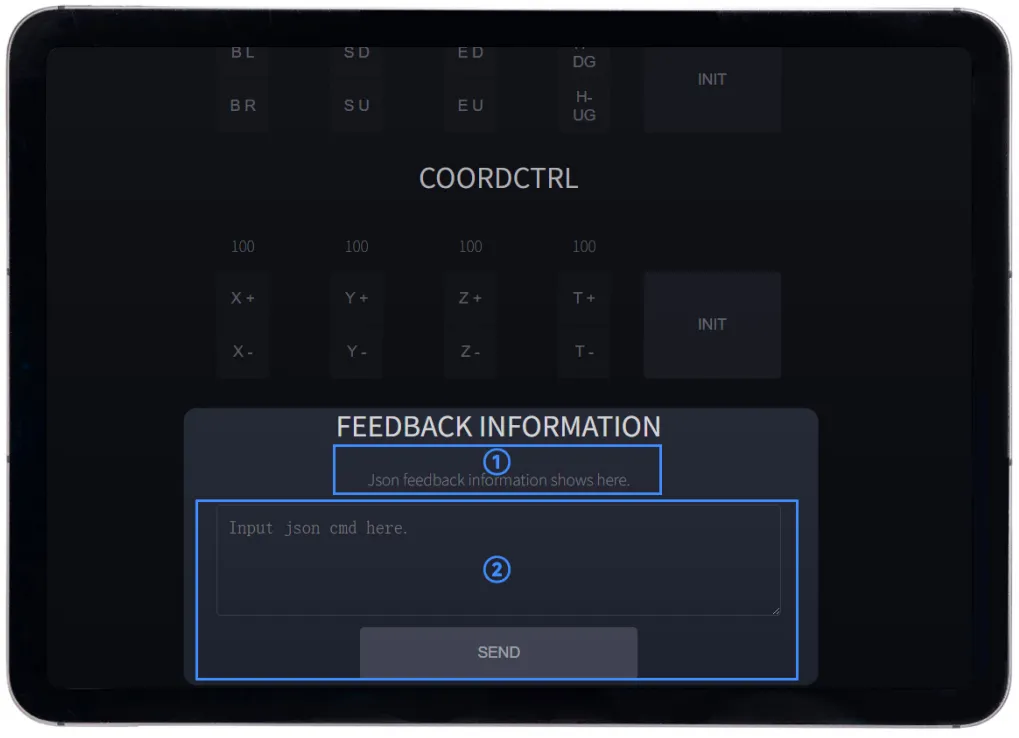 Feedback Area Annotation
- ① Status Information Display Area: Feedback from the sent JSON command will be displayed here;
- ② JSON Command Sending Area: Enter a JSON command and click
SENDto send it, achieving fine control of the robotic arm.
Some JSON commands return long feedback content, which may be not fully displayed in the status information display area. To view the complete feedback, it is recommended to use HTTP Request Communication or Serial Communication.
Steps:
- Ensure that you have connected to the robotic arm's Wi-Fi and opened the web control interface; see Preparation → Power-on and Connection for details;
- Enter a JSON command in the sending area of the FEEDBACK INFORMATION area at the bottom of the web control interface, and click
SENDto send; - After the robotic arm executes the command, it will display the return information from the robotic arm in the ① Status Information Display Area.
For a complete description of the FEEDBACK INFORMATION area, please refer to Web Control Interface Usage → FEEDBACK INFORMATION.
2. HTTP Request Communication
HTTP (Hypertext Transfer Protocol) is a protocol that enables wireless communication based on a Wi-Fi module. It wirelessly sends JSON commands to the robotic arm continuously and retrieves complete feedback, offering flexibility and simplicity. It is suitable for programmatic control from a PC or host computer, or integrating the robotic arm into other systems.
Communication features:
- Wireless communication based on Wi-Fi, no additional wiring required;
- Request-response model, capable of obtaining complete feedback content from the robotic arm;
- Supports any programming language or tool that can initiate HTTP requests.
2.1 Prerequisites
The host computer must be on the same Wi-Fi network as the robotic arm, and the current IP address of the robotic arm must be known:
- Robotic arm in AP mode (factory default): IP address is fixed at
192.168.4.1. Connect the host computer to the robotic arm hotspot (RoArm-M2-GA, password:12345678); - Robotic arm in STA mode (already connected to a router): The IP address is assigned by the router; check the actual IP address displayed on the second line of the robotic arm's OLED screen.
For information on switching Wi-Fi modes, please refer to [Wi-Fi Configuration].
2.2 Download Example
- Linux (Raspberry Pi / Jetson / RDK)
- Windows
Install Git (skip if already installed):
sudo apt update
sudo apt install git
Clone the repository:
git clone https://github.com/waveshareteam/roarm_m2
Two download methods are available. Method 1 (direct download) is recommended:
-
Method 1: Direct Download (Recommended)
Click to download RoArm-M2-GA Python Example. After downloading, right-click the ZIP file, select "Extract All", and extract it to your desired directory (e.g., Desktop).
-
Method 2: Clone using Git
If you have Git installed and want to get updates via
git pullin the future, execute the following in Command Prompt:git clone https://github.com/waveshareteam/roarm_m2
After downloading, the Python example directory structure is as follows:
RoArm-M2_Python/
├── http_simple_ctrl.py       ← HTTP communication example
├── serial_simple_ctrl.py     ← Serial communication example
└── requirements.txt          ← Dependency library list
2.3 Install Python
Before running the example, ensure that Python is installed on the host computer.
- Linux (Raspberry Pi / Jetson / RDK)
- Windows
Devices like Raspberry Pi, Jetson Orin Nano, and RDK X5 usually come with Python3 pre-installed. You can verify by running the following command in the terminal:
python3 --version
If not installed, execute the following to install:
sudo apt update
sudo apt install python3 python3-pip
After installation, run python3 --version again to confirm the version.
① Open Command Prompt
Click the "Start" button at the bottom left of Windows, type cmd in the search bar, and click "Command Prompt" to open it. All subsequent commands should be entered in this window.
② Check if Python is already installed
Enter the following command in Command Prompt:
python --version
- If a version number is displayed (e.g.,
Python 3.11.0), Python is already installed. You can skip this section; - If the message "not recognized as an internal or external command" appears, Python is not installed. Please continue with the following steps.
③ Download and Install Python
Go to the Python official website to download the Python 3.x installer.
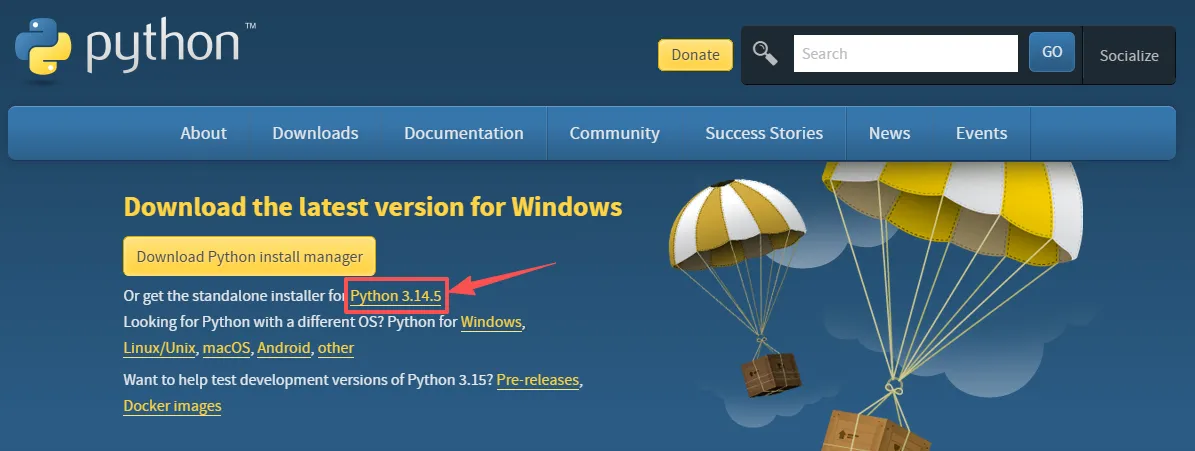 Python Download Instructions
During installation, be sure to check the Add Python to PATH option at the bottom, then click Install Now. If you do not check this option, the command prompt will not recognize the python command, and you will need to uninstall and reinstall.
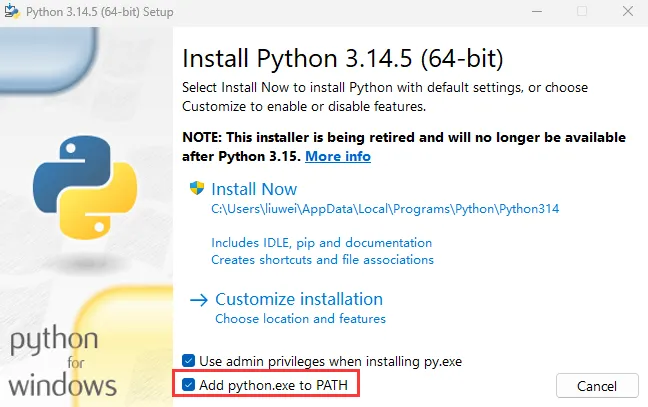 Python Installation Instructions
④ Verify Installation
After installation, close and reopen Command Prompt, then enter python --version again. A version number indicates successful installation.
2.4 Create a Virtual Environment and Install Dependencies
A virtual environment is an isolated Python runtime space. Dependency libraries installed within it do not affect other Python projects on the system. It is recommended to create a separate virtual environment for each project to avoid library version conflicts between projects.
- Linux (Raspberry Pi / Jetson / RDK)
- Windows
① Navigate to the example directory
cd roarm_m2/RoArm-M2_python
② Create a virtual environment
python3 -m venv virtual_environment_name[generally project-name-env]

# Example: python3 -m venv roarm-env
After execution, a folder named roarm-env will be created in the current directory. This is the virtual environment.
③ Activate the virtual environment, replacing project-name-env with your actual virtual environment name:
source project-name-env/bin/activate
After successful activation, the command prompt will show (project-name-env) at the beginning, e.g., (roarm-env) user@hostname:~/roarm_m2/RoArm-M2_python$.
④ Install dependencies within the virtual environment:
pip3 install -r requirements.txt
requirements.txt is a manifest file that lists the dependencies required by the example. Python can read this file and install all required libraries at once, eliminating the need to install them manually one by one.
Wait for the installation to complete. A message Successfully installed... indicates success.
① In Command Prompt, navigate to the example directory
Replace extraction_directory in the path below with your actual extraction directory. For example, if extracted to the Desktop, the path would be: C:\Users\YourUsername\Desktop\RoArm-M2_Python\RoArm-M2_Python:
cd extraction_directory\RoArm-M2_Python\RoArm-M2_Python
② Enter the command to create a virtual environment:
python -m venv virtual_environment_name[generally project-name-env]

# Example: python -m venv roarm-env
After execution, a folder named roarm-env will be created in the current directory. This is the virtual environment, as shown in the figure below.
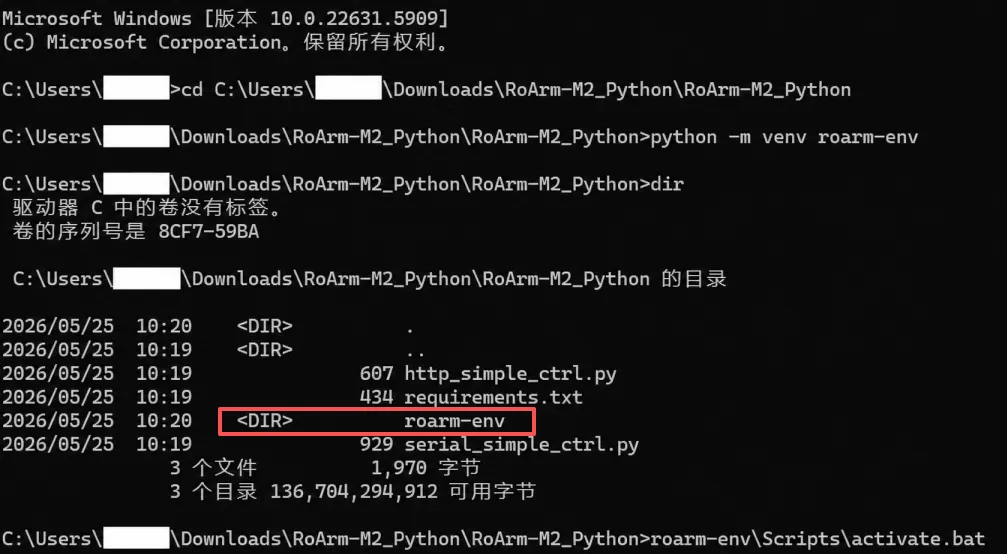
③ Activate the virtual environment, replacing project-name-env with your actual virtual environment name:
project-name-env\Scripts\activate.bat
After successful activation, the command prompt will show (project-name-env) at the beginning, e.g., (roarm-env) C:\extraction_directory\RoArm-M2\examples\python, as shown below.

④ Install dependencies within the virtual environment:
pip install -r requirements.txt
requirements.txt is a manifest file that lists the dependencies required by the example. Python can read this file and install all required libraries at once, eliminating the need to install them manually one by one.
After entering the command, wait for the installation to complete. A message Successfully installed... indicates success.
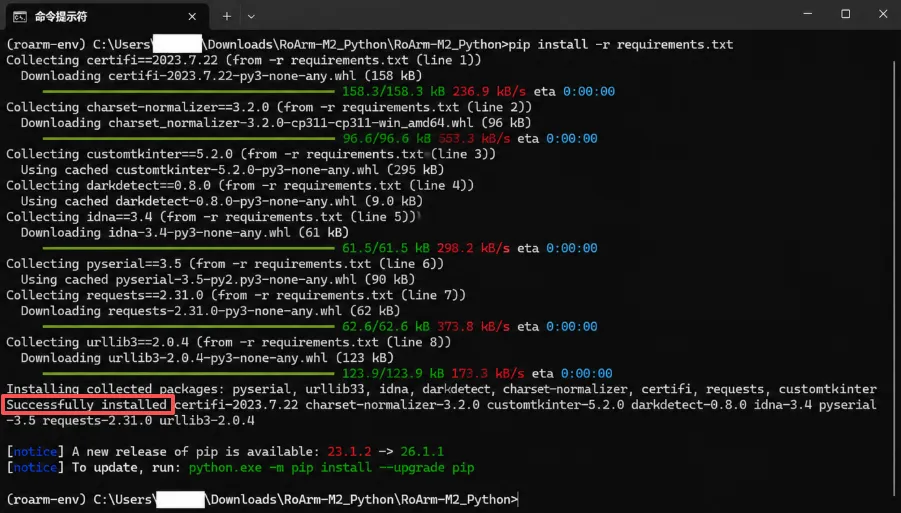
The virtual environment only needs to be created and dependencies installed once. Each time before running the example, you must activate the virtual environment first. If the command prompt/terminal shows project-name-env at the beginning, the virtual environment is already activated and does not need to be reactivated.
2.5 Run the Example
After confirming that the virtual environment is activated (the command prompt/terminal shows project-name-env at the beginning), run the following command to start the HTTP request communication example, replacing the IP address with the actual IP address of the robotic arm:
#Linux (Raspberry Pi/Linux/RDK)
python3 http_simple_ctrl.py 192.168.4.1

#Windows
python http_simple_ctrl.py 192.168.4.1
After successful execution, the terminal will display the following prompt, indicating that a communication connection has been established with the robotic arm:
input your json cmd:

At this point, you can enter a JSON command at the cursor and press Enter to send it. The robotic arm will execute the command and return feedback, which will be displayed in the terminal. Send one command at a time; you can continue inputting. Press Ctrl + C to exit the program.
Example: Send a command to view robotic arm information:
input your json cmd:{"T":105}
After entering this command, the terminal will return information such as the end-effector position coordinates, joint angles, and load of the robotic arm, as shown below.

After use, exit the virtual environment by entering the following command in the command prompt/terminal (common to both Windows and Linux):
deactivate
For available JSON commands and their parameter descriptions, please refer to [JSON Command Function Details].
3. Serial Communication
Serial communication is a wired communication method that directly connects the robotic arm to the host computer via a physical cable. It offers good stability and low latency, suitable for scenarios requiring a reliable connection or where Wi-Fi is inconvenient. It is also suitable for long-term integration of the robotic arm into a host computer control system.
The host computer refers to the computing device used to send commands to control the robotic arm, for example: personal computer (PC), Raspberry Pi, Jetson Orin Nano, RDK X5, etc. The robotic arm receives commands from the host computer, performs corresponding actions, and sends the execution results back to the host computer.
Communication parameters:
| Parameter | Value |
|---|---|
| Baud Rate | 115200 |
| Data Bits | 8 |
| Stop Bits | 1 |
| Parity | None |
Quick connection guide by device:
| Device | Recommended Connection Interface | Recommended Transmission Method |
|---|---|---|
| PC (Windows / Linux) | USB Type-C Interface | Serial assistant software or Python example |
| Raspberry Pi | GPIO Pins (RX / TX) | Python example |
| Jetson Series | GPIO Pins (RX / TX) | Python example |
| RDK Series | GPIO Pins (RX / TX) | Python example |
3.1 Hardware Connection
Serial communication supports the following two hardware connection methods. The two connection methods cannot be used simultaneously.
Method 1: USB Connection (Recommended for Beginners)
USB connection is the simplest wired connection method and is recommended for users trying serial communication for the first time.
Use the USB cable (Type A male to Type C male) provided with the product to connect the ESP32 Serial Communication (Type-C) interface on the robotic arm base to the USB interface of the host computer.
(Image to be added: Diagram showing PC / Raspberry Pi / Jetson / RDK connected to the robotic arm)
After a successful connection, the host computer system will recognize the robotic arm as a serial device. Subsequent communication with the robotic arm will need to use this serial port.
After connecting the robotic arm to the host computer via USB, the host computer system automatically assigns a serial device number to identify this connection:
- Windows: Displayed as
COMxin Device Manager (x is a number, e.g.,COM3); - Linux: Displayed as
/dev/ttyUSB0or/dev/ttyACM0.
Later, when using a serial assistant software or Python example, you will need to enter this number to specify the communication port.
- Linux (Raspberry Pi / Jetson / RDK)
- Windows
Execute the following command in the terminal. Run it once before connecting the robotic arm to the host computer and once after. The newly appeared device is the robotic arm's serial number:
ls /dev/ttyUSB*
# or
ls /dev/ttyACM*
Click the "Start" button at the bottom left of Windows, type "Device Manager" in the search bar. In Device Manager, expand "Ports (COM & LPT)". Find a newly appeared port with a name similar to CP2102x USB to UART Bridge(COMx). Here, COMx is the robotic arm's serial number.
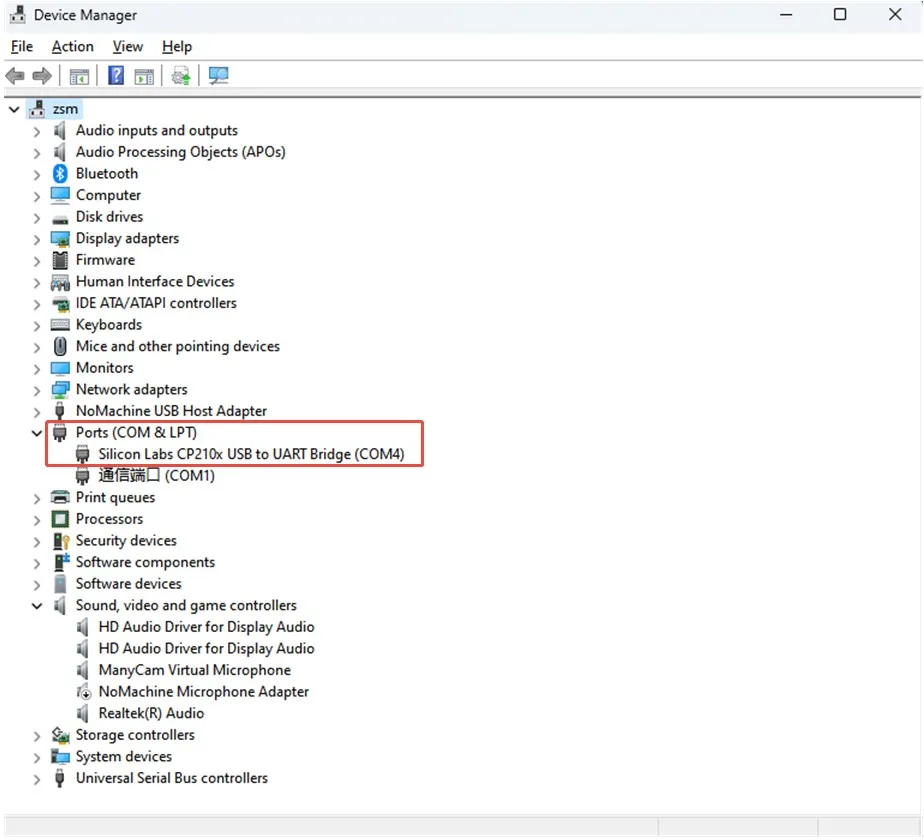 View Serial Number Diagram
If a device with a similar name does not appear in Device Manager, it is because the robotic arm's serial communication chip is CP2102. Windows systems usually do not automatically install the driver for this chip, requiring manual installation to properly recognize the serial device.
Driver Installation Steps:
- After connecting the robotic arm to the host computer via USB, open Device Manager. If you see a device with "CP2102" in its name and a yellow exclamation mark under "Other devices", the driver needs to be installed.
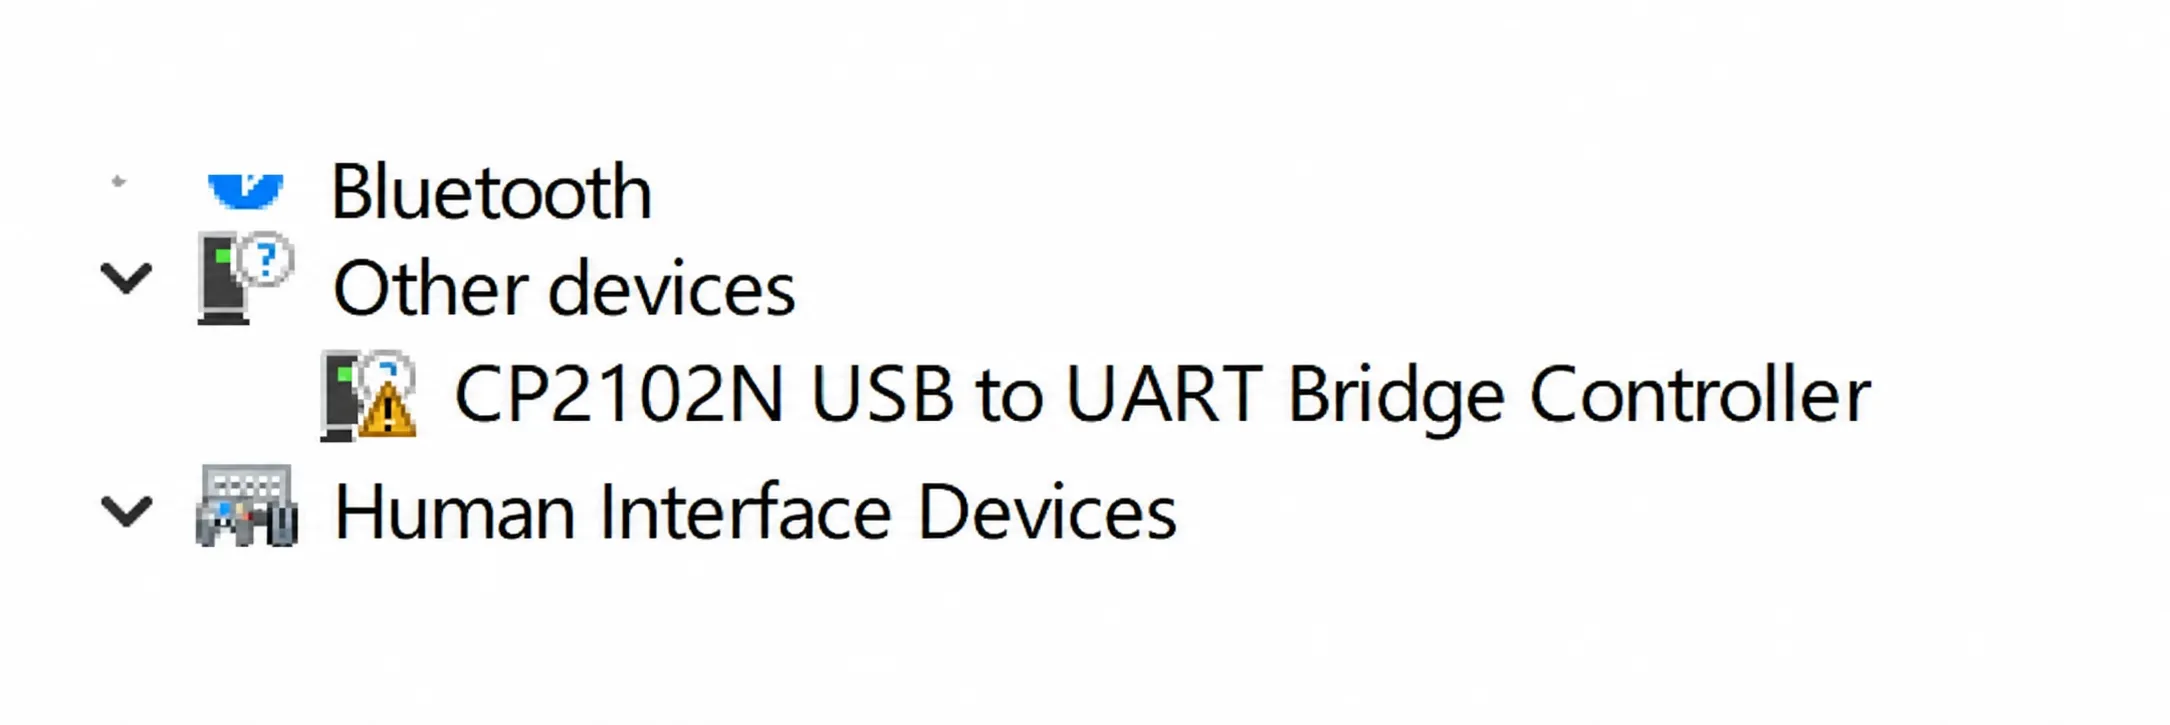 Serial Port Unrecognized Diagram
-
Click to download the CP210x Serial Port Driver package. After downloading and extracting it, double-click to run the installer and follow the wizard to complete the installation.
-
After installation, re-plug the USB cable connecting the robotic arm to the host computer. Open Device Manager and confirm that a device named
CP2102x USB to UART Bridge(COMx)appears under "Ports (COM & LPT)". This indicates the driver has been successfully installed.
Tutorial is being continuously updated...