Working with Raspberry Pi
This section covers how to use the UPS HAT (E) on a Raspberry Pi.
Enable I2C Interface
-
Open a terminal on the Raspberry Pi and enter the following command to open the configuration interface:
sudo raspi-config -
Select
Interfacing Options->I2C->Yesto enable the I2C kernel driver.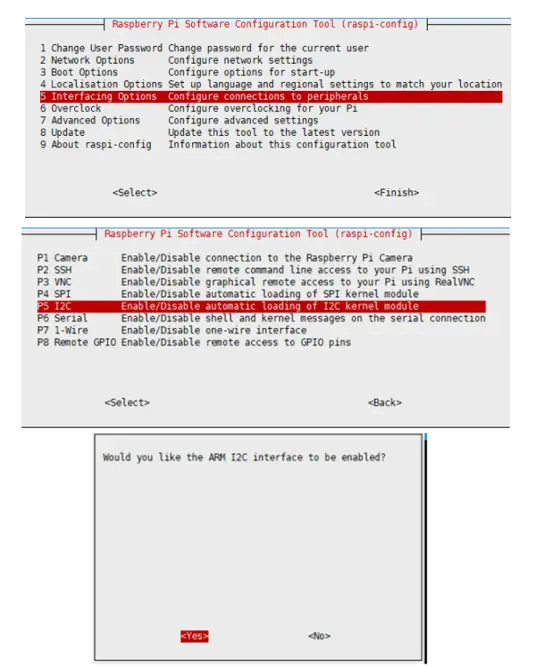
-
Then reboot the Raspberry Pi:
sudo reboot
Battery Level Detection
When demonstrating this example on the Raspberry Pi, mount the module to the bottom of the Raspberry Pi and use it with pogo pins.
Run the following commands to execute the program:
cd ~
sudo apt-get install python3-smbus
wget https://files.waveshare.com/wiki/UPS-HAT-E/UPS_HAT_E.zip
unzip UPS_HAT_E.zip
cd UPS_HAT_E
python3 ups.py
After the program runs, it will output values such as Type-C mode, voltage, current, power, battery voltage, battery current, battery power, and remaining battery percentage.
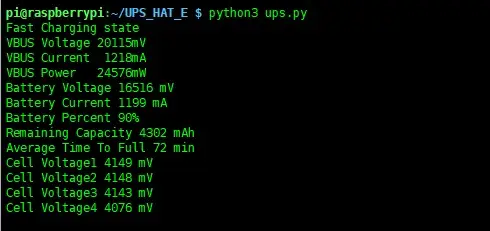
- A negative VBUS current indicates Type-C output current; a positive value indicates input charging current.
- A negative battery current indicates battery discharge current (considered as the load current of the Raspberry Pi); a positive battery current indicates battery charging current.
- When the system load is high and the battery voltage is low, insufficient battery current may cause the system to repeatedly reboot, this is undesirable. In practice, you can avoid this by checking the battery voltage and automatically shutting down when it is too low.
- The example program already includes a battery voltage check. If the battery voltage is too low and no external power is connected, the program will issue a shutdown command within 60 seconds to power off the system.
The program will display the following message when the battery voltage is too low, indicating that charging is needed; otherwise, the system will shut down automatically.
Voltage Low,please charge in time,otherwise it will shut down in 58 s
Battery Icon Display
The example provides a desktop UI program to display the battery icon. It is recommended to use this on Raspberry Pi OS with a desktop environment.
Open a terminal and run:
cd ~/UPS_HAT_E
DISPLAY=':0.0' python3 batteryTray.py
After running the program, a battery icon should appear in the upper-right corner of the desktop. If it does not show up, check the error messages, verify the I2C interface, and ensure the required libraries are installed.

To have the UI display and battery level detection run automatically at boot, execute the following commands:
cd ~/UPS_HAT_E
sudo chmod +x main.sh  # Grant execute permission to the script
./main.sh   # Do NOT use sudo
sudo reboot
After rebooting, the battery icon in the upper-right corner indicates the setup is complete. Hover the mouse over the icon to view battery level and voltage. When the battery level drops below 5%, a low-battery warning will appear, and the system will shut down after 60 seconds; the warning will disappear once an external power source is connected.

If the battery icon does not appear, run batteryTray.py separately and check the error output.
Raspberry Pi 5 Current Limit Removal
When the Raspberry Pi 5 boots, it checks the Type-C port for PD (Power Delivery) protocol. If the official power supply is not detected, the system may show a warning and limit the USB Type-A output current to 3 A.

Method 1: Remove USB Type-A Current Limit
This method only removes the USB Type-A current limit, but does not suppress the boot-time warning. Run the following command to edit config.txt:
sudo nano /boot/firmware/config.txt
Add the following setting to remove the 3 A limit on USB Type-A and allow up to 5 A:
usb_max_current_enable=1
Method 2: Remove Current Limit and Suppress Boot Warning
Run the following command to edit the EEPROM configuration:
sudo rpi-eeprom-config --edit
Add the following setting to remove the 3 A USB Type-A current limit and suppress the boot warning. Save the changes and reboot the system:
PSU_MAX_CURRENT=5000

Power-on Auto-Start Principle
When the voltage is too low, you can use the program to let the Raspberry Pi save data before shutting down, preventing data loss from sudden power-off. The auto-start-on-power function is controlled by BIT0 of register 0x40, with a default value of 1. If you need the system to wait for power to return after a low-voltage shutdown, write 0x55 to register 0x01 to trigger a one-time shutdown sequence. Note that this command is not intended to enable auto-start-on-power.
Before running the following commands, install i2c-tools:
sudo apt-get install i2c-tools
Open a terminal and run the following command to detect the I2C address:
sudo i2cdetect -y 1

0x2D is the I2C address of the MCU. Run the following commands to read the register values; the values of registers 0x00 and 0x01 are 0x0a and 0x0b respectively. For register definitions, refer to the Register Manual.
sudo i2cget -y 1 0x2d 0x00
sudo i2cget -y 1 0x2d 0x01
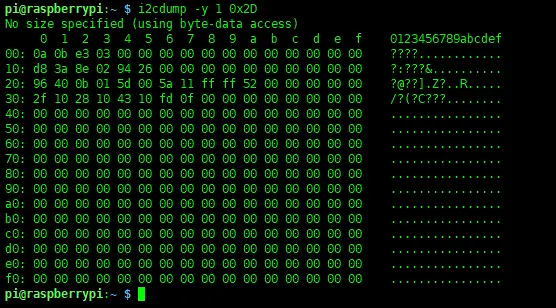
Writing 0x55 to register 0x01 triggers a one-time shutdown sequence: the MCU will cut power to the Raspberry Pi after about 30 seconds, and then start detecting charging after about 60 seconds. When power is detected, the module will re-apply power to the Raspberry Pi and boot it. This write does not change the BIT0 configuration of 0x40.
Before executing the next command, save all data on the Raspberry Pi. After writing 0x55, the module will cut power in about 30 seconds. It is recommended to perform a safe shutdown immediately after writing to avoid data loss from sudden power-off. Do not use this command to enable auto-start-on-power.
Run the following command to trigger the one-time shutdown sequence:
sudo i2cset -y 1 0x2d 0x01 0x55
- BIT0 of
0x40is1by default, indicating that auto-start-on-power is enabled;0x01=0x55is only used to trigger shutdown and wait for power to return.