Web Server
The core logic of this tutorial applies to all ESP32 boards, but all the operation steps are explained using the example of the Waveshare ESP32-S3-Zero mini development board. If you are using a development board of another model, please modify the corresponding settings according to the actual situation.
The ESP32 has built-in Wi-Fi capabilities that can serve other devices in the network as a web server. By running a web server on ESP32, a browser-based user interface can be created for monitoring sensor data or controlling device status, which is one of the fundamental features for implementing IoT applications.
1. WebServer Library Introduction
The Arduino-ESP32 core library has built-in 'WebServer.h’, which provides a simple set of APIs to quickly build Web Servers. By registering routes (URL paths) and callback functions, request distribution and response can be achieved. It is suitable for local web interaction in the majority of typical IoT projects. This library will be used for this tutorial.
- Simple and easy to use, suitable for beginners and resource-constrained scenarios.
server.handleClient()should be called regularly within the main loop (loop()) to handle client requests.- For complex scenarios such as high traffic or high concurrency, it is recommended to use an asynchronous library (e.g., ESPAsyncWebServer).
2. Example 1: Basic Web Services (STA Mode)
Create a basic web server in STA mode to display a static page containing "Hello World!".
2.1 Code
#include <WiFi.h>
#include <WebServer.h>

const char *ssid = "Maker";         // Replace with your Wi-Fi name
const char *password = "12345678";  // Replace with your Wi-Fi password

WebServer server(80);

void setup() {
  Serial.begin(115200);
  delay(10);

  // Connect to a WiFi network
  Serial.print("Connecting to ");
  Serial.println(ssid);

  WiFi.begin(ssid, password);

  // Wait for the connection to succeed
  while (WiFi.status() != WL_CONNECTED) {
    delay(500);
    Serial.print(".");
  }

  Serial.println();
  Serial.println("WiFi connected.");
  Serial.println("IP address: ");
  Serial.println(WiFi.localIP());

  // Configure routing and start the server
  server.on("/", handleRoot);
  server.begin();
}

void loop() {
  server.handleClient();
}

// Handle root path requests
void handleRoot() {
  server.send(200, "text/html", generateHTML());
}

// Generate HTML page content
String generateHTML() {
  String htmlContent = "<!DOCTYPE html> <html>\n";
  htmlContent += "<head><meta charset=\"utf-8\" name=\"viewport\" content=\"width=device-width\">\n";
  htmlContent += "<title>ESP32S3 Test</title>\n";
  htmlContent += "</head><body>\n";
  htmlContent += "<h1>Hello World!</h1>\n";
  htmlContent += "<p>Hello from ESP32</p>\n";
  htmlContent += "</body>\n";
  htmlContent += "</html>\n";
  return htmlContent;
}
2. Code Analysis
#include <WebServer.h>: Include the Web Server library to create an HTTP server on ESP32.WebServer server(80);: Creates a server object that listens on the standard HTTP port80. 80 is the default port for the HTTP protocol.server.on("/", handleRoot);: Registers the route handler function. When a client accesses the root path "/", thehandleRoot()function is called.server.begin();: Starts the server and begins listening for client connection requests.server.handleClient();: Continuously called inloop()to handle incoming client requests.handleRoot(): This is a custom callback function that handles requests for specific paths.server.send(statusCode, contentType, content);: Sends an HTTP response to the client. It returns a simple HTML page containing "Hello World" to the client browser.200: HTTP status code, '200 OK' indicates that the request was successful."text/html": MIME type that informs the browser the response content is HTML text.generateHTML(): The function returns a string, which is the actual content of the web page.
generateHTML(): A helper function that concatenates HTML code into aStringobject, returning a string containing the full HTML structure.
3. Running Results
Upload the code after changing the ssid and password to the name and password of the target Wi-Fi network. The serial monitor will display the connection process and obtained IP address. Open a browser on a device on the same LAN and enter the displayed IP address, and you will see the "Hello World!" page.
3. Example 2: Control LED via Web Page (STA Mode)
In STA mode, turn on the web server. For devices under the same LAN, control the LED status connected to ESP32 via a web page.
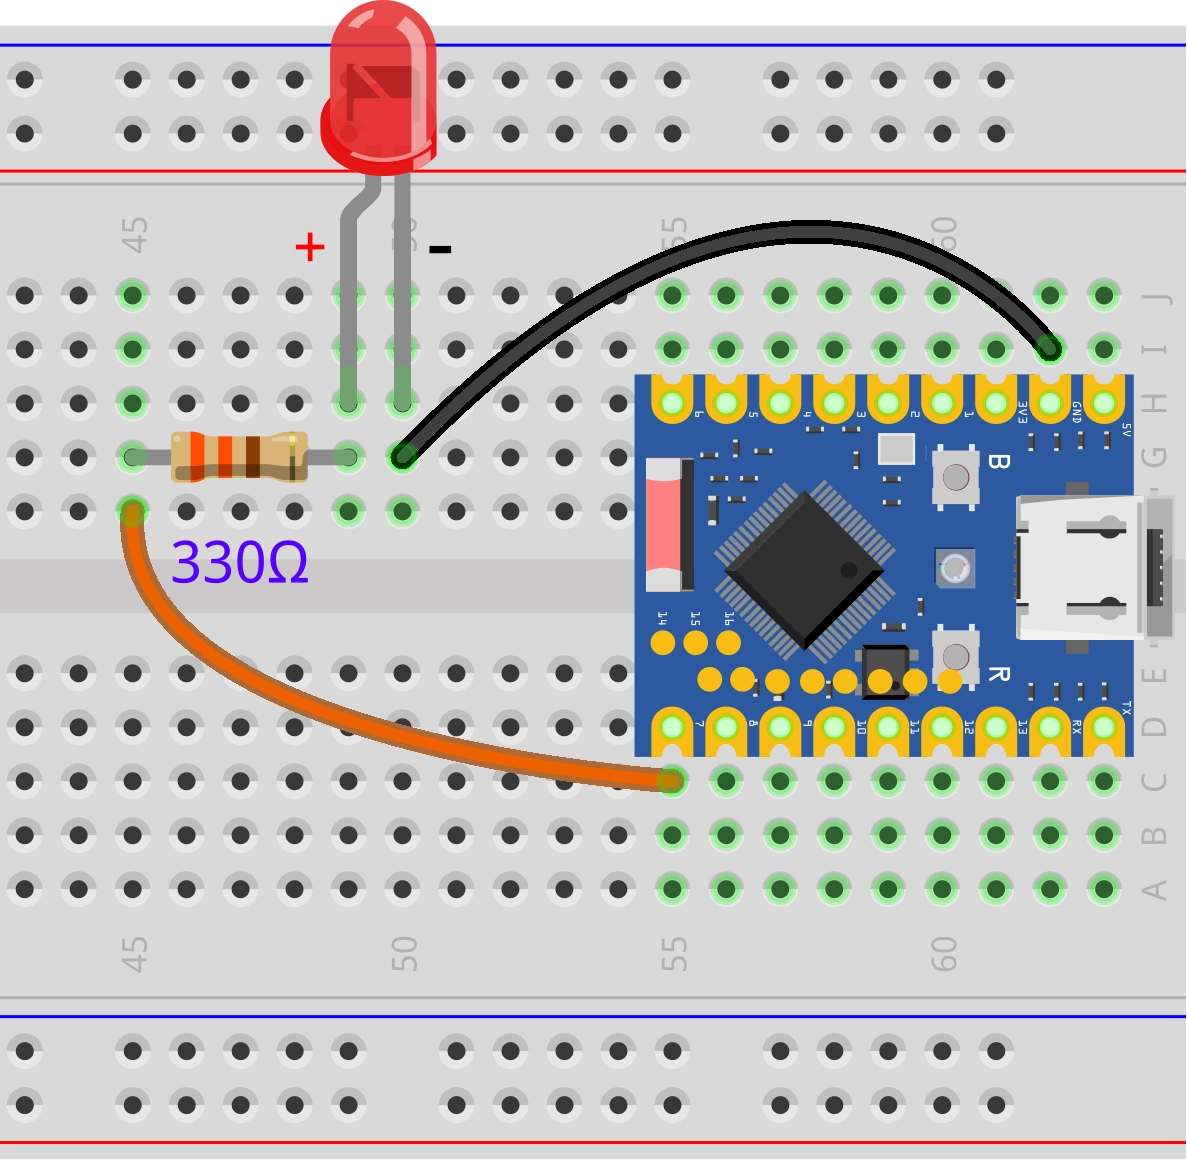
3.1 Circuit Assembly
Components required:
- LED * 1
- 330Ω resistor * 1
- Breadboard * 1
- Wire
- ESP32 development board
Connect the circuit according to the wiring diagram below:
ESP32-S3-Zero Pinout Diagram

3.2 Code
#include <WiFi.h>
#include <WebServer.h>

const int ledPin = 7;

const char *ssid = "Maker";         // Replace with your Wi-Fi name
const char *password = "12345678";  // Replace with your Wi-Fi password

WebServer server(80);

void setup() {
  pinMode(ledPin, OUTPUT);
  Serial.begin(115200);

  // Connect to a WiFi network
  Serial.print("Connecting to ");
  Serial.println(ssid);

  WiFi.begin(ssid, password);

  // Wait for the connection to succeed
  while (WiFi.status() != WL_CONNECTED) {
    delay(500);
    Serial.print(".");
  }

  Serial.println();
  Serial.println("WiFi connected.");
  Serial.println("IP address: ");
  Serial.println(WiFi.localIP());

  // Configure routing and start the server
  server.on("/", handleRoot);
  server.on("/ledon", handleLedOn);
  server.on("/ledoff", handleLedOff);
  server.begin();
}

void loop() {
  server.handleClient();
}

// Handle root path requests
void handleRoot() {
  server.send(200, "text/html", generateHTML(digitalRead(ledPin)));
}

// Turn on the LED
void handleLedOn() {
  digitalWrite(ledPin, HIGH);
  server.send(200, "text/html", generateHTML(true));
}

//Turn off the LED
void handleLedOff() {
  digitalWrite(ledPin, LOW);
  server.send(200, "text/html", generateHTML(false));
}

// Generate HTML page content
String generateHTML(bool ledState) {
  String htmlContent = "<!DOCTYPE html> <html>\n";
  htmlContent += "<head><meta charset=\"utf-8\" name=\"viewport\" content=\"width=device-width\">\n";
  htmlContent += "<title>ESP32S3 Test</title>\n";
  htmlContent += "</head><body>\n";

  htmlContent += "<h1>Hello World!</h1>\n";

  if (ledState) {
    htmlContent += "<p>LED Status: ON</p>";
    htmlContent += "<a href=\"/ledoff\">Turn off the LED</a>\n";
  }else{
    htmlContent += "<p>LED Status: OFF</p>";
    htmlContent += "<a href=\"/ledon\">Turn on the LED</a>\n";
  }

  htmlContent += "</body>\n";
  htmlContent += "</html>\n";
  return htmlContent;
}
3.3 Code Analysis
-
Add route:
-
server.on("/ledon", handleLedOn);:Bind a request for the
/ledonpath to thehandleLedOnfunction. When the browser accesseshttp://<IP address>/ledon, the server will call thehandleLedOnfunction. -
server.on("/ledoff", handleLedOff);:Similarly, bind the
/ledoffpath to thehandleLedOfffunction. When the browser accesseshttp://<IP address>/ledoff, the server will call thehandleLedOfffunction.
-
-
LED control:
-
Create a link button using the HTML
<a>tag, and when clicked, send a GET request to the corresponding path to control the LED.When the user clicks on the "Turn on the LED" link, the browser initiates an HTTP GET request to the server's
/ledonpath.After the server receives the request,
server.handleClient()will matchserver.on("/ledon", handleLedOn);and execute thehandleLedOnfunction. -
In the
handleLedOnandhandleLedOfffunctions, the LED state is controlled first viadigitalWrite(). After performing the hardware operation, they will callgenerateHTML()again to generate a new page and send it to the client to update the page state.
-
-
Dynamic HTML:
-
The
generateHTML(bool ledState)function now accepts a boolean parameter that represents the current state of the LED. -
Inside the function,
if-elsestatements are used to dynamically generate different HTML content based on the value ofledState.- If the light is on, display the "Turn off the LED" button to turn off the LED;
- If the light is off, the "Turn on the LED" button is displayed to turn on the LED.
-
3.4 Running Results
After uploading the code, open the serial monitor to view the IP address. Then access that IP address in a browser, and the page will display the current LED status and control buttons. Click the "Turn on the LED" or "Turn off the LED" button to control the on/off status of the LED, and the page will update in real time to show the current status.
The above webpage is not aesthetically designed and is only used for functional demonstration; you can expand it with HTML/CSS to create a more user-friendly interface.
4. Example 3: Control LED via Web Page (AP Mode)
In AP mode, start the web server. When other devices connect to the Wi-Fi hotspot created by the ESP32, they can access the server provided by the ESP32 directly through the web page to control the LED status.
4.1 Circuit Assembly
Components required:
- LED * 1
- 330Ω resistor * 1
- Breadboard * 1
- Wire
- ESP32 development board
Connect the circuit according to the wiring diagram below:
ESP32-S3-Zero Pinout Diagram
4.2 Code
#include <WiFi.h>
#include <WebServer.h>

const int ledPin = 7;

const char *ssid = "ESP32S3-TEST";  // Set the hotspot name
const char *password = "12345678";  // Set hotspot password (at least 8 digits)

WebServer server(80);

String generateHTML(bool ledState = false);

void setup() {
  pinMode(ledPin, OUTPUT);
  Serial.begin(115200);

  // Create a Wi-Fi hotspot
  Serial.println("Configuring access point...");
  if (!WiFi.softAP(ssid, password)) {
    Serial.println("Soft AP creation failed.");
    while (1)
      ;
  }
  IPAddress myIP = WiFi.softAPIP();
  Serial.print("AP IP address: ");
  Serial.println(myIP);

  // Configure routing and start the server
  server.on("/", handleRoot);
  server.on("/ledon", handleLedOn);
  server.on("/ledoff", handleLedOff);
  server.begin();
}

void loop() {
  server.handleClient();
}

// Handle root path requests
void handleRoot() {
  server.send(200, "text/html", generateHTML(digitalRead(ledPin)));
}

// Turn on the LED
void handleLedOn() {
  digitalWrite(ledPin, HIGH);
  server.send(200, "text/html", generateHTML(true));
}

//Turn off the LED
void handleLedOff() {
  digitalWrite(ledPin, LOW);
  server.send(200, "text/html", generateHTML(false));
}

// Generate HTML page content
String generateHTML(bool ledState) {
  String htmlContent = "<!DOCTYPE html> <html>\n";
  htmlContent += "<head><meta charset=\"utf-8\" name=\"viewport\" content=\"width=device-width\">\n";
  htmlContent += "<title>ESP32S3 Test</title>\n";
  htmlContent += "</head><body>\n";

  htmlContent += "<h1>Hello World!</h1>\n";

  if (ledState) {
    htmlContent += "<p>LED Status: ON</p>";
    htmlContent += "<a href=\"/ledoff\">Turn off the LED</a>\n";
  }else{
    htmlContent += "<p>LED Status: OFF</p>";
    htmlContent += "<a href=\"/ledon\">Turn on the LED</a>\n";
  }

  htmlContent += "</body>\n";
  htmlContent += "</html>\n";
  return htmlContent;
}
4.3 Code Analysis
- AP mode configuration: Use
WiFi.softAP(ssid, password)to create a Wi-Fi hotspot instead of connecting to an existing network. WiFi.softAPIP(): Gets the IP address of the ESP32 when acting as a hotspot, typically defaulting to 192.168.4.1.- Independent Network: ESP32 creates its own local network, and other devices need to connect to this hotspot first in order to access the web server.
- Web Server Logic: The logic for handling HTTP requests is basically the same as the example in STA mode, with the main difference being how the network connection is initialized.
4.4 Running Results
Once the code is uploaded, the ESP32 creates a Wi-Fi hotspot called "ESP32S3-TEST". Connect your computer or phone to this hotspot (password: 12345678), then access 192.168.4.1 in your browser to view the LED control page. Click the button to control the on/off status of the LED.